19 Signal Processing Essentials
Map Sensor Signals to Reliable Digital Evidence
19.1 In 60 Seconds
Signal processing is the evidence path between a physical event and a digital decision. Preserve the phenomenon first, then choose sample rate, ADC resolution, filtering, and validation from the event shape, range, noise, and timing constraints. More samples, more bits, or more filtering only help when they protect evidence the application actually needs.
19.2 Start With the Story
Start with a physical signal that is noisy, delayed, sampled, quantized, calibrated, filtered, packed, and finally sent as a number someone will trust. The core idea in Signal Processing Essentials is simple: signal processing is the bridge between the physical world and digital evidence, so every sampling, ADC, filter, and calibration choice changes the value that leaves the device. This page focuses that idea on Overview for IoT signal processing decisions: sensor signal boundaries, sampling rate, ADC resolution, filtering, validation evidence. In everyday IoT, temperature drift, vibration spikes, audio snippets, and lab traces all become decisions only after their limits and uncertainty are made visible. Start simple: trace one measurement through the chain, keep the raw-to-processed evidence, and move advanced math into the deeper review only when the simple chain no longer explains the result.

Phoebe’s Why
This chapter treats sample rate and resolution as coupled decisions, and the resolution side has an inverse question that is easy to skip: instead of asking “what SNR do these N bits give me,” ask “how many bits does my smallest meaningful change actually require.” The load-cell example below is the clean case, because it states both numbers a review needs – the smallest change that matters (10 g) and the full-scale range that has to hold it (5 kg). Quantization noise is a second, independent question – it lives inside a single code step even after you have enough steps – and this chapter’s own warning that “bench noise already jittering by several codes” can beat more bits is that second question showing up before the first one is even finished. On the timing side, the same 2x logic applies to whatever pulse a fast event like the motor-current jam produces: sampling too slowly does not blur the pulse, it makes it vanish, because a signal component above half the sample rate folds back and impersonates a slower one instead of simply disappearing cleanly.
The Derivation
Nyquist criterion, derived fully in the ADC Fundamentals chapter:
\[f_s \ge 2f_{max}\]
Bit depth needed to resolve a change \(\Delta_{min}\) across a full-scale range \(\mathrm{FSR}\) – the inverse of the usual LSB formula:
\[N_{min}=\left\lceil\log_2\!\frac{\mathrm{FSR}}{\Delta_{min}}\right\rceil\]
Independently, the resulting code step \(q=\mathrm{FSR}/2^N\) still carries the usual uniform-rounding noise and ideal-SNR limit:
\[\sigma_q=\frac{q}{\sqrt{12}}, \qquad \mathrm{SNR}_{dB}=6.02N+1.76\]
Worked Numbers: This Chapter’s Own Load-Cell Example
- Target: resolve \(\Delta_{min}=10.0\) g on a \(\mathrm{FSR}=5000\) g scale \(\to\) steps needed \(=5000/10=500\), so \(N_{min}=\lceil\log_2500\rceil=\lceil8.97\rceil=9\) bits.
- Check: at \(N=8\), \(q=5000/256=19.5\) g – fails the 10 g target; at \(N=9\), \(q=5000/512=9.77\) g – just clears it; at \(N=12\) (a common off-the-shelf part), \(q=5000/4096=1.22\) g – an \(8\times\) safety margin over the requirement, not “wasted” bits if the analog chain can actually support them.
- Quantization noise at \(N=9\): \(\sigma_q=9.77/\sqrt{12}=2.82\) g rms, and ideal \(\mathrm{SNR}=6.02(9)+1.76=55.9\) dB.
- This chapter’s own caution matters here: that \(2.82\) g quantization floor is the theoretical limit. If the conditioned analog signal already jitters by several codes of bench noise – this chapter’s own warning – the real noise floor sits above \(\sigma_q\), and no amount of extra bit depth moves it, because \(\sigma_q\) only bounds the rounding error, not the sensor and front-end noise riding on top of it. The 9-bit-minimum, 12-bit-comfortable calculation tells you when you have enough codes; it does not tell you whether the analog signal reaching those codes is clean enough to use them.
19.3 Turn a Signal into Trustworthy Evidence
Signal processing turns a sensor’s changing electrical signal into digital evidence that software can trust. The essential choices are where the useful signal lives, how fast to sample it, how much ADC resolution is meaningful, what filtering belongs before or after conversion, and how the result will be validated.
The important idea is that the best design is not the fastest or most precise possible. It is the one that preserves the required phenomenon with enough evidence to explain the decision.
If you only need the intuition, this layer is enough: name the physical thing you must preserve, sample fast enough and resolve finely enough to see it, filter only the problem you can name, and keep evidence that the chain preserved the phenomenon.
Think of a witness statement. You want an accurate, explainable account of what happened, not the longest possible transcript. Oversized settings can record pages of noise; a good signal-processing design records the part that matters and can show why.
For example, a motor-current monitor should preserve the short rise that marks a jam or stall, not merely the average current over a long window. Sampling too slowly can make the pulse disappear; filtering too aggressively can make it look like a gentle ramp; choosing more ADC bits cannot help if the pulse was never captured. The useful design records enough raw evidence to show the event, then filters only the noise pattern that would mislead the decision. That record should include one raw trace, one filtered trace, and the reason the filter preserves the event.
The Three Core Decisions
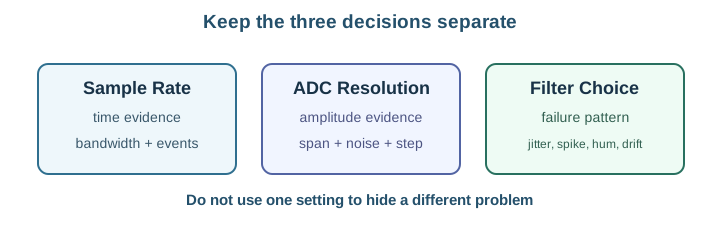
Sample rate
A timing decision: how often to observe the signal. It follows the fastest meaningful feature, not the converter’s top speed.
ADC resolution
An amplitude decision: how fine the code step is. More bits help only when the sensor and front end can support them.
Filter choice
A response to a named failure pattern. Choose the filter from the problem you can see, not as a generic cleanup step.
Beginner Examples
- A slow humidity monitor can use a modest sample rate and simple validation because the physical event changes gradually.
- A motor-current sensor must preserve short load changes, so the review checks bandwidth and sampling before any smoothing.
- An acoustic monitor combines analog filtering, sampling, compression, and packet budgeting, so the record covers both signal quality and network cost.
Signal Basics Knowledge Check
If you can name the core decisions, you can stop here. Continue to Practitioner to make and record a signal-processing decision.
19.4 Apply It: Make a Signal-Processing Decision
Every decision should connect back to the phenomenon the product must preserve. Separating the three choices makes the review far easier, because rate, resolution, and filtering each solve a different problem.
Walkthrough: From Phenomenon to Record
- State the phenomenon. Name the physical variable, expected range, timing, and event shape.
- Choose the boundary. Decide what belongs in analog conditioning, ADC conversion, digital filtering, or later handling.
- Match the setting to evidence. Select sample rate, bit depth, and filter type from bandwidth, noise, range, and validation needs.
- Record what changed. Keep enough raw and processed evidence to explain why the chosen settings are safe.
Try It: Filter Frequency Response Explorer
Filtering is the decision learners most often rush. Choose a filter only after you can name the failure pattern. Use the explorer to move a cutoff and see which frequencies pass and which are attenuated, so the filter matches the problem rather than guessing.
Worked Review: A Slow Sensor with Sharp Jumps
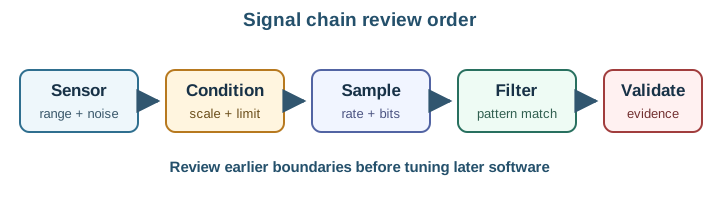
An environmental sensor occasionally reports sharp jumps. Do not immediately raise resolution or average more samples. Review the chain in order:
- Physical behavior: decide whether sharp jumps are even possible in this environment.
- Analog boundary: check supply, reference, grounding, range, and whether the signal clips.
- Sample plan: confirm the interval can see the fastest event that matters.
- Resolution fit: compare the required change with the code step and noise.
- Failure pattern: decide whether the jumps are isolated spikes, aliasing, saturation, or real events.
- Filter decision: choose median, average, low-pass, notch, or no filter from that pattern.
- Validation: capture before and after evidence and record what the filter might hide.
Incremental Practice
Beginner
For a slow humidity monitor, justify a modest sample rate and simple validation in one sentence each.
Intermediate
For a motor-current channel, write why bandwidth and sampling are checked before any smoothing.
Advanced
For one sensor, write a four-row decision note: sample rate, resolution, filter, and validation test, with the evidence behind each.
Sampling Boundary Knowledge Check
If you can make and record a defensible decision, you can stop here. Continue to Under the Hood for the boundary rule, resolution fit, and filter selection details.
19.5 Under the Hood: Boundaries, Resolution Fit, and Filter Choice
The deeper layer explains why the order of the chain matters and how each setting is bounded by physics rather than by the largest available specification.
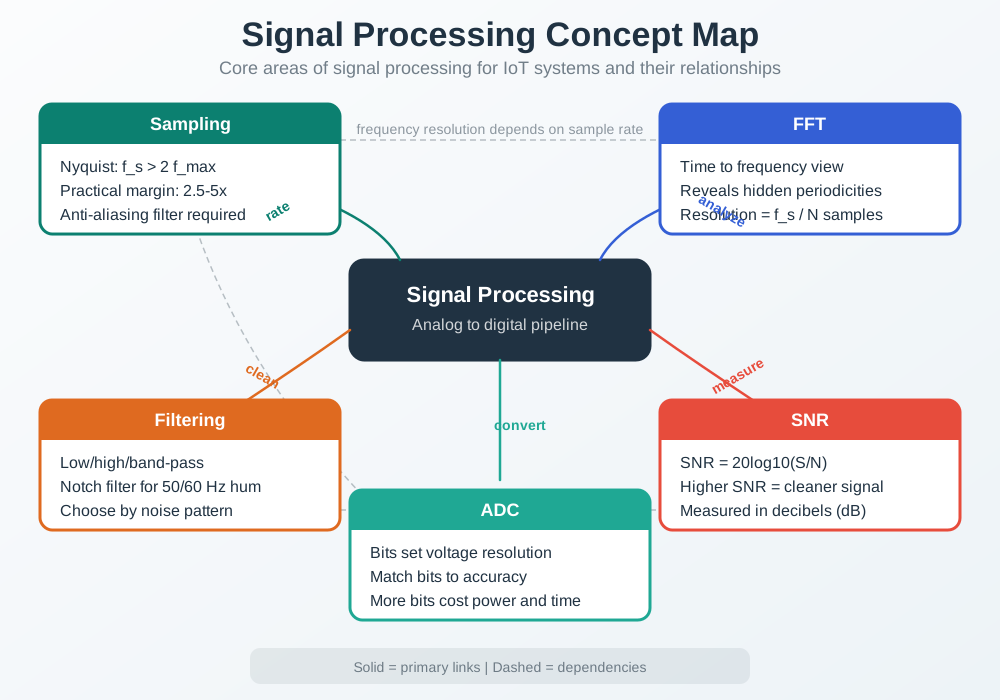
A concept map keeps the dependencies visible. Sampling sets time resolution and anti-aliasing requirements; ADC range and bit depth set amplitude resolution; filtering changes lag and bandwidth; SNR limits whether the extra samples or extra bits are actually informative. Review each decision against the evidence it depends on before treating a smoother or more precise-looking trace as more trustworthy.
The Boundary Rule
Digital filtering cannot recover information that the analog front end or sampling plan already lost. Aliasing, clipping, saturation, and an unsuitable reference range must be handled before or during conversion, not explained away afterward. Software can make a sampled sequence smoother, but it cannot prove that the lost information never mattered.
Resolution Fit
Resolution is an amplitude decision. Compute the code step from the reference range and bit depth, then compare it with the smallest meaningful physical change:
code_step = V_ref / 2^N
If analog noise, sensor accuracy, or calibration uncertainty is larger than the code step, extra bits may add no information. Useful questions: what physical change must be detected, what voltage span maps to it after conditioning, is the reference matched to that span, and is the noise floor below the planned code step?
Worked example: a load-cell front end may need to detect a 10 g change on a 5 kg scale. If the conditioned signal maps that change to less than one ADC code, the design needs more gain, a narrower reference, or a better converter. If bench noise already jitters by several codes, adding more bits mostly records noise. The review should compare required physical change, conditioned voltage span, code step, and measured noise before declaring the resolution good enough. The same record should state which physical change the chosen code step can still separate.
Filter Selection by Failure Pattern
Name the failure pattern first, then pick the filter that targets it.
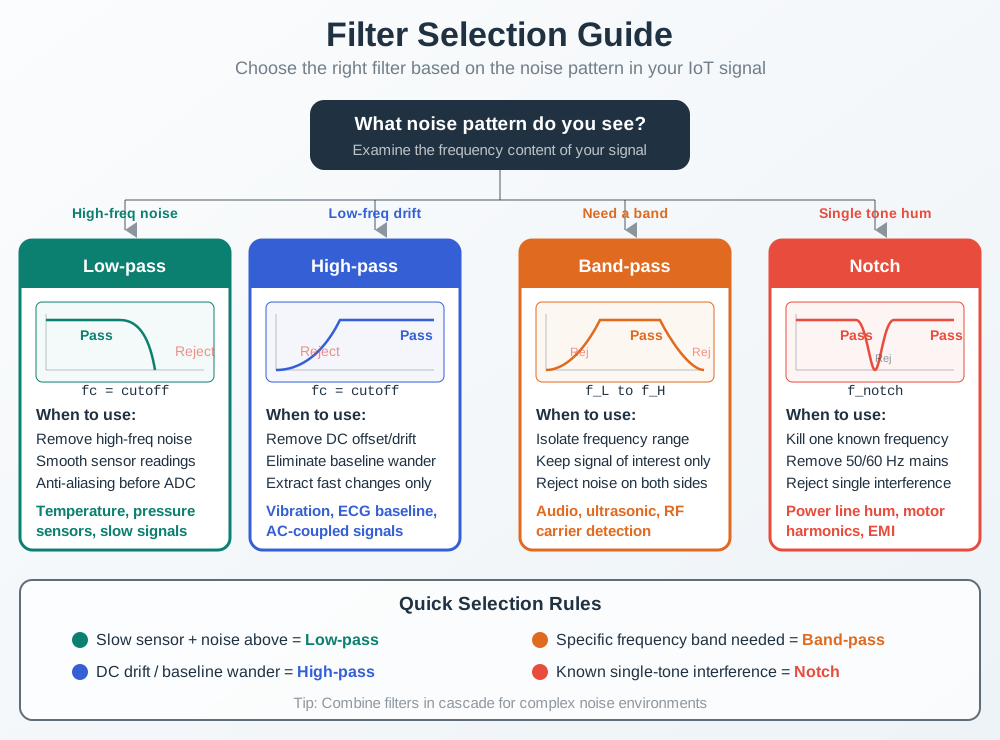
Moving average
Use when random jitter dominates and a slower response is acceptable.
Median
Use when occasional isolated spikes appear and should not pull nearby readings.
Low-pass
Use when useful behavior is slower than the unwanted high-frequency noise.
Notch
Use when one known interference tone, such as mains hum, can be targeted.
Common Pitfalls
- Treating more data as better data. Higher rates and wider bit depths can grow files without preserving better evidence.
- Filtering before naming the failure pattern. A filter chosen without evidence can hide the event the system should detect.
- Fixing analog problems in software. Smoothing cannot undo clipping, reference mismatch, saturation, or aliased content.
Filter Selection Knowledge Check
Where Each Decision Is Developed
This chapter is a map. The focused chapters carry the deeper method for each decision: timing and Nyquist, code-step and filtering detail, and sensor dynamics.
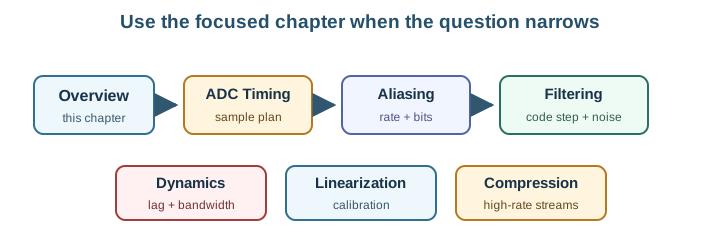
At this depth, signal processing is the evidence path between the physical world and a digital decision. The strongest designs are easy to explain: they preserve the phenomenon that matters, discard what does not, and leave enough evidence for another engineer to repeat the decision.
19.6 Summary
- Signal processing turns a changing electrical signal into digital evidence software can trust.
- Separate the three core decisions: sample rate is timing, ADC resolution is amplitude, and filtering responds to a named failure pattern.
- The boundary rule holds: digital filtering cannot recover information lost to aliasing, clipping, saturation, or a bad reference.
- Fit resolution to the smallest meaningful change and the noise floor, not to the largest available bit depth.
- Choose a filter from the observed problem; a median rejects isolated spikes, a moving average smooths jitter, a low-pass removes high-frequency noise, and a notch targets one known tone.
- The strongest designs leave a record that another engineer can use to repeat the decision.
Signal processing turns raw measurements into usable information. Sampling, resolution, filtering, calibration, and validation must each be matched to the physical phenomenon before the values drive decisions.
19.7 See Also
ADC Sampling Fundamentals
Build the timing and anti-aliasing foundation behind the sample-rate decision.
Quantization and Digital Filtering
Go deeper on code-step review, smoothing, and filter implementation discipline.
Sensor Dynamics and Response
Connect sensor bandwidth and response time to what the ADC can observe.