Start with devices that have to pass useful data before any fixed network is guaranteed. In Lab: Ad-Hoc Networks and Quiz, the first question is not the protocol name; it is which neighbors, routes, failure signals, and degraded behaviors you would trust in the field.
16.2 Start With the Packet You Can Explain
The lab becomes easier when you follow one packet instead of trying to understand the whole network at once. Ask who created it, which neighbor heard it, why that neighbor forwarded it, and what evidence shows the route worked.
That packet story connects simulation, measurement, and quiz questions. Start with one route trace, then change traffic, topology, or mobility and explain why the proof changes.
Chapter Roadmap
Use this lab chapter as a sequence:
First define the scenario contract: node count, radio range, traffic cadence, mobility, and failure conditions.
Then build an evidence pack that compares DSDV, DSR, ZRP, and DTN behavior under the same inputs.
Next use the quiz and worked examples to check the overhead trade-offs: sequence numbers, source-route headers, zone radius, and store-and-forward cost.
Finally run the ZRP implementation, validate the simulation, and turn the result into a deployment recommendation.
Checkpoints recap what you have covered; collapsed sections are deeper references.
Putting Numbers to It
Quiz mastery targets are easiest to plan with threshold math:
Worked example: For a 15-question quiz, target correct answers are \(\lceil 0.8 \times 15 \rceil = 12\). If a learner moves from 8/15 to 12/15, score rises from 53.3% to 80%, crossing mastery with four additional correct answers.
Key Concepts
Ad Hoc Network Simulation: NS-3 or OMNET++ simulation of MANET scenarios to evaluate routing protocol performance metrics
Mobility Trace: Pre-recorded or generated sequence of node positions used in simulation for reproducible experiments
Random Waypoint Model: Nodes move to random destinations at random speeds; standard mobility model for protocol evaluation
Trace Analysis: Parsing simulation output or Wireshark captures to extract routing decisions and timing events
Protocol Comparison Matrix: Systematic comparison of DSDV, DSR, AODV, and ZRP across mobility, density, and load dimensions
Lab Scenario Design: Defining topology, mobility, traffic, and measurement points for controlled ad hoc network experiments
Real Hardware Ad Hoc Testing: Using Raspberry Pi, Arduino with Wi-Fi, or custom radio platforms for physical ad hoc network experiments
16.3 In 60 Seconds
Protocol comparison is traffic-dependent: DSDV has lower overhead than DSR for high-traffic scenarios (>1 packet/30s), while DSR wins for sparse traffic – there is no universally best protocol. ZRP uses three components (IARP proactive within zone, IERP reactive between zones, BRP bordercast to edges) with zone radius as the critical tuning parameter. Simulation with realistic traffic patterns is the only reliable way to compare protocols for a specific deployment.
Phoebe’s Field Notes: Why “Shrink Radio Range” Is A Battery Knob Too
Phoebe’s Why
The lab’s “shrink radio range” fault injection and the “Battery voltage sag affecting range (not modeled)” limitation noted later in this chapter are the same physics wearing two names. A radio’s range comes from a link budget: transmit power minus path loss must still clear the receiver’s sensitivity. Path loss itself grows two ways – with distance, through spherical spreading (inverse-square, the Friis relationship), and with obstruction, through a log-distance exponent \(n\) that rises as more walls and bodies sit in the path. But transmit power is not fixed either: as a mobile node’s battery sags under load, its internal resistance eats into the voltage actually available to the power amplifier, quietly shrinking the same link budget that \(n\) and distance already spend. A simulator that lets you drag a “range” slider is modeling the outcome of all three effects at once, which is exactly why a fault that shrinks range needs a note about which cause – distance, obstruction, or battery – is intended before the result is trusted.
The Derivation
Spherical spreading gives free-space path loss at reference distance \(d_0\):
The log-distance model extends that reference across distance \(d\) with path-loss exponent \(n\) (\(n=2\) free space, higher \(n\) for obstructed indoor paths):
\[PL(d) = PL(d_0) + 10\,n\log_{10}\frac{d}{d_0}\]
The maximum range comes from solving the link budget \(B = P_t - P_{rx,sens}\) for \(d\), after reserving a fade margin \(M\):
\[\log_{10} d = \frac{(B - M) - PL(d_0)}{10\,n}\]
A battery’s internal resistance sags the terminal voltage under load, which caps the power actually reaching the antenna:
\[V_{term} = V_{oc} - I\,R_{int}\]
Worked Numbers: Range Loss From Distance, Obstruction, And Sag
Reference loss at 1 m, 2.4 GHz (\(\lambda = 0.125\) m): \(PL(1\text{m}) = 20\log_{10}(4\pi/0.125)\)\(= 40.0\) dB
Link budget (catalog-typical low-power mesh radio): \(P_t = 0\) dBm, sensitivity \(-90\) dBm \(\to B = 90\) dB
Open field, \(n = 2\):\(\log_{10}d = (90-40.0)/20\)\(= 2.50 \to d = 315\) m
Obstructed indoor mesh, \(n = 3.5\) (catalog-typical, matching the “shrink radio range” fault case): \(\log_{10}d = (90-40.0)/35\)\(= 1.43 \to d = 26.7\) m – an \(11.8\times\) range collapse from obstruction alone, the same collapse the dense-versus-sparse radio-range settings are standing in for
Battery sag on top of the open-field case: a 3 dB transmit-power cut from voltage sag under load shrinks the budget to \(87\) dB: \(\log_{10}d = (87-40.0)/20\)\(= 2.35 \to d = 223\) m, about \(71\%\) of the un-sagged range – confirming that the “not modeled” battery-sag caveat below is not a minor omission; it moves the range knob by nearly a third on its own
Minimum Viable Understanding
Protocol comparison is traffic-dependent: DSDV has lower overhead than DSR for high-traffic scenarios (>1 packet/30s), while DSR wins for sparse traffic – there is no universally “best” protocol
Simulation reveals real trade-offs: Dense networks favor proactive routing; sparse/disconnected networks need epidemic or context-aware DTN approaches; zone radius tuning is critical for ZRP
ZRP implementation uses three components: IARP (proactive within zone), IERP (reactive between zones), and BRP (bordercast to zone edges), with zone radius determining the balance point
16.4 Overview: The Lab Proves Traffic Fit
Roadmap stop one is the scenario contract. Before choosing a protocol, freeze the conditions that make that choice true.
An ad-hoc protocol choice is not proven by a protocol label. It is proven by a scenario record: node count, radio range, movement pattern, traffic cadence, packet lifetime, delivery target, overhead budget, and energy limit. The same protocol can look strong in one record and weak in another.
This lab should therefore treat DSDV, DSR, ZRP, and DTN routing as candidates under test. DSDV pays periodic state cost for quick forwarding. DSR pays discovery and header cost when traffic appears. ZRP pays local proactive cost and bordercast discovery cost based on zone radius. Epidemic DTN pays replication cost to survive disconnection.
The first deliverable is the scenario contract. Freeze the coordinate system, random seed or mobility trace, packet size, offered load, radio range model, queue capacity, run duration, warm-up interval, and stopping condition before looking at results. If those inputs move between protocols, the lab is testing configuration drift instead of routing behavior.
Separate protocol correctness from deployment fit. A dense, connected mesh may let every candidate deliver packets, but the right result still depends on first-packet delay, control bytes per data byte, delivery before packet expiry, route repair time, and the energy proxy attached to each relay. The lab recommendation should name the scenario where it is valid and the change that would make the result expire.
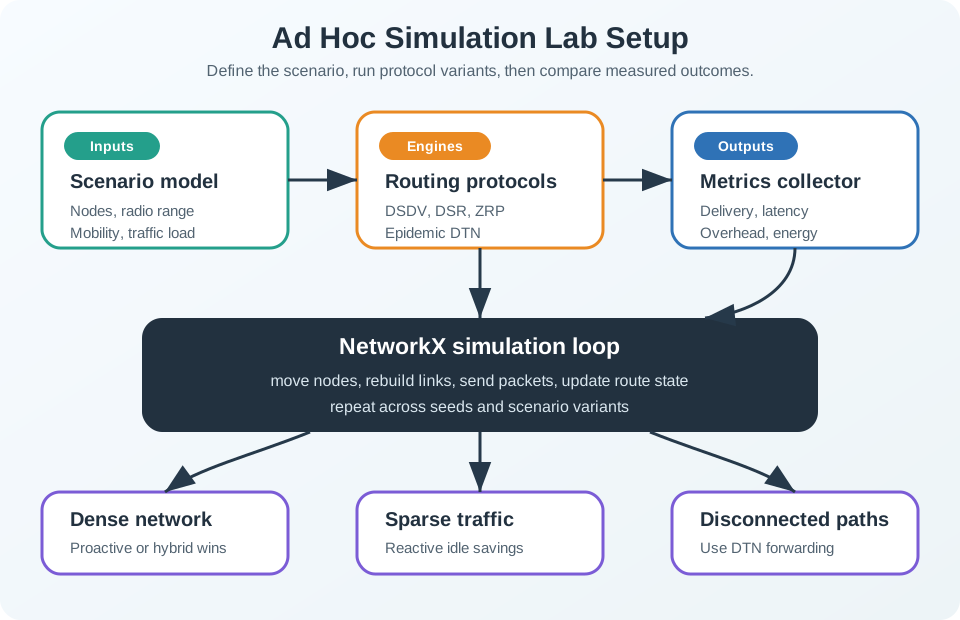
The lab earns its recommendation only when the same scenario model feeds each candidate protocol and the metrics collector compares delivery, delay, overhead, and energy pressure from repeatable runs.
Mobile summary: Define one scenario, run DSDV, DSR, ZRP, and DTN variants through the same simulation loop, then choose from measured delivery, latency, overhead, and energy results.
Scenario scope: record density, mobility, traffic rate, and disconnection pattern before comparing protocols.
Metric boundary: compare delivery, latency, overhead, buffer use, and energy pressure together.
Decision limit: state which deployment change would force a rerun of the lab.
16.5 Practitioner: Build The Evidence Pack
Keep one evidence pack per test run. Include the random seed or mobility trace, traffic schedule, radio range, initial topology, protocol settings, measured outputs, and a short interpretation. That makes the result repeatable and prevents a single chart from becoming a general recommendation.
For ZRP, record zone radius and network diameter together. For DSR, record route-cache timeout and average path length. For DSDV, record update period and invalidation behavior. For DTN, record TTL, replica limit, buffer occupancy, and contact assumptions. Those parameters explain the trade-off more clearly than the protocol names alone.
Start with sanity tests before the comparison run. A one-hop topology should deliver without discovery noise, a deliberately disconnected graph should fail or store packets in the expected way, and a replayed mobility trace should produce the same result when the seed and code revision are unchanged. If using a simple NetworkX model, state that MAC contention, propagation loss, and queueing are approximations. If using ns-3 or OMNeT++, record the propagation, PHY, MAC, and queue models because those choices change the measured overhead.
Report the evidence as a scenario-by-protocol table, not as one winner chart. Include packet delivery ratio, median and tail latency, normalized routing load, route discoveries, route errors, buffer drops, average hop count, and a relay-energy proxy. If confidence intervals overlap, the honest recommendation is "no clear winner under this scenario" or "rerun with a longer trace," not a forced protocol label.
End the pack with an operator-facing decision record: selected protocol, rejected alternatives, parameter values, confidence limits, and the field condition that triggers retesting.
Run log: preserve inputs, seed, protocol settings, and topology snapshot.
Result table: report delivery ratio, delay, control overhead, buffer pressure, and energy proxy.
Decision note: approve, reject, or retest a protocol for the named scenario only.
16.6 Under The Hood: State Cost Moves Around
Ad-hoc routing protocols move state cost between tables, packet headers, control floods, local zones, and buffers. There is no free choice. A proactive table can reduce first-packet delay while consuming periodic airtime. A source route can reduce intermediate table state while adding header bytes. A DTN replica can raise delivery probability while consuming energy and buffer space.
The hidden risk is stale state. Mobility changes neighbor sets, cached paths, zone membership, delivery utility, and buffer contents. A strong lab result shows how the selected protocol notices stale state, withdraws or repairs it, and limits the cost of that repair.
Measurement state can bias the result as much as routing state. DSDV may look excellent if tables are fully warmed before the first application packet; DSR may look worse if every run begins with an empty route cache; DTN may look better if buffers are already populated before the measured window. Reset state consistently, record warm-up policy, and separate formation transients from steady-state delivery.
Add one explicit fault injection to the lab: break a link, pause a carrier, shrink radio range, or move a gateway out of contact. Then inspect the mechanism that follows. DSDV should advertise fresh invalidation, DSR should emit route errors and purge bad cache entries, ZRP should bound bordercast scope, and DTN should expire or drop replicas according to policy. The acceptance test is bounded recovery without loops, black holes, uncontrolled floods, or hidden buffer growth.
That acceptance proof should be visible in the trace, not only in aggregate metrics: a route table update, route error, bordercast count, or buffer-drop event should explain the final chart.
Table state risks stale next hops after movement or link loss.
Header state risks oversized packets and exposed path assumptions.
Buffer state risks replica storms, expiry loss, and delayed delivery claims.
Checkpoint: Scenario Evidence
You now know:
A protocol recommendation is valid only for the recorded node count, radio range, mobility pattern, traffic cadence, packet lifetime, and energy limit.
DSDV, DSR, ZRP, and DTN move cost to different places: periodic tables, route discovery, zone maintenance, packet headers, or buffers.
A useful evidence pack reports delivery ratio, median and tail latency, normalized routing load, route errors, buffer drops, hop count, and relay-energy proxy.
Sensor Squad: Protocol Olympics
“Welcome to the Protocol Olympics!” announced Max the Microcontroller. “Today, three routing protocols compete to deliver messages across our network!”
“First up: DSDV!” said Sammy the Sensor. “DSDV keeps a map of EVERYTHING, updated every 15 seconds. Super fast delivery, but it gets tired from all that updating!”
“Next: DSR!” added Lila the LED. “DSR keeps NO map and figures out the route fresh each time. Great when you rarely need to send messages, but slow to start when you do!”
“And finally: Epidemic DTN!” said Bella the Battery. “It copies the message to EVERYONE it meets. Almost guaranteed delivery, but my battery is crying from all those copies!”
“The winner depends on the event!” Max explained. “Sprint (frequent messages)? DSDV wins! Marathon (rare messages)? DSR wins! Obstacle course (no connected path)? Epidemic DTN is the only one that finishes!”
The Squad’s lab tip: Try changing the number of nodes, speed, and message frequency in the simulation. You’ll see that no single protocol wins every scenario – that’s why choosing the right one matters!
16.7 Learning Objectives
By the end of this chapter, you will be able to:
Simulate Ad Hoc Networks: Build Python simulations using NetworkX for MANET scenarios
Compare Routing Protocols: Evaluate DSDV, DSR, and Epidemic routing performance
Model Node Mobility: Implement random waypoint and other mobility patterns
Measure Protocol Metrics: Analyze delivery ratio, latency, and overhead for different protocols
Design DTN Scenarios: Create intermittent connectivity simulations for challenged environments
Test Protocol Selection: Apply knowledge to select appropriate protocols for specific use cases
Using This Lab Chapter
What is this chapter? Practical exercises for ad-hoc networking protocols (DSDV, DSR, ZRP, DTN).
When to use:
After studying ad-hoc routing fundamentals
When comparing routing protocol behaviors
Before implementing mobile network solutions
Protocols Covered:
DSDV: proactive table-driven routing for stable networks with frequent traffic.
DSR: reactive source routing for dynamic networks with sparse traffic.
ZRP: hybrid zone routing for mixed scenarios where local routes should be ready and distant routes can be discovered on demand.
DTN: delay-tolerant store-and-forward routing for disconnected networks.
Knowledge Gaps Hub - Common misconceptions about ad-hoc routing overhead and protocol selection
Quizzes Hub - Additional routing protocol quizzes covering AODV, OLSR, and TORA
Videos Hub - Visual demonstrations of DSDV convergence, DSR route discovery, and ZRP bordercasting
Knowledge Map - See how ad-hoc routing connects to WSN, FANET, and VANET architectures
Related lab tools:
Network topology visualizer (simulations hub) for designing ad-hoc network layouts
Protocol comparison tool for evaluating DSDV vs DSR performance trade-offs
Interactive mobility pattern generator for testing routing protocol robustness
DSDV vs DSR Overhead
The Misconception: Many students believe proactive protocols like DSDV always generate more overhead than reactive protocols like DSR, making reactive protocols universally better for mobile networks.
The Reality: Overhead depends on traffic patterns, not just protocol type. In high-traffic scenarios, DSDV can have lower total overhead than DSR.
Example comparison data:
Scenario: 30-node tactical network, 500m×500m area, random waypoint mobility
Low traffic, 5 packets/min: DSDV sends about 12,000 control packets/hour, while DSR sends about 3,200. DSR wins because it avoids periodic route maintenance when the network is mostly idle.
High traffic, 300 packets/min: DSDV stays near 12,000 control packets/hour, while DSR can rise toward 47,000 because repeated discoveries and repairs dominate. DSDV wins because its fixed cost is amortized.
Battery life at low traffic: DSDV lasts about 14.2 hours; DSR lasts about 18.6 hours.
Battery life at high traffic: DSDV lasts about 14.2 hours; DSR drops toward 8.3 hours.
Why This Happens:
DSDV Overhead:
Fixed periodic updates regardless of traffic: 20 nodes × 20 updates/hour = 400 control packets/hour baseline
Overhead constant whether sending 5 or 300 data packets/min
“Pays upfront” for always-available routes
DSR Overhead:
Per-route discovery: Each new destination requires RREQ flood
High traffic = many unique destinations = many route discoveries
300 packets/min to 25 different destinations = 180 route discoveries/hour in mobile network (routes break frequently)
Each RREQ floods network: 20 nodes × 180 discoveries = 3,600 control packets/hour from discoveries alone
Add RERR messages for broken routes in mobile network: +1,000 control packets/hour
Route cache helps, but mobility invalidates cached routes quickly
High traffic: DSDV’s 12,000 control packets << DSR’s 47,000 (constant discoveries)
Key Insight: Protocol selection must consider application traffic patterns: - Sparse traffic (monitoring sensors): Reactive protocols (DSR, AODV) waste less energy - Dense traffic (video streaming, telemetry): Proactive protocols (DSDV, OLSR) amortize update cost - Hybrid traffic: ZRP adapts by tuning zone radius
Rule of Thumb: If average data transmission rate > 1 packet every 30 seconds, consider proactive routing. The “always-on” overhead pays for itself through eliminated route discoveries.
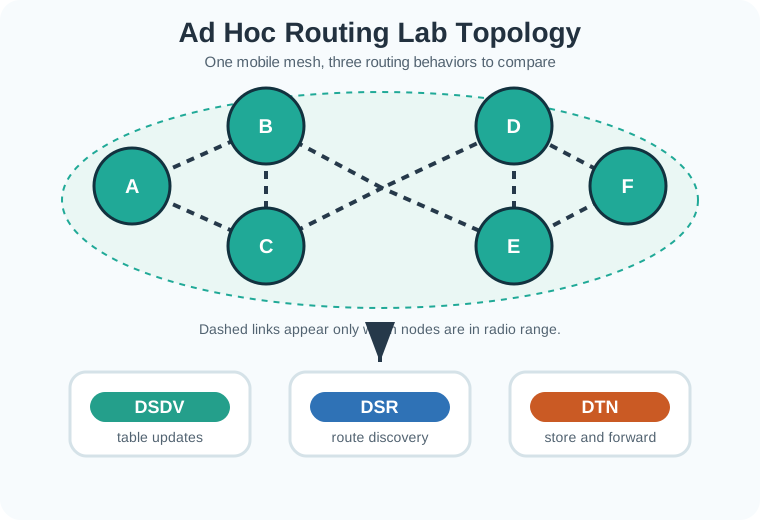
Figure 16.1: Ad hoc network lab topology diagram showing six mobile nodes with intermittent radio-range links. The same mobile mesh is used to compare DSDV table updates, DSR route discovery, and epidemic DTN store-and-forward behavior.
16.8.2 Simulation Setup
We’ll use Python with NetworkX to simulate a mobile ad hoc network:
16.8.3 Lab Tasks
Task 1: Protocol Comparison
Run the simulation with different network parameters:
Run it: Instead of imagining how each protocol behaves, run the comparison in the Ad-Hoc Routing Visualizer below. For the dense case, choose the Dense Field scenario and set Nodes to about 30 with a wide Radio Range; for the sparse case, drop to about 15 nodes with a short range or use the Partition Risk scenario; then switch the Protocol selector across DSDV, DSR, AODV, and ZRP and press Start Discovery to watch each route form. Toggle Mobility: On for the high-mobility case and press Compare Protocols to see delivery and overhead side by side. Use what you observe to answer which protocol performs best in each scenario and where the overhead trade-offs appear.
Test Scenarios:
Dense network: use 30 nodes with radio range 30.
Which protocol performs best?
Why?
Sparse network: use 15 nodes with radio range 15.
Does epidemic routing help?
What happens to DSDV/DSR?
High mobility: increase the movement speed limit to 10.
Which protocol adapts best?
Observe convergence time
Questions:
Under what conditions does each protocol excel?
What are the overhead trade-offs?
Task 2: Implement Route Maintenance
Enhance the simulation:
Add to DSDV:
Link break detection
Route invalidation (infinity metric)
Observe convergence after topology change
Add to DSR:
Route error (RERR) messages
Route cache timeout
Alternate route discovery
Measure:
Convergence time after link breaks
Overhead (number of control messages)
Task 3: DTN Performance Analysis
For epidemic routing:
Experiment with parameters:
TTL values: 5, 10, 20, 50
Network density
Number of replicas
Collect metrics:
Delivery ratio
Average latency
Overhead (total transmissions)
Buffer occupancy
Plot results and identify optimal configuration
Checkpoint: Lab Setup
You now know:
The dense test uses 30 nodes with radio range 30; the sparse test uses 15 nodes with radio range 15.
The high-mobility test raises the movement speed limit to 10 so convergence time and route repair become visible.
DSDV can win at high traffic because its fixed update cost is amortized, while DSR can win at sparse traffic by avoiding idle periodic updates.
16.9 Interactive Quiz
Duration: ~20 min | Level: Intermediate | Code: P04.C04.U02
DSR Source Header Overhead
Scenario: You’re deploying DSR (Dynamic Source Routing) for a warehouse automation mesh network. Network characteristics: - Typical paths: 10 hops average from robot to base station - Node addressing: 2-byte node IDs (16-bit addresses) - Payload: 50-byte sensor telemetry packets (position, battery, task status) - Data rate: 100 packets/second across 40 mobile robots
Think about:
Calculate the routing header overhead for a 10-hop DSR source route with 2-byte node IDs.
What percentage of each packet is routing overhead vs actual payload?
How does this compare to hop-by-hop routing protocols like AODV?
Overhead percentage: 20/70 = 28.6% of packet is routing header! At 100 packets/sec across 40 robots, that’s 80 KB/sec of pure routing overhead bandwidth.
Trade-off analysis: DSR eliminates routing table memory at intermediate nodes (saves ~500 bytes/node × 40 nodes = 20 KB total memory) but costs 20 bytes per packet in bandwidth.
Alternative: Hop-by-hop routing (AODV, DSDV) uses only 4-byte next-hop header per packet (7.4% overhead vs 28.6%) but requires every node to maintain routing tables.
Recommendation for this scenario: Switch to AODV - 10-hop packets waste less bandwidth (4 vs 20 bytes), and 40 warehouse robots have sufficient memory for routing tables. DSR better suited for memory-constrained sensors, not mobile robots with ample RAM.
Real deployment (Amazon warehouse): AODV reduced header overhead 80% (4 vs 20 bytes), enabling 5x higher robot density in same bandwidth.
Scenario: You’re optimizing a 15-node emergency response team mesh network using Zone Routing Protocol (ZRP). Current configuration: - Zone radius ρ = 10 hops - Network diameter: 8 hops (maximum distance between any two nodes) - Observed overhead: 4200 control packets/minute - Route availability: Instant (0ms discovery time) - Memory per node: 850 KB routing tables
Performance comparison with ρ=3: - ρ=3 overhead: 650 control packets/minute - ρ=3 discovery time: 45ms average - ρ=3 memory: 180 KB per node
Think about:
With ρ=10 in a 15-node network, what happens to ZRP’s hybrid architecture?
Why is overhead so high with large zone radius, and what protocol is ZRP essentially behaving like?
How should you tune the zone radius for this emergency response network?
Solution
Zone radius ρ=10 encompasses entire network (all nodes within 10 hops in 8-hop diameter network).
ZRP degenerates to pure proactive DSDV-like protocol: - IARP maintains routes to all 15 nodes continuously (4200 packets/min overhead) - IERP reactive component never used (all destinations within zone) - Every node maintains full routing tables (850 KB)
Problem: You’re paying proactive overhead for entire network but getting no hybrid benefit.
Solution: Reduce to ρ=2-3 hops for optimal balance: - Achieves 85% overhead reduction (650 vs 4200 packets/min) - 79% memory savings (180 vs 850 KB) - Accepts modest 45ms discovery latency for distant nodes
Rule: Zone radius should cover 30-50% of network, not 100%. For 15-node emergency network: ρ=2 optimal (covers ~7 nodes, hybrid benefits intact, 6.5x less overhead).
Real deployment (tactical military MANET): Reducing ρ from 8 to 3 in 20-node network decreased overhead 72%, increased battery life from 6 hours to 18 hours.
16.10 Python ZRP Implementation
The quiz sections name the trade-offs. The implementation turns ZRP into a small graph experiment you can inspect line by line.
This comprehensive implementation demonstrates the hybrid routing paradigm that combines proactive intra-zone routing with reactive inter-zone route discovery.
16.10.1 Complete Implementation
The implementation below keeps the graph model small enough for a notebook while preserving the main ZRP behavior: proactive lookup inside the local zone and reactive border search when the destination is outside that zone.
from collections import dequedef shortest_path(graph, source, target):"""Return a hop-by-hop path in an unweighted adjacency-list graph.""" queue = deque([(source, [source])]) seen = {source}while queue: node, path = queue.popleft()if node == target:return pathfor neighbor in graph.get(node, []):if neighbor notin seen: seen.add(neighbor) queue.append((neighbor, path + [neighbor]))returnNonedef routing_zone(graph, source, radius):"""Return all nodes within the configured ZRP zone radius.""" queue = deque([(source, 0)]) zone = {source}while queue: node, distance = queue.popleft()if distance == radius:continuefor neighbor in graph.get(node, []):if neighbor notin zone: zone.add(neighbor) queue.append((neighbor, distance +1))return zonedef border_nodes(graph, source, radius):"""Return zone-edge nodes that should receive bordercast queries.""" zone = routing_zone(graph, source, radius)return { nodefor node in zoneifany(neighbor notin zone for neighbor in graph.get(node, [])) }def zrp_route(graph, source, target, radius):"""Find a route using local proactive lookup, then reactive bordercast.""" local_zone = routing_zone(graph, source, radius)if target in local_zone:return {"mode": "IARP local","path": shortest_path(graph, source, target),"queries": 0, } frontier = deque(border_nodes(graph, source, radius)) visited =set(local_zone) queries =len(frontier)while frontier: border = frontier.popleft() path_to_border = shortest_path(graph, source, border) border_zone = routing_zone(graph, border, radius)if target in border_zone: path_to_target = shortest_path(graph, border, target)return {"mode": "IERP bordercast","path": path_to_border + path_to_target[1:],"queries": queries, }for next_border in border_nodes(graph, border, radius):if next_border notin visited: visited.add(next_border) frontier.append(next_border) queries +=1return {"mode": "unreachable", "path": None, "queries": queries}graph = {0: [1, 5],1: [0, 2, 6],2: [1, 3, 7],3: [2, 4, 8],4: [3, 9],5: [0, 6, 10],6: [1, 5, 7, 11],7: [2, 6, 8, 12],8: [3, 7, 9, 13],9: [4, 8, 14],10: [5, 11],11: [6, 10, 12],12: [7, 11, 13],13: [8, 12, 14],14: [9, 13],}for radius in (1, 2, 3): result = zrp_route(graph, source=0, target=14, radius=radius)print(radius, result["mode"], result["path"], result["queries"])
The route remains six hops in this toy topology, but the number of bordercast queries falls as the zone radius increases. In a full simulation, that query count should be combined with the proactive table-maintenance cost for each radius.
16.10.3 Key Features Demonstrated
1. Hybrid Routing Paradigm:
Proactive within routing zone (radius R hops)
Reactive for inter-zone destinations
Balances routing overhead vs route discovery latency
2. Intra-Zone Routing:
Distance-vector protocol (similar to DSDV)
Proactive table maintenance for zone members
Limited flooding scope (only R hops)
Low latency for nearby destinations
3. Inter-Zone Routing:
On-demand route discovery (similar to DSR)
Bordercasting: Query forwarded only to zone border nodes
Reduces flooding overhead compared to pure reactive
Route caching for frequently used paths
4. Zone Radius Tradeoff:
Small R (r=1): Minimal proactive overhead, more reactive queries
Large R (r=3): More proactive coverage, fewer reactive queries
Optimal R: Depends on network density, mobility, traffic patterns
5. Bordercasting Optimization:
Route requests only forwarded to border nodes
Border node: Has neighbors outside its routing zone
Significantly reduces query flooding
Key innovation of ZRP over pure flooding
6. Performance Metrics:
Zone size tracking (average nodes per zone)
Route request count vs zone radius
Success rate (routes found / routes requested)
Proactive update overhead
7. Notebook-Ready Features:
Small adjacency-list graph representation
Short functions for route tracing and zone inspection
Configurable zone radius for tuning
Loop detection and prevention
Query-count tracking for overhead comparison
This ZRP implementation completes the routing protocol trilogy in this chapter: - DSDV: Pure proactive (table-driven) - DSR: Pure reactive (on-demand) - ZRP: Hybrid (best of both worlds)
The hybrid approach makes ZRP particularly suitable for large-scale IoT deployments where pure proactive or reactive protocols would be inefficient.
Checkpoint: ZRP Mechanics
You now know:
Radius 1, 2, and 3 all find a six-hop path in the toy topology, but bordercast queries fall from 13 to 6 to 3.
A small zone radius reduces proactive maintenance but causes more reactive bordercast work.
A large zone radius makes more routes instantly available, but can push ZRP toward DSDV-like table cost.
DSDV Convergence After Failure
Scenario: 30-node DSDV network experiences link failure. Calculate time until all nodes have consistent routing information.
Given:
30-node network in 5×6 grid, diameter = 10 hops
Link A-B fails at t=0
DSDV full update period: 15 seconds
Incremental update triggered immediately on link break
Average propagation: 2 hops/second
Steps:
Node A detects link failure (t=0):
Sets route to B: hop_count = ∞, seq = 51 (increment from 50)
Best alternate: A → C → D → B (3 hops vs direct 1-hop)
Gradual discovery as nodes exchange tables
Full convergence (t=15-30s):
Next full update at t=15s ensures consistency
Some nodes may still have suboptimal routes until t=30s (2nd full update)
Result: Convergence time ≈ 15-30 seconds (1-2 full update cycles after failure)
Key Insight: DSDV convergence is bounded by update period, not network size. This predictable behavior suits industrial control better than DSR’s variable discovery delay.
Simulate Before Deployment
Use simulation to validate protocol selection before expensive hardware deployment.
Protocol comparison: collect delivery ratio, latency, and routing overhead with NS-3 or OMNeT++; plan about one week.
Scalability: measure performance as node count grows from 10 to 1000 using OPNET or Qualnet; plan about three days.
Mobility impact: track convergence time and packet loss in a custom Python model; plan about two days.
Energy analysis: estimate battery lifetime and node death distribution with Cooja/Contiki; plan about one week.
Real traffic patterns: replay application-specific workloads in a trace-driven simulation; plan about one week.
Simulation Checklist:
Common Simulation Mistakes:
Using default parameters without tuning to your deployment
Simulating only best-case scenarios (perfect grid, no failures)
Ignoring MAC layer (leads to 30-50% optimistic throughput)
Short simulation time (<10× convergence time)
Not validating against real testbed (at least 5-10 nodes)
Validate Simulation in the Field
The Mistake: Deploying protocols based solely on simulation results, discovering 3-5× worse performance in production due to unmodeled real-world effects.
Example: Agricultural network simulated delivery ratio 92% (DSR), actual field deployment measured 67% due to: - Tractor interference (not modeled) - Weather effects on 2.4 GHz (rain attenuation) - Battery voltage sag affecting range (not modeled) - Animals disturbing antenna orientation
Validation Strategy:
Simulate (1 week): Get baseline expectations
Testbed (1 week): 10-20 real nodes, controlled environment
Pilot (2-4 weeks): 30-50 nodes, actual deployment site
Production (continuous): Monitor and tune
Reality Factors to Model:
Non-uniform node placement (not perfect grid)
Variable transmission power (battery depletion)
Asymmetric links (A hears B, but B doesn’t hear A)
Key Lesson: Simulation predicts trends (protocol A > protocol B), not absolute performance. Always validate with real hardware in target environment before full deployment.
Common Pitfalls
Once the simulation works, the risk shifts to trusting weak evidence. These pitfalls keep the recommendation from overfitting one clean run.
1. Running Only One Simulation Seed
Simulation results with a single random seed may not represent average protocol behavior. Monte Carlo-style evaluation with 30+ different seeds per scenario provides statistically valid results. Single-seed results can accidentally show excellent or poor performance due to random mobility coincidences.
Measure Beyond Stable Networks
Initial network formation and route discovery cause transient performance degradation. If measurement starts at time 0, initial route flooding and table building distort results. Always skip a warm-up period (30-60 seconds) before collecting performance measurements to capture steady-state behavior.
Match Traffic Loads Before Comparing
Comparing DSDV (proactive) and DSR (reactive) at the same high load biases results toward proactive — routes are pre-built and available. At low load, reactive may win by avoiding constant overhead. Compare protocols across a range of loads to understand where each excels.
Validate Simulation With Models
Before trusting simulation results, validate the simulator by checking that simple scenarios (two nodes, one hop) produce results matching theoretical calculations. Simulator configuration bugs can produce silently incorrect results that look plausible but are wrong.
Checkpoint: Validation Discipline
You now know:
Single-seed simulation is weak evidence; this chapter calls for 30+ different seeds per scenario.
Measurement should skip a 30-60 second warm-up period so formation transients do not dominate the result.
Robust tests vary parameters by +/-50%, run for at least 10 times the convergence time, and compare against a 5-10 node real testbed when hardware is available.
Label the Diagram
Code Challenge
16.11 Summary
The remaining sections turn the same ideas into quick review: match the protocol concepts, sequence the simulation workflow, and answer the core trade-off questions before moving to adjacent routing chapters.
This chapter covered ad hoc network routing protocols and simulation for mobile IoT:
Routing Protocol Classes: Proactive protocols (DSDV) maintain routes continuously with periodic updates for fast route availability but high overhead, while reactive protocols (DSR) discover routes on-demand with lower idle overhead but higher initial latency
DSDV Implementation: Distance-vector routing with sequence numbers prevents routing loops and ensures stale route information doesn’t propagate, using periodic broadcasts to maintain fresh routes to all destinations within the network
DSR Source Routing: Complete path embedded in packet headers eliminates routing table requirements at intermediate nodes, enables route caching through overhearing, but creates header overhead proportional to path length (20 bytes for 10-hop path with 2-byte node IDs)
Epidemic Routing for DTN: Store-and-forward approach floods packet replicas throughout disconnected networks achieving 95-99% delivery ratio but with 800-1200% overhead, making it suitable only when delivery is critical and energy is abundant
Zone Routing Protocol (ZRP): Hybrid approach uses proactive routing within zone radius (2-3 hops typically) and reactive discovery for distant destinations, with bordercasting reducing query flooding compared to pure reactive protocols
Context-Aware Routing: Exploits predictable mobility patterns to selectively forward packets only to high-utility neighbors, achieving 85-90% delivery with 200-350% overhead (3-5x more efficient than epidemic) for battery-limited mobile IoT devices with regular movement routines
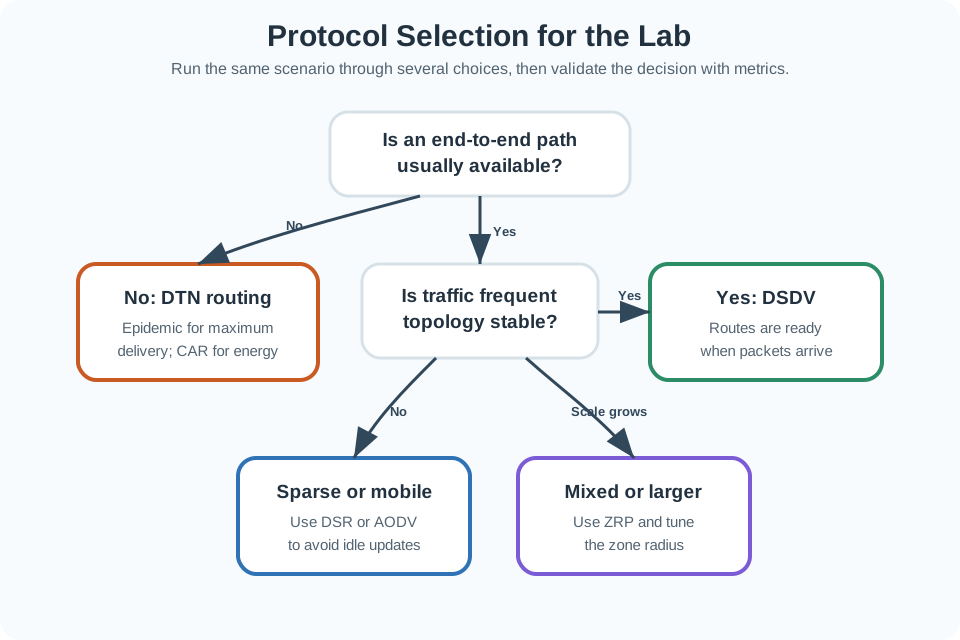
This variant presents ad-hoc routing protocol selection as a decision flow based on network characteristics, helping practitioners match protocols to deployment scenarios.
Figure 16.2: Alternative view: Protocol selection depends on multiple factors. Stable networks benefit from proactive routing, mobile sparse networks need reactive routing, mixed larger networks benefit from ZRP, and disconnected networks require DTN forwarding.
Overhead vs Delivery Spectrum
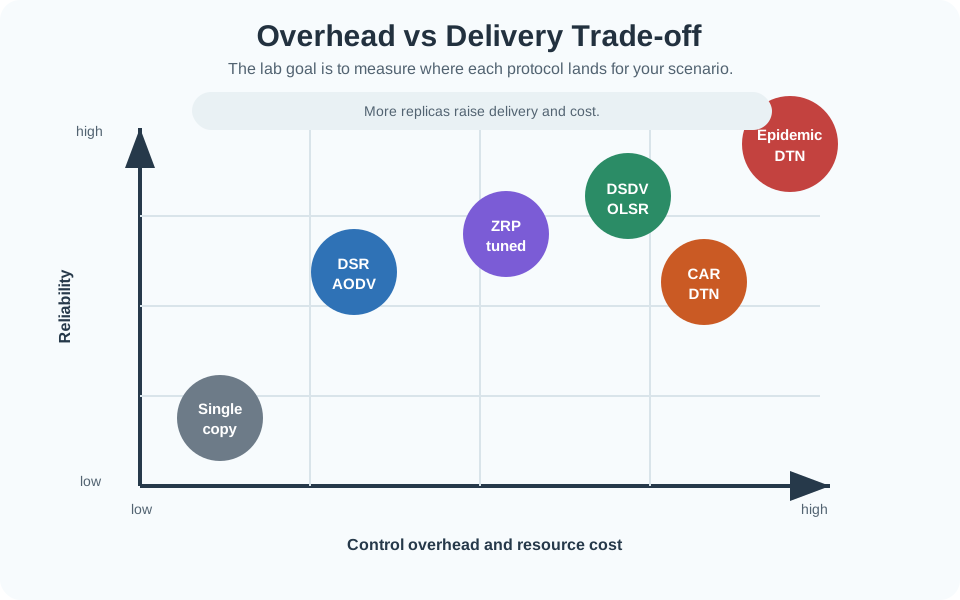
This variant shows ad-hoc protocols positioned on a continuous spectrum between overhead and delivery ratio, illustrating the fundamental trade-off.
Figure 16.3: Alternative view: All routing protocols exist on a spectrum trading overhead for delivery reliability. Single-copy protocols minimize resources but risk message loss. Epidemic protocols maximize delivery at high overhead cost.
16.13 Visual Reference Gallery
Visual: Ad Hoc Network Schematic
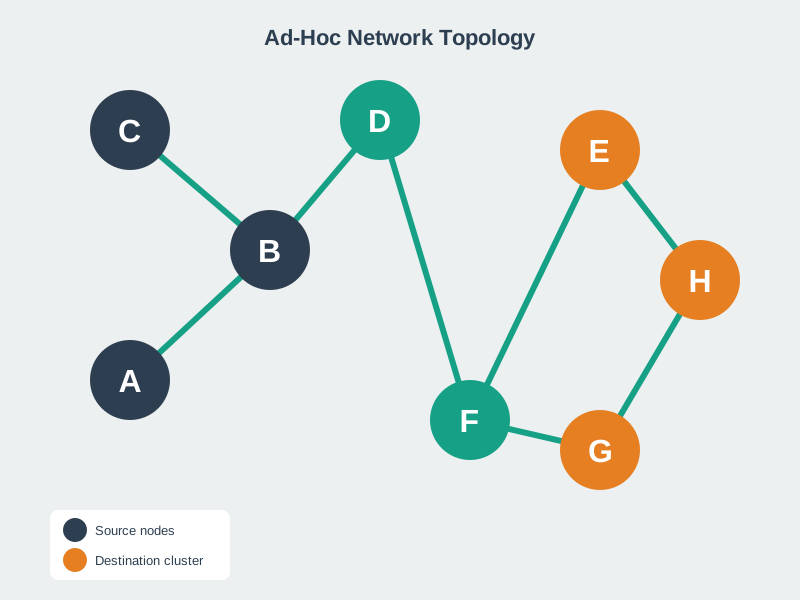
Schematic visualization of an ad hoc network topology
This diagram illustrates the basic ad hoc network structure that forms the foundation for the routing protocol simulations in this lab chapter.
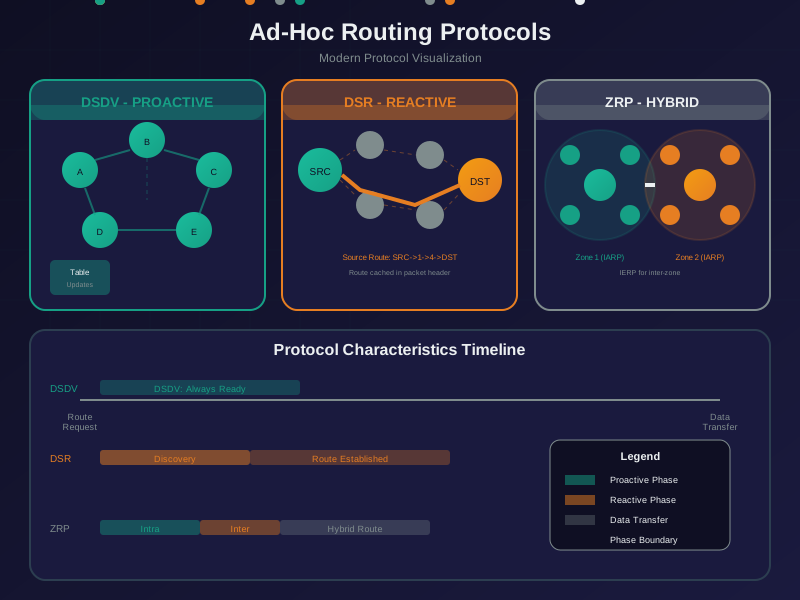
Ad Hoc Routing Protocols
Classification of ad hoc routing protocols
This visualization shows the taxonomy of routing protocols covered in the lab exercises, helping contextualize DSDV, DSR, and ZRP comparisons.
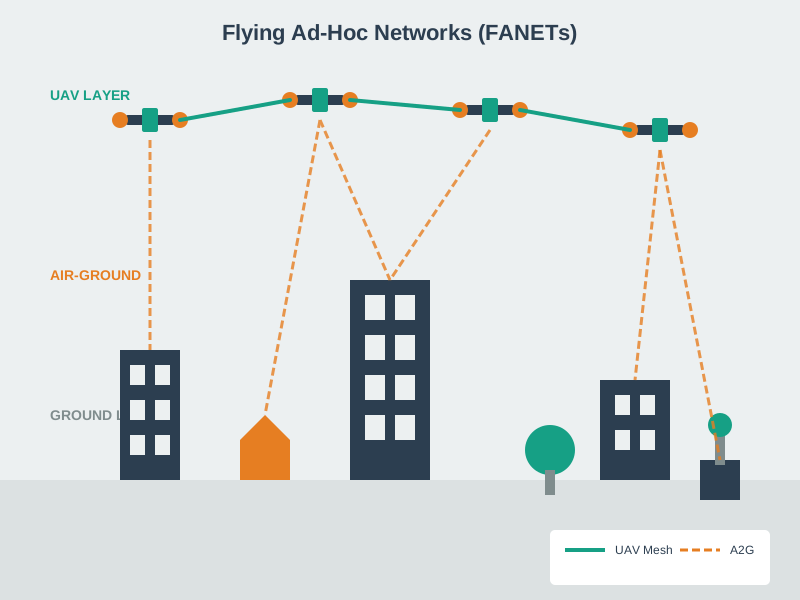
Visual: Flying Ad Hoc Networks (FANETs)
FANET architecture and UAV ad hoc networking
FANETs represent a specialized ad hoc network scenario where the lab concepts apply to highly mobile UAV networks with unique routing challenges.
Ad hoc labs should measure behavior under mobility, failures, traffic load, and route changes. The goal is to explain routing evidence, not just produce a successful packet trace.

 Checkpoint: Scenario Evidence