Prototyping
Programming Basics, Hardware Prototypes, Software Prototypes, Kits, Platforms, and Evidence Records
IoT prototyping, hardware prototype, software prototype, development kit, platform selection, evidence record
Your guide: Voltage Vera
“Trust the probe, not the diagram — the circuit tells you what it actually is.”
Start With the Story
Imagine a team building a classroom air-quality node. The first version blinks, reads a sensor, and publishes a value, so everyone wants to move straight to a polished enclosure. The useful question is smaller and sharper: which unknown would make the next build expensive if it is wrong? It might be power draw, sensor drift, Wi-Fi recovery, cable strain, dashboard staleness, or whether another student can repeat the setup from the notes.
Read this module as that team’s route map. Each chapter asks what the prototype must prove, what evidence should be recorded, and what decision becomes safe only after the evidence is visible.
Overview: Prototype the Riskiest Unknown
A prototype is useful when it answers a decision the team cannot safely make from opinion alone. In IoT, that decision might be whether an ESP32 has enough RAM for the firmware loop, whether a Raspberry Pi Pico W can hold a reliable Wi-Fi reconnection path, whether a pressure or temperature sensor remains stable inside an enclosure, whether MQTT reconnect behavior is visible to a dashboard, or whether a cloud kit hides too much of the failure path. The first move is not to buy hardware. The first move is to write the uncertainty as a decision: keep this board, change this sensor, split this service boundary, choose this platform, or delay the product claim until more evidence exists.
Use this module guide to choose the chapter group that matches the current uncertainty. Programming basics help when the risk is firmware structure, debugging habits, language choice, memory use, timing, or testability. Hardware prototyping helps when the risk is the physical world: sensor fit, wiring, current draw, connector strain, enclosure airflow, PCB transition, or manufacturing tolerance. Software prototyping helps when the risk is service behavior, update paths, libraries, API boundaries, telemetry freshness, and integration with a dashboard or broker. Kits and platforms help when the risk is speed versus lock-in: how much the learner gains from a development kit, managed device platform, or framework, and what it will cost to leave later.
| Current Unknown | Prototype Evidence | Likely Route |
|---|---|---|
| Firmware loop reliability | Commit, toolchain, serial log, timing trace, reset reason, watchdog behavior, and failure case | Programming basics and software prototyping |
| Sensor or enclosure fit | Wiring photo, raw readings, calibration note, current measurement, airflow or mounting condition, and retest trigger | Hardware prototyping |
| Connectivity recovery | Broker log, packet capture, retry timing, stale-data rule, dashboard state, and user-visible recovery message | Software prototyping and platforms |
| Kit or platform fit | Supported protocol, SDK version, device identity model, OTA path, observability, support burden, and exit path | Kits and platforms |
The overview route keeps quick builds honest. A blinking LED, simulated sensor, Wokwi sketch, breadboard wiring, MQTT topic, or cloud dashboard is not evidence by itself. It becomes evidence only when the learner records what was tested, what changed, what failed, and what decision follows. That discipline protects the next chapter choice: a team should not jump to PCB design before measuring power and sensor stability, and it should not choose a device platform before testing identity, update, telemetry, and recovery behavior under failure.
Practitioner: Make the Evidence Packet Reproducible
A working demo is not enough. A useful prototype record names the question, bill of materials, firmware commit or version, wiring, library versions, measurement method, test cases, observed defects, decision, and retest trigger. A bench note with serial logs, current measurements, packet captures, screenshots, and photos is often more valuable than a polished demo video because it lets a different engineer reproduce the result. The packet should also say what the prototype does not prove: breadboard wiring does not prove connector reliability, a room-temperature reading does not prove outdoor stability, and a successful cloud publish does not prove recovery from an outage.
Pick tools that expose the risk instead of tools that make the demo look finished. Wokwi or a browser simulator can test code paths, pin use, and teaching flow before hardware arrives. PlatformIO, Arduino IDE, Zephyr, FreeRTOS examples, or vendor SDKs can expose build, flash, update, logging, and dependency complexity. A multimeter can reveal current draw; an oscilloscope or logic analyzer can reveal timing and bus behavior; nRF Connect or another BLE scanner can expose advertisements and GATT characteristics; Mosquitto logs or another MQTT broker log can expose retained messages, reconnects, and last-will behavior; Wireshark or a simple gateway trace can reveal whether a network claim is really being exercised.
Run each prototype as a small experiment. Write the decision, build the smallest version that can answer it, instrument the behavior, test normal and failure cases, record the evidence, and decide what changes next. For a classroom environmental monitor, the normal case might be five minutes of stable readings, while the failure cases include sensor disconnect, enclosure blockage, low battery, Wi-Fi loss, gateway reboot, stale dashboard state, and firmware restart. For a kit comparison, the failure cases include SDK version mismatch, certificate rotation, OTA rollback, rate limits, data export, and support ownership. If the evidence packet cannot reproduce those cases, the prototype has not retired the risk yet.
The retest trigger matters because prototypes age quickly. A sensor change, library upgrade, enclosure revision, new firmware scheduler, different power source, broker configuration change, cloud policy update, or dashboard redesign can invalidate earlier evidence. Treat that trigger as part of the deliverable. It tells the next learner when old confidence should be reopened instead of inherited blindly.
Under the Hood: Prototype Boundaries Become Product Boundaries
The hidden cost of a prototype is that shortcuts can become architecture. A blocking firmware loop, unversioned calibration constant, unmeasured deep-sleep current, hard-coded broker credential, cloud-only command path, optimistic dashboard state, or manual reset habit may survive into the product unless the evidence packet names the limitation explicitly. Under the hood, the prototype is already drawing boundaries between device firmware, gateway logic, message broker, cloud service, dashboard, manufacturing test, and operations playbook. If those boundaries are accidental, the product inherits accidental behavior.
For deeper work, treat the prototype as a boundary test. Ask which behavior belongs on the device, gateway, cloud service, dashboard, or support workflow. A sensor filter may belong on the device when power, latency, and privacy matter, but it may belong at the edge or cloud when calibration, fleet comparison, or model updates matter more. An OTA update path may depend on bootloader layout, signed image format, rollback storage, network reliability, and operational approval. A command path may need local fallback when the cloud is unavailable, or it may need cloud authority when audit and access control dominate. The prototype should make those tradeoffs visible rather than hiding them behind a single “works on bench” result.
Test the boundary under stress: reset, stale telemetry, packet loss, battery sag, sensor disconnect, gateway reboot, credential expiry, OTA rollback, service outage, rate limits, time drift, and configuration changes. These cases expose whether the prototype is proving product behavior or only proving a happy path. A retained MQTT message can make stale data look fresh. A device shadow can hide delayed command confirmation. A development kit can make device identity easy while obscuring how production provisioning, certificate rotation, and fleet ownership will work. A browser dashboard can show a value while failing to record where it came from, when it was last observed, and what should happen when it disappears.
The result should tell the next engineer what is proven, what is provisional, and what must be retested before release. That is why the module route moves from programming basics to hardware, software, kits, and platforms instead of treating them as separate topics. Prototype evidence has to travel across those layers. A reliable firmware loop can be undermined by an unmeasured enclosure constraint; a good sensor can be undermined by an update path that cannot recover; a promising cloud platform can be undermined by observability gaps or exit cost. Under-the-hood prototyping makes those product boundaries explicit while the design is still cheap to change.
Learning Objectives
By the end of this module, you should be able to:
- Explain how prototypes reduce uncertainty before full implementation.
- Choose the right prototype fidelity for a technical question.
- Separate programming, hardware, software, kit, and platform decisions.
- Capture evidence from a prototype so later teams can trust the result.
- Recognize when a quick demo is not enough for an engineering decision.
- Plan a route through the prototyping chapters based on your current risk.
Module Route
Use this page as the route map for the prototyping part of the course.
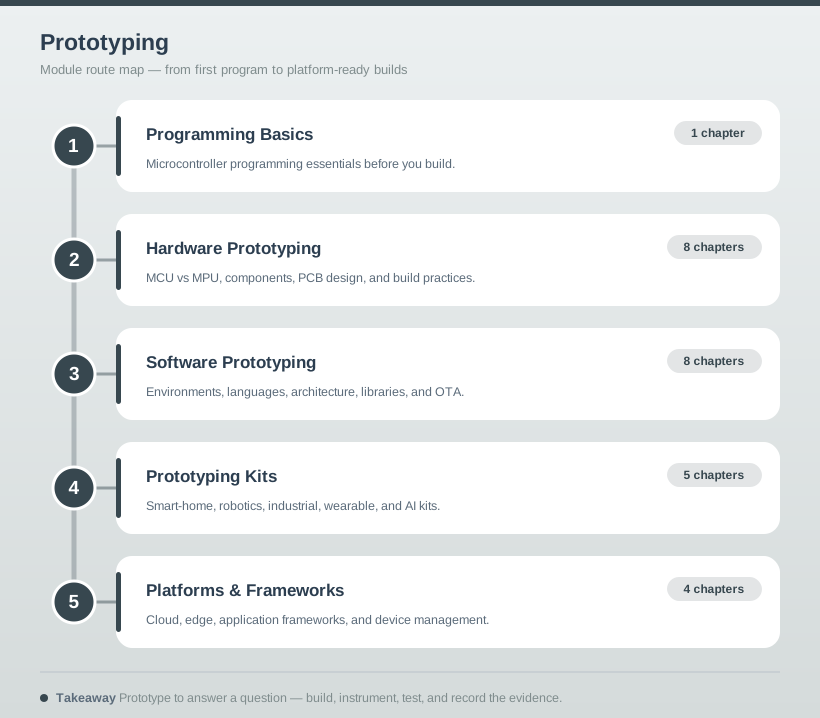
Programming basics Start here when the main risk is firmware structure, debugging, language choice, toolchain setup, code quality, or implementation habits.
Hardware prototyping Use this path when the risk is sensor selection, MCU versus MPU choice, power state, wiring, enclosure, PCB transition, or physical reliability.
Software prototyping Use this path when the risk is application architecture, libraries, testing, OTA update behavior, integration, or service boundary design.
Kits and platforms Use these paths when the question is whether an existing kit, framework, cloud service, edge stack, or device-management platform fits the project.
Prototype Loop
A useful prototype starts with a question, not a shopping list. The loop should be small enough to run quickly and disciplined enough to leave evidence.
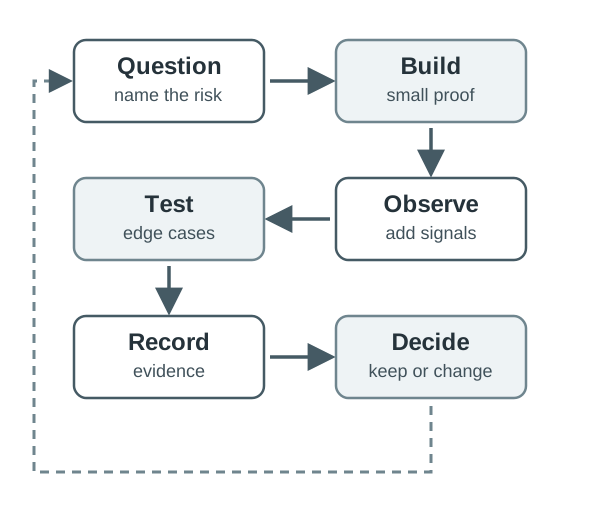
Run each loop this way:
- Name the uncertainty: what decision cannot be made yet?
- Define the smallest build that can answer it.
- Instrument the prototype so the result is observable.
- Test normal, edge, and failure cases.
- Record the evidence and remaining risks.
- Decide whether to keep building, change direction, or retire the risk.
Evidence Packet
The output of a prototype is not the demo. The output is the evidence packet that lets the next engineer understand what was proven and what was not.
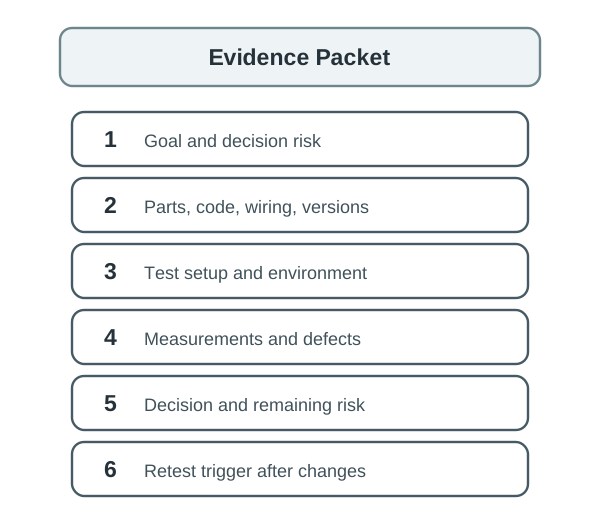
Record:
- Goal and decision being tested.
- Hardware, firmware, software, wiring, enclosure, and tool versions.
- Test setup, input cases, measurement method, and environment.
- Results, defects, workarounds, and unresolved risks.
- Decision made from the evidence.
- Retest trigger after hardware, firmware, library, enclosure, workload, or platform changes.
Choose Your Path
The best next chapter depends on the risk you need to reduce.
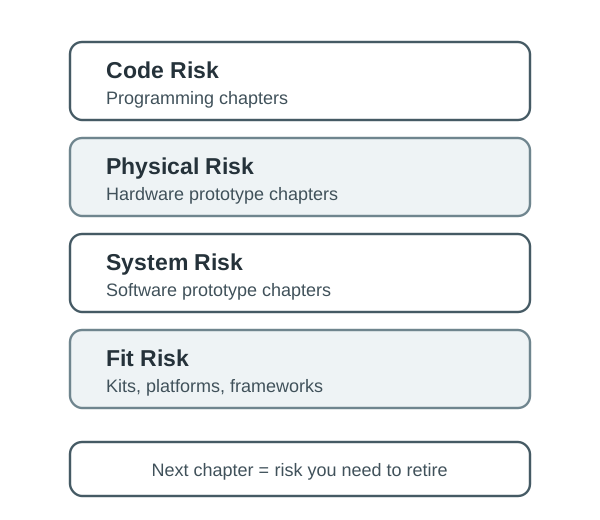
Code and toolchain risk Read the programming chapters first. Focus on build tools, debugging, coding patterns, examples, and practices.
Physical design risk Read the hardware chapters first. Focus on components, boards, power, measurement, enclosure, and PCB transition.
System behavior risk Read the software chapters first. Focus on architecture, libraries, testing, OTA, telemetry, and service boundaries.
Selection risk Read kits and platforms first. Focus on fit evidence, support burden, lifecycle, integration, and exit path.
Example Progression: Prototype Evidence
- Beginner Example: Blink an LED, read one sensor value, or publish one MQTT message only after naming the question. The evidence can be a wiring photo, firmware version, serial log, and a note about what still was not tested.
- Intermediate Example: Build a classroom monitor bench unit with a sensor, enclosure mockup, Wi-Fi reconnect path, and dashboard update cadence. The evidence should include raw and filtered readings, reset reasons, stale-data behavior, current draw, and known defects.
- Advanced Example: Compare an edge gateway, a managed device platform, and a custom cloud path for an update-heavy fleet. The evidence should cover OTA rollback, device identity, telemetry retention, service outage behavior, operational ownership, and exit cost.
Try It: Scope A Prototype Loop
Choose one IoT prototype idea and write a six-line loop before choosing hardware or software:
- Decision: what choice the prototype must support.
- Smallest build: the minimum device, code, enclosure, service, or dashboard needed to answer it.
- Instrumentation: the log, meter, trace, screenshot, packet capture, or observation that will make behavior visible.
- Failure case: the reset, disconnect, stale reading, low battery, denied permission, or outage to test.
- Evidence packet: what another engineer needs to reproduce or challenge the result.
- Retest trigger: the change that makes the evidence stale.
Common Pitfalls
- Building a broad demo before naming the decision it needs to support.
- Treating breadboard behavior as proof of field reliability.
- Ignoring firmware update, recovery, logging, and testability until late.
- Choosing a kit because it is available instead of because it matches the risk question.
- Comparing platforms by feature lists without testing integration, operations, and exit paths.
- Failing to record measurement conditions, versions, defects, and retest triggers.
Worked Example: Environmental Sensor Prototype
A team is building a classroom environmental monitor. The unresolved question is whether the selected sensor, enclosure, firmware loop, and dashboard update cadence can produce stable readings without making the device hard to maintain.
Prototype loop
- Build one bench unit with the target sensor, microcontroller, enclosure material, and firmware loop.
- Instrument raw readings, filtered values, timestamps, firmware version, reset reason, and network state.
- Test normal operation, stale readings, network loss, restart, sensor disconnect, and enclosure airflow.
- Record which problems are sensor behavior, firmware behavior, enclosure behavior, or integration behavior.
Decision
The team keeps the design only if the evidence packet proves measurement stability, maintainable firmware, observable failures, and a clear retest trigger after enclosure or sensor changes.
Knowledge Check
What’s Next
Choose the entry point that matches your current uncertainty:
- Microcontroller Programming Essentials for firmware and toolchain foundations.
- Software Architecture Patterns for code-structure choices.
- Hardware Prototyping Introduction for physical build decisions.
- Prototyping Software for application and integration prototypes.
- Kit Selection Best Practices for kit-based exploration.
- Cloud Platform Evidence for platform and framework selection.