Before state
Record the selected prefix, next hop, route source, metric, and known return path before changing the topology.
advanced routing lab, forwarding records, convergence lab, routing metric, ETX, RPL boundary, route failure
Advanced routing behavior is easiest to test when something changes on purpose. A link fails, a metric worsens, a preferred parent disappears, a default route is withdrawn, or a gateway is replaced while traffic is still expected to move.
Use the change event as the center of the lab. Record the baseline path, the trigger, the new route state, the packet evidence, and the time it took to converge. That sequence shows whether the network recovered or merely found a different problem.
These advanced labs move beyond “does a route exist?” and ask for routing records. You will build a forwarding decision record, observe convergence after a route change, compare path metrics, and document boundary behavior between a constrained IoT mesh and the wider IP network. The goal is not to memorize a simulator or copy a long code listing. The goal is to produce a traceable route record: selected prefix, next hop, TTL or Hop Limit result, route-change timing, link-quality impact, and return-path proof.
By the end of this lab chapter, you will be able to:
Use any safe local environment: a packet simulator, a container network, a small virtual topology, a classroom router lab, or a paper-and-spreadsheet model. Do not connect these labs to production networks. Do not treat a simulator run as proof of RF performance, formal compliance, installed reliability, device lifetime, or provider behavior.
Every lab in this chapter should produce these artifacts:
Goal: Prove how a packet is handled by a forwarding decision process.
Set up a small test route set with at least four entries:
Create packet records that exercise the route set. Include at least these cases:
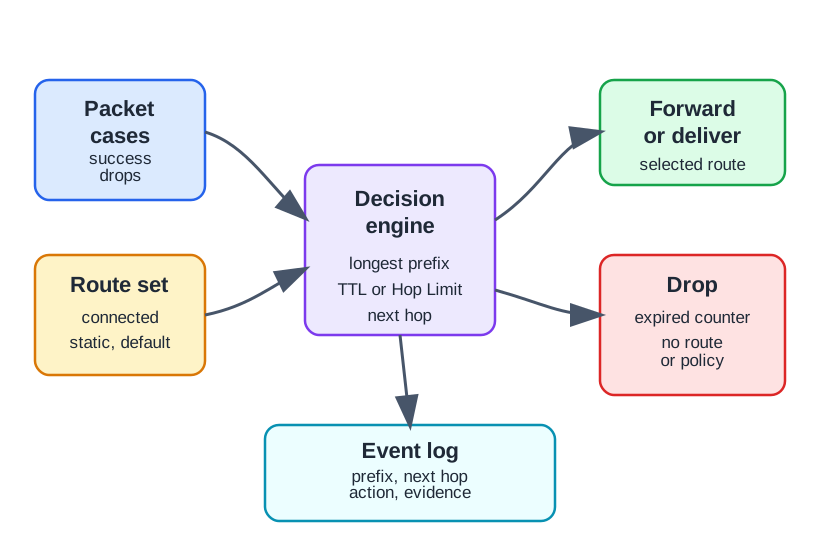
For each packet, record:
Acceptance standard: A teammate should be able to read your log and explain why each packet was forwarded or dropped without rerunning the lab.
Goal: Observe how route state changes after a topology change.
Build a small topology with at least two possible paths between an edge node and a gateway. The topology can be simulated or physical, but the records must show route state before and after a change.
Run this sequence:
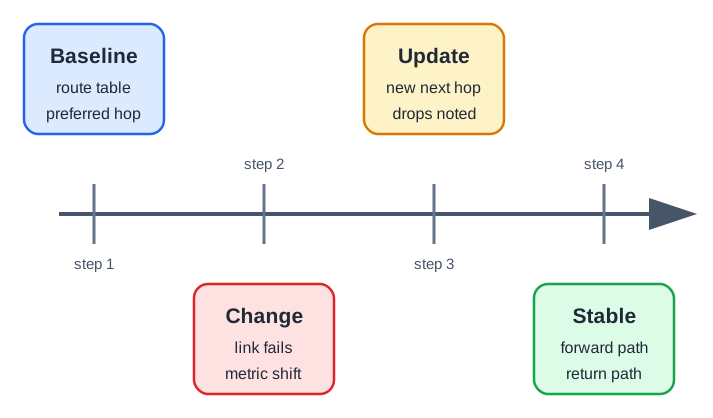
Do not report only “it worked.” Report the route-change records:
If your environment cannot measure real time accurately, report convergence in update rounds or observation steps. That is acceptable as long as you define the unit clearly.
Goal: Compare routing choices when hop count is not the only useful metric.
Create two candidate paths from a sensor-side node to a gateway or border router:
For each path, record:
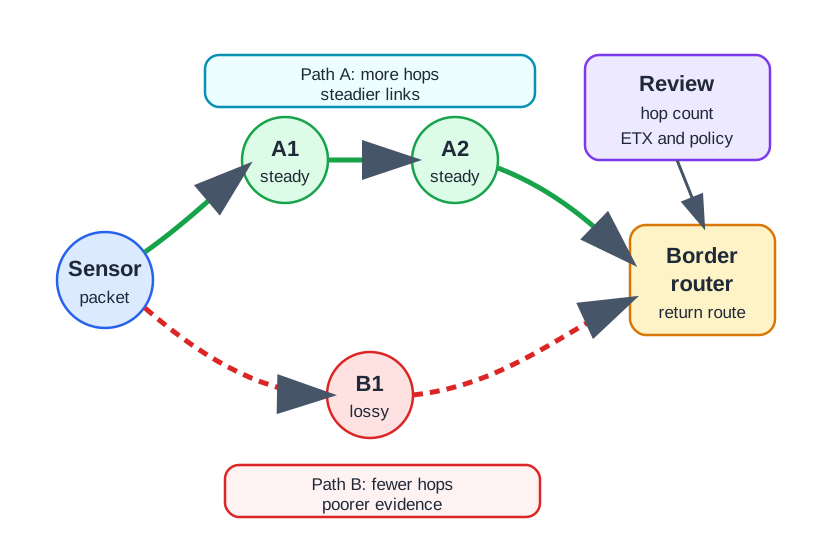
The point is not that one metric always wins. Hop count may be appropriate in a stable wired lab. ETX may be more informative in a lossy wireless mesh. Latency may matter for control traffic. Policy may override all of them at a boundary. Your conclusion must name the objective function you used and the records that support it.
For RPL-oriented checks, separate three questions:
Use this structure for your lab report:
Before marking the advanced lab complete, confirm that you have:
The advanced lab is not only asking whether routing recovers. It asks whether the learner can show what changed, when forwarding became stable again, which packets were affected during the change, and which return path or RPL boundary remained outside the local proof.
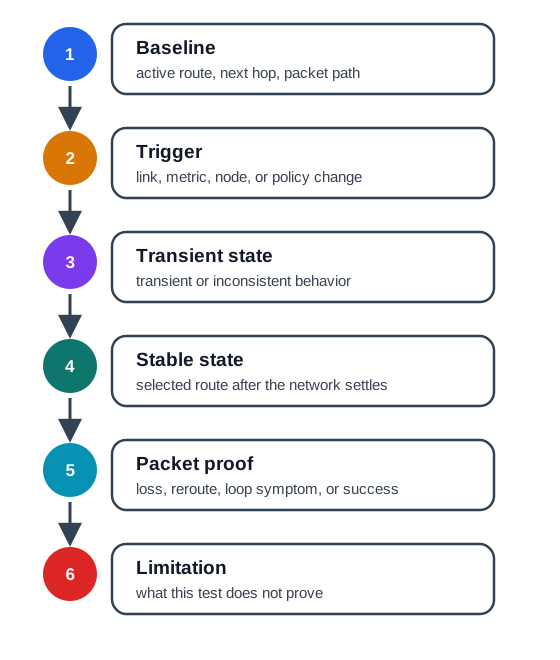
Start with the baseline because it is the comparison point. A baseline row should name the active route, selected next hop or parent, route source, metric or objective function, and at least one packet that proves the path was actually used. Then name the trigger: a failed link, changed metric, withdrawn route, moved node, policy change, or gateway replacement. Without those two rows, the rest of the lab becomes guesswork because the reviewer cannot tell whether the new route is a repair, a normal alternate path, or a different test case.
The middle of the record is where many reports get weak. Record the transient state even when it is messy: dropped packets, loop symptoms, delayed DAO or route-table updates, temporary parents, or an unknown interval. The final stable state matters, but it should be accepted only after packet proof and return-path proof are attached. The limitation row is also part of the result. It says what this classroom, simulator, or bench lab did not prove, such as installed RF reliability, upstream firewall policy, or application retry behavior.
Record the selected prefix, next hop, route source, metric, and known return path before changing the topology.
Capture the route update, temporary drops, parent or next-hop replacement, and the first stable forwarding test.
State which claims the lab still does not prove, such as installed RF reliability, upstream policy, or application behavior.
A practitioner report should make the unstable interval visible. The useful record is not a long packet dump; it is a compact sequence that ties a link or metric change to route-table updates, packet outcomes, and the decision to accept or reject the recovered path.
Use observation numbers if the lab cannot measure wall-clock time accurately. For example, "step 3" or "update round 2" is better than pretending the lab measured milliseconds. Each row should be small enough to audit: one route-table change, one forwarding test, one return-path check, or one boundary note. If several things change at once, split them so the reviewer can see which evidence supports which conclusion.
A mesh node moves from parent A to parent B after A is degraded. The final route works, but two telemetry packets are dropped during parent replacement and the return path stabilizes one observation step later. The release note should accept the new path only with that outage window and retest trigger attached.
Keep the acceptance decision separate from the observation. "Forward path recovered" is an observation. "Accept for this lab" is a decision that also needs the return path, owner, and retest trigger. In an RPL-oriented lab, the owner might be the mesh firmware team for parent selection, the border-router owner for prefix advertisement, and the site-network owner for upstream routing. Naming those boundaries prevents a local mesh result from being overstated as an end-to-end service guarantee.
Hop count, ETX, latency, and policy answer different questions. A shorter route can lose more packets. A stable mesh path can still fail at the border router. A metric that works for telemetry can be wrong for commands. The advanced lab should show which risk the metric reduces and which risk it leaves for another record.
Do not compare metrics until the route candidates are comparable. First prove the packet destination, matching prefix, route source, and boundary. Longest-prefix match still comes before ordinary metric comparison. After that, the metric record should state the objective: minimize hop count, reduce expected transmissions, avoid a policy boundary, keep traffic inside a mesh, or prefer a route with better observed delivery. The same topology can produce different choices when the objective changes.
Reduces path length, but can prefer a short lossy link unless link quality is recorded separately.
Targets delivery reliability, but needs enough observations and does not prove upstream or return-path behavior.
Can override local metrics at a gateway, border router, firewall, or application ownership boundary.
This is why ETX-style reasoning needs careful wording. A lower expected-transmission path can be a better mesh parent and still be insufficient evidence for cloud reachability. A policy route can be correct for security and still add latency. A return path can fail even when the uplink packet succeeds. Under the hood, the lab is teaching evidence ownership: metrics explain a route choice, packet records prove forwarding behavior, and boundary notes prevent one proof from being stretched across the whole system.
Advanced routing labs should produce records, not just output. The important records are selected prefixes, next hops, hop-counter behavior, convergence changes, metric assumptions, border-router responsibilities, and return-path results. A useful lab report is reproducible, scoped, and honest about what the environment proves and what it does not prove.
Routing labs are useful when they leave records of topology, assumptions, route decisions, failures, and the reasoning behind each selected path.
Continue to Routing Labs: Algorithms when you are ready to compare route-computation methods. Then use Routing Labs and Quiz to check the lab sequence before moving deeper into RPL-specific implementation and check chapters.