25 Sensor Fusion and Kalman Filtering
25.1 Start With the Measurement Story
Advanced sensing begins when one reading is no longer enough. Start with the real claim - smoother position, better anomaly evidence, or more robust context - then decide whether filtering, fusion, or a Kalman model earns its complexity.
25.2 Field Sensors Fail Differently
Maria, an agricultural IoT engineer, was frustrated. Her soil moisture sensors worked perfectly in the lab—readings were stable, accurate, and repeatable. But three months after deploying them across a vineyard in Napa Valley, farmers started complaining: “The readings wander around even when it hasn’t rained in weeks!”
After days of debugging, Maria discovered something that surprises many engineers: averaging more samples doesn’t always help. Her sensors suffered from a phenomenon called 1/f noise, where longer measurement windows actually captured more low-frequency drift, not less. The solution wasn’t more averaging—it was smarter signal processing and combining multiple sensors together.
This chapter takes you on the journey from lab-perfect sensors to field-reliable systems. You’ll learn why some noise defies averaging, how combining sensors makes them stronger than any individual sensor, and what it takes to build sensing systems that work reliably for years in harsh real-world conditions.
25.3 Why This Matters
These aren’t just academic concepts—they’re the foundation of technology you use every day:
- Your smartphone’s GPS uses Kalman filtering to maintain position when walking through urban canyons
- Fitness trackers fuse accelerometer + gyroscope + barometer for accurate step and floor counting
- Self-driving cars combine 10+ sensor types using advanced fusion algorithms
- Industrial IoT saves millions in maintenance by detecting sensor drift before failures occur
Understanding these principles separates hobbyist projects from production-ready systems.
25.4 In 60 Seconds

Phoebe’s Why
This chapter’s brief for “sensor transduction physics” does not fit literally – averaging and fusion sit downstream of whatever transducer already turned Maria’s soil moisture into a voltage. The physics that actually belongs here is the noise-averaging law behind Maria’s mystery: independent, zero-mean noise samples partially cancel when you average them, which is exactly why white noise shrinks as \(1/\sqrt{N}\). 1/f noise fails to cancel the same way because its power is concentrated at low frequencies – averaging longer moves your measurement window deeper into exactly the frequency band where the noise is worst, not better averaged out. The corner frequency is simply the point where those two noise sources are equally loud; past it, more samples buy you almost nothing.
The Derivation
Variance of the mean for \(N\) independent white-noise samples (central-limit-theorem result), giving the familiar improvement factor:
\[\sigma_{mean} = \frac{\sigma}{\sqrt{N}} \quad\Rightarrow\quad \text{improvement} = \sqrt{N}\]
1/f (“pink”) noise power spectral density, normalized so it equals the white floor \(S_0\) exactly at the corner frequency \(f_c\):
\[S_{1/f}(f) = S_0\frac{f_c}{f}\]
An averaging window of length \(T\) has an effective bandwidth near \(1/(2T)\); requiring that bandwidth to stay above the corner (so white noise, not drift, dominates) sets the maximum useful window:
\[\frac{1}{2T} \ge f_c \quad\Rightarrow\quad T \le \frac{1}{2f_c}\]
Worked Numbers: This Chapter’s Own Averaging Table And 0.5 Hz Quiz
- White-noise column, independently re-derived: \(\sqrt{10}=3.16\times\), \(\sqrt{100}=10.0\times\), \(\sqrt{1{,}000}=31.6\times\), \(\sqrt{10{,}000}=100\times\) – an exact match to this chapter’s own “White Noise Result” column, confirming the \(1/\sqrt{N}\) law is doing the work there.
- Corner-frequency window rule, independently re-derived from the equal-power argument above: for this chapter’s own knowledge-check sensor (\(f_c=0.5\) Hz), \(T\le1/(2\times0.5)=1.00\) s – an exact match to the chapter’s own stated “optimal window is about 1 second,” now with the physics reason attached instead of a bare rule of thumb.
- Applying the same rule to this chapter’s own 1/f-corner table: a MEMS accelerometer at the low end of its 1-10 Hz corner range caps useful averaging at \(T\le1/(2\times1)=0.500\) s; at the high end, \(T\le1/(2\times10)=0.0500\) s – a \(10\times\) tighter window, which is exactly why that row’s advice is to check the exact datasheet corner rather than use one number for every MEMS part.
- The “with 1/f noise” ceiling values in this chapter’s table (5x, 6x, 6x) are the widget’s own illustrative smoothing curve, not a direct integral of \(S_{1/f}\); they are qualitatively consistent with the saturation this derivation predicts, but this panel does not claim to re-derive those exact multipliers.
25.5 Key Concepts
- MEMS Sensors: Micro-Electro-Mechanical Systems sensors fabricated using semiconductor processes; combine mechanical sensing elements with signal conditioning electronics on a single chip, enabling miniature low-cost accelerometers, gyroscopes, and pressure sensors
- Piezoelectric Effect: The generation of electrical charge in a material when mechanical stress is applied; used in vibration sensors, ultrasonic transducers, and force sensors; also works in reverse (electrical voltage causes mechanical strain)
- Hall Effect Sensor: Produces a voltage proportional to a perpendicular magnetic field; used for contactless current sensing, position detection, and rotary encoders — immune to wear unlike mechanical contacts
- Time-of-Flight (ToF) Sensor: Measures distance by timing the round-trip of a laser or ultrasonic pulse; lidar ToF sensors achieve millimeter resolution; more accurate than ultrasonic and unaffected by ambient sound levels
- Capacitive Sensing: Measures changes in capacitance caused by proximity, touch, or dielectric variation; used in soil moisture sensors, proximity switches, touch screens, and liquid level detection without direct contact
- Thermal Imaging Array: A grid of thermopile elements producing a 2D temperature map; the MLX90640 (32x24 pixel) provides room-scale thermal images for occupancy detection and predictive maintenance
- Load Cell: A strain-gauge-based transducer converting mechanical force to electrical signal; requires Wheatstone bridge excitation and instrumentation amplification; typical resolution 0.01% of full scale
- Electrochemical Gas Sensor: Uses oxidation/reduction reactions at electrodes to produce current proportional to gas concentration; used for CO, NO2, and other toxic gases; requires periodic calibration and has limited operating lifetime
Learning Objectives
After completing this chapter, you will be able to:
- Identify 1/f noise in sensor data and explain why it limits long-term averaging effectiveness
- Design multi-sensor fusion architectures that outperform individual sensors
- Implement Kalman filtering algorithms for optimal state estimation
- Construct robust sensing systems with error handling, redundancy, and watchdog recovery for production deployment
25.6 What Makes This Advanced
When you move beyond hobby projects to building real-world sensor systems, new challenges appear that textbooks often skip over. Here’s the key insight:
Lab sensors work. Field sensors fail. The difference isn’t the sensor—it’s understanding the hidden problems:
- Drift over time: Your temperature sensor slowly “forgets” its calibration, like a watch that loses minutes each day
- Noise that doesn’t average away: Some noise (called “1/f noise”) actually gets worse with longer measurements
- Single-sensor blindspots: GPS doesn’t work indoors; accelerometers drift; barometers shift with weather
The solution? Combine sensors intelligently (sensor fusion) and build systems that detect and recover from failures automatically.
Think of it like asking several witnesses to describe the same car accident. Each person saw it from a different angle and might have missed details—but by combining their accounts, you get a more complete and accurate picture than any single witness could provide. That’s sensor fusion.
25.7 Meet the Sensor Squad
Throughout this chapter, Sammy the Sensor, Max the Microcontroller, Lila the LED, and Bella the Battery will help explain these tricky concepts in fun ways! Look for their special boxes at the end of the chapter.
Sneak peek: Sammy discovers that the longer he averages his readings, the LESS it helps! Max explains it’s because of something called “1/f noise” (pronounced “one-over-f”). And the whole squad learns how working TOGETHER as a team (sensor fusion!) makes them stronger than any one friend alone.
Skip to the end to meet the full Sensor Squad story!
25.8 Prerequisites
Before diving in, make sure you’re comfortable with:
- Signal Processing Fundamentals: Filtering techniques and noise characteristics
- Calibration Techniques: Error sources and correction methods
If terms like “low-pass filter” or “calibration offset” feel unfamiliar, review those chapters first—this chapter builds directly on those concepts.
25.9 Quick Prerequisite Check
Test your readiness for this chapter with these quick questions:
- What does a low-pass filter do? → Allows slow changes through, blocks rapid fluctuations (noise)
- Why do we calibrate sensors? → To correct systematic errors like offset and gain drift
- What is sensor noise? → Random variations in readings that don’t reflect the actual measured quantity
If you answered all three correctly, you’re ready! If not, consider reviewing the prerequisite chapters first.
25.9.1 Chapter Roadmap
This overview covers the two ideas every later technique depends on, then points to focused child chapters for implementation and production work.
| Part | Topic | Key Question |
|---|---|---|
| Part 1 | 1/f Noise | Why doesn’t more averaging always help? |
| Part 2 | Sensor Fusion | How do we combine imperfect sensors? |
| Dig deeper | Kalman Implementation | How does the prediction-update estimator work in code? |
| Dig deeper | Production Validation | How do we make fusion reliable in the field? |
Let’s begin with the mystery that stumped Maria.
25.10 Part 1: The 1/f Noise Problem
Let’s start with the mystery Maria encountered: why doesn’t more averaging always help?
25.10.1 When Averaging Fails on 1/f Noise
You’ve probably learned that averaging reduces noise. Take 100 readings, average them, and you get a result that’s 10× cleaner (√100 = 10). This works beautifully for “white noise”—the random fluctuations that are equally likely at any frequency.
But here’s what the textbooks often skip: not all noise is white noise.
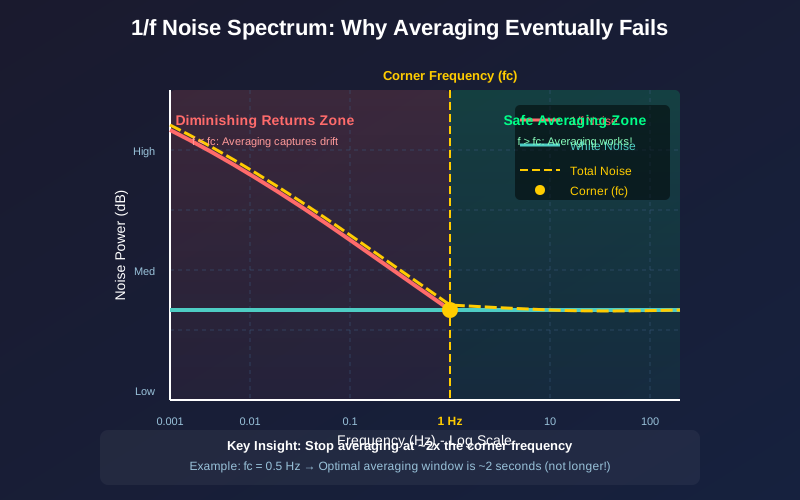
1/f noise (also called “pink noise” or “flicker noise”) behaves differently. Its power increases at lower frequencies, which means slow, wandering drift dominates over long time periods. And here’s the frustrating part: when you average over longer windows, you’re actually capturing more of this low-frequency drift, not averaging it away.
25.10.2 How 1/f Noise Affects Your Sensors
The impact is counterintuitive: short-term averaging works exactly as expected (10 samples gives you ~3× improvement), but long-term averaging hits a wall. At some point, taking more samples stops helping—and can even make things worse as you capture slow baseline drift.
Let’s put numbers to this. Imagine you’re averaging temperature readings:
| Averaging Window | White Noise Result | With 1/f Noise |
|---|---|---|
| 10 readings | 3.2× cleaner | 3.0× cleaner |
| 100 readings | 10× cleaner | 5× cleaner |
| 1000 readings | 31.6× cleaner | 6× cleaner (barely improved!) |
| 10000 readings | 100× cleaner | 6× cleaner (no more improvement!) |
See the pattern? With strong 1/f noise, you hit diminishing returns much sooner than expected.
25.10.3 1/f Corner Frequency
Every sensor has a “1/f corner frequency”—the frequency where 1/f noise equals the white noise floor. Below this frequency, 1/f noise dominates and averaging becomes ineffective.
| Sensor Type | Typical 1/f Corner | What This Means |
|---|---|---|
| MEMS accelerometer | 1-10 Hz | Check datasheet; avoid averaging below your sensor’s corner frequency |
| Thermistor | 0.1-1 Hz | 1-5 second averages are optimal (check your device’s corner) |
| Photodiode | 100-1000 Hz | Must sample at 2× the corner frequency or higher (200 Hz to 2 kHz depending on device) |
| Gas sensor | 0.01 Hz | Long-term drift is expected and unavoidable |
The practical rule: Stop averaging at roughly 2× the corner frequency. For a sensor with a 0.5 Hz corner, 2× the corner = 1.0 Hz, so averaging for more than ~1 second (1/1.0 Hz) provides no additional benefit.
25.10.4 Fighting Back: Mitigation Strategies
So what can you do? Here are four proven techniques, ordered from simplest to most sophisticated:
1. Know when to stop averaging. Check your sensor’s datasheet for the 1/f corner frequency. If it’s not listed, measure it experimentally by computing the Allan variance at different averaging times.
2. Use high-pass filtering. Remove DC and very-low-frequency components before your measurement. This cuts out the 1/f-dominated frequencies.
25.11 Optional High-Pass Filter Pattern
# Simple high-pass filter to remove DC drift
alpha = 0.99  # Cutoff tuning parameter
filtered = 0.0
previous_reading = sensor.read()

while True:
    new_reading = sensor.read()
    filtered = alpha * (filtered + new_reading - previous_reading)
    previous_reading = new_reading
3. Apply chopping/modulation. Periodically reverse the sensor’s polarity or bias, then subtract alternate readings. This moves your signal above the 1/f corner frequency where noise is well-behaved.
4. Use correlated double sampling. Take two measurements under different conditions (e.g., with and without excitation), then subtract. The 1/f noise, being correlated between samples, largely cancels out.
25.12 Explore 1/f Noise and Averaging
Use this simulation to see how averaging window size affects noise reduction. Drag the sliders and watch how 1/f noise limits long-term averaging!
25.13 When One Sensor Is Not Enough
Now that you understand why individual sensors have inherent limitations (noise that doesn’t average away, drift over time, blind spots in certain conditions), let’s explore a powerful solution: combining multiple sensors to create something stronger than any individual sensor.
This is called sensor fusion, and it’s the secret behind everything from smartphone navigation to self-driving cars.
25.13.1 Single-Sensor Problem
Let’s be honest about what individual sensors can’t do:
| Sensor | What It’s Good At | Where It Fails |
|---|---|---|
| GPS | Absolute position outdoors | Doesn’t work indoors; multipath in urban canyons |
| Wi-Fi RSSI | Works indoors | ±5-8m accuracy; affected by people moving |
| Barometer | Altitude/floor detection | Drifts with weather; no horizontal info |
| Accelerometer | Detecting motion | Drifts over time; can’t tell position |
| Gyroscope | Smooth rotation tracking | Drifts; no absolute reference |
| Magnetometer | Compass heading | Distorted by metal, electronics |
Notice a pattern? Each sensor has complementary weaknesses. GPS drifts indoors where Wi-Fi works. Accelerometers drift over time where GPS provides corrections. Barometers give altitude that GPS struggles with in urban environments.
The insight: Instead of trying to build a perfect single sensor (impossible), combine imperfect sensors that fail in different ways.
25.13.2 Sensor Fusion: The Core Idea
Remember the witness analogy from the introduction? Each witness sees a different angle of the same event. No single witness is complete, but by weighing each account based on what they could reliably observe, you reconstruct reality more accurately than any individual could. Sensor fusion applies this same principle to electronic measurements:
25.14 Fusion Rule of Thumb
Best estimate = weighted combination of GPS, Wi-Fi, barometer, accelerometer, gyroscope, and magnetometer readings.
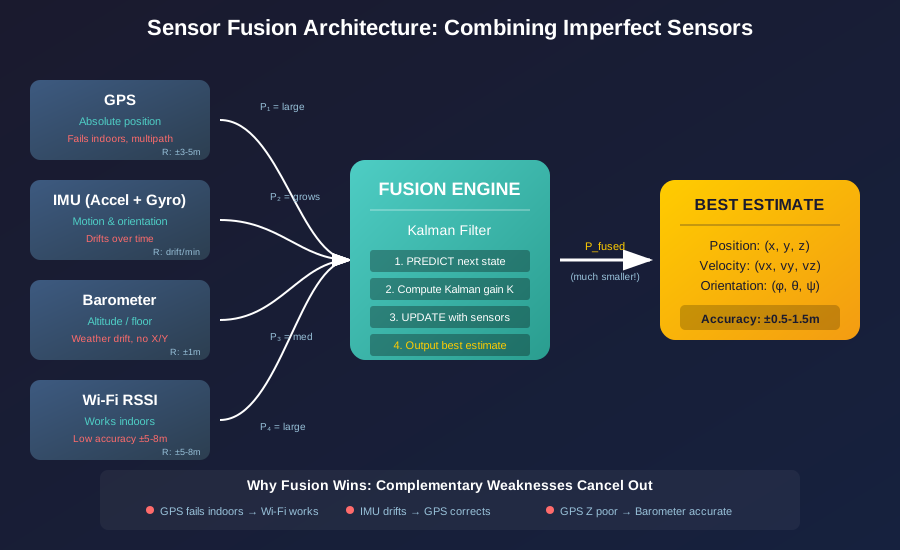
The key is figuring out the right weights—how much to trust each sensor at each moment. That’s where the Kalman filter comes in.
25.15 Continue: Kalman Filtering
The Kalman material is now a focused child chapter instead of a second mini-chapter inside this page.
- Kalman filtering and position fusion: prediction-update steps, MicroPython and Arduino examples, tuning tools, GPS plus IMU fusion, and Kalman gain practice.
25.16 Continue: Production Sensor Systems
Production validation is now a focused child chapter so field reliability, validation simulators, complementary-filter tuning, and deployment failure modes can be read without expanding this overview.
- Production sensor fusion and validation: lab-to-field degradation, validation rules, strategy selection, complementary filters, production pitfalls, and practice activities.
25.17 Summary
Key advanced sensor takeaways:
- 1/f noise limits long-term averaging - Know the corner frequency before choosing an averaging window.
- Sensor fusion beats single sensors - Combine complementary measurements rather than trusting one noisy or drifting channel.
- Kalman filtering is the next implementation step - Use the child chapter when you need prediction-update code and gain tuning.
- Production systems need validation - Use the production child chapter when a sensor result can drive action, alerts, or maintenance.
25.18 You Might Also Like
| If you enjoyed… | Explore… | Why |
|---|---|---|
| 1/f Noise | Signal Processing Essentials | Learn frequency-domain thinking |
| Sensor Fusion | Kalman filtering and position fusion | Implement the estimator path |
| Production Systems | Production sensor fusion and validation | Validate real deployments |