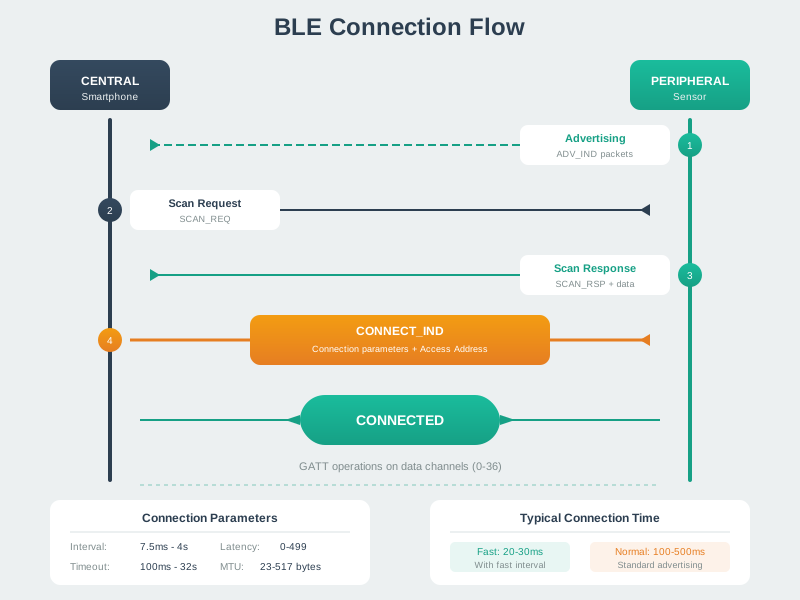
Everything in Building BLE Apps on ESP32 works on the bench. This chapter is about the day it does not: notifications that never arrive, connections that eat the battery, payloads that silently truncate. Each war story ends with the evidence that would have caught it — and the internals section explains what the stack was doing all along.
Phoebe’s Field Notes: The mAh-to-Runtime Chain, and Where It Sags
Phoebe’s Why
A coin cell’s mAh rating is a charge budget, not an energy budget, and definitely not a promise about the voltage you will see mid-pulse. Charge just counts electrons in and electrons out; multiply it by the cell’s voltage and you get the energy budget in Wh. But the voltage is not fixed – every real cell has an internal resistance, so a current spike like a 15 mA BLE transmit burst pulls the terminal voltage down for the length of the pulse, and that sag gets worse as the cell empties and its internal resistance climbs. A firmware bug that quietly leaves the radio drawing milliamps instead of microamps during “sleep” does not show up as a crash – it shows up months later as a battery that died in days instead of months.
Widget defaults: 100 ms interval, 15 mA TX current, 500 \(\mu\)s TX duration, 5 \(\mu\)A sleep, 225 mAh cell \(\to\) duty \(= 500\mu s/100ms = 0.500\%\)
Average current:\(I_{\mathrm{avg}} = 15(0.005) + 0.005(0.995) = 0.0800\) mA \(\to\) runtime \(= 225/0.0800 = 2814\) h \(= 117\) days
Energy budget (3.0 V nominal coin cell, catalog-typical): \(E = 0.225\text{ Ah} \times 3.0\text{ V} = 0.675\) Wh
Voltage sag on the TX pulse (10 \(\Omega\) fresh-cell \(R_{\mathrm{int}}\), catalog-typical): \(\Delta V = 0.015\text{ A}\times10\,\Omega = 0.150\) V, about \(5.00\%\) of 3.0 V – survivable fresh, but \(R_{\mathrm{int}}\) can climb past 100 \(\Omega\) near end of discharge, where the same pulse would sag over 1.5 V and could brown out the radio
The Mistake 8 bug, quantified: replacing the 5 \(\mu\)A sleep current with the chapter’s measured $$8 mA leak gives \(I_{\mathrm{avg}} = 15(0.005)+8(0.995) = 8.04\) mA \(\to\) runtime \(= 225/8.04 = 28.0\) h \(= 1.17\) days – a $\(100\)$ collapse in battery life from one missing shutdown call, straight out of the same average-current formula
16.2 When It Breaks in the Field
Most BLE bugs are not random. They come from a mismatch between what the code assumes and what the protocol actually agreed to do. These are the war stories to keep nearby when a demo works once and then fails on a different phone, in a different room, or with a larger payload.
16.2.1 War story: notifications never arrive
Mistake 1: Forgetting to Enable Notifications
Problem: Code connects to BLE device but doesn’t receive updates.
Cause: Notifications require writing to CCCD descriptor.
Wrong:
// Only reads once, no updatesvalue = characteristic.read();
Correct:
// Enable notifications via CCCDcharacteristic.getDescriptor(BLEUUID((uint16_t)0x2902))->writeValue((uint8_t*)"\x01\x00",2,true);// Now notifications will arrive in callback
16.2.2 War story: the connection is too fast, too slow, or too expensive
Mistake 2: Connection Interval Mismatch
Problem: Battery drains quickly or response is too slow.
Cause: Using default connection interval without optimization.
Application
Recommended Interval
Game controller
7.5-15ms
Fitness tracker
100-200ms
Temperature sensor
1000-4000ms
Fix: Request appropriate connection parameters after connecting.
Try It: BLE Connection Interval Power Estimator
See how connection interval affects battery life. Shorter intervals mean faster response but higher power consumption — find the right balance for your application.
The field failure rarely says “Bluetooth is broken.” It says notifications stopped, the battery collapsed, the MTU was too small, the connection interval drifted, or the lab trace no longer matches the installed device.
Use this chapter as a debugging trail. Reproduce one symptom, capture the radio and application evidence, change one variable, and keep the smallest explanation that makes the deployed behavior understandable.
16.3.1 War story: the payload grows past the default MTU
Mistake 3: MTU Size Assumptions
Problem: Large data packets get truncated.
Cause: Default MTU is only 23 bytes (20 payload).
Fix: Negotiate larger MTU after connection:
// Request MTU exchangeBLEDevice::setMTU(247);// Request 247 bytes// Actual MTU may be less based on negotiation
Common Mistake: Using Default MTU Size for Large Sensor Payloads
The Mistake: Sending sensor data packets larger than 20 bytes without negotiating a larger MTU (Maximum Transmission Unit), causing data truncation, protocol errors, or silent packet loss. This often manifests as “missing bytes” or “corrupted readings” that work fine in testing with short payloads but fail in production with full data.
Why It Happens: The default BLE MTU is only 23 bytes (20 bytes usable payload after 3-byte ATT header overhead). Developers test with simple sensor values (2-4 bytes) that fit easily, then add more features (timestamps, multiple readings, metadata) pushing total payload to 30-50 bytes without realizing MTU negotiation is required.
Real-World Impact:
Scenario: Environmental sensor sends combined reading:
- Temperature: 2 bytes (int16)
- Humidity: 2 bytes (uint16)
- Pressure: 4 bytes (uint32)
- Timestamp: 4 bytes (uint32_t)
- Battery: 1 byte (uint8)
- Device ID: 6 bytes (MAC address)
Total: 19 bytes ✓ (fits in default 20-byte MTU)

Then you add:
- CO2 level: 2 bytes
- Light intensity: 2 bytes
Total: 23 bytes ✗ (exceeds 20-byte payload!)

Result without MTU negotiation:
- First 20 bytes transmitted
- Last 3 bytes silently dropped
- Light intensity always reads 0
- Hours of debugging "sensor malfunction"
The Fix: Always negotiate MTU after connection establishment:
// ESP32 Example: Request larger MTUvoid on_connected(uint16_t conn_handle){// Request 247 bytes (maximum for BLE 4.2+) esp_ble_gattc_send_mtu_req(conn_handle,247);// Wait for MTU exchange callback before sending data! mtu_negotiated =false;}void on_mtu_exchanged(uint16_t conn_handle,uint16_t mtu){ Serial.printf("MTU negotiated: %d bytes\n", mtu); effective_mtu = mtu; max_payload = mtu -3;// Subtract ATT header mtu_negotiated =true; Serial.printf("Max payload: %d bytes\n", max_payload);// NOW safe to send large packets}// Only send when MTU is readyvoid send_sensor_data(){if(!mtu_negotiated){ Serial.println("ERROR: Attempted to send before MTU negotiation!");return;}if(payload_size > max_payload){ Serial.printf("ERROR: Payload %d exceeds MTU %d\n", payload_size, max_payload);return;} pCharacteristic->setValue(data, payload_size); pCharacteristic->notify();}
Alternative: Chunking Strategy (if MTU negotiation fails):
// Fallback for devices that won't negotiate larger MTUvoid send_large_data_chunked(uint8_t* data,size_t total_len){constsize_t CHUNK_SIZE = max_payload -2;// Reserve 2 bytes for sequencefor(size_t offset =0; offset < total_len; offset += CHUNK_SIZE){size_t chunk_len = min(CHUNK_SIZE, total_len - offset);// Packet format: [sequence_number] [chunk_data]uint8_t packet[max_payload]; packet[0]= offset / CHUNK_SIZE;// Chunk sequence packet[1]=(offset + chunk_len >= total_len)?1:0;// Last chunk flag memcpy(&packet[2], data + offset, chunk_len); pCharacteristic->setValue(packet, chunk_len +2); pCharacteristic->notify(); delay(20);// Allow time for transmission}}
Key Insight: The 23-byte default MTU is a BLE legacy constraint. Always negotiate MTU to 247 bytes (BLE 4.2+) immediately after connection. If you forget, your application will work fine until you exceed 20 bytes, then fail mysteriously.
Try It: BLE MTU Payload Calculator
Build your sensor payload by toggling fields on/off. See if your total fits within the default BLE MTU or if you need to negotiate a larger one.
Show code
viewof mtu_negotiated = Inputs.select([23,65,128,185,247], {value:23,label:"Negotiated MTU (bytes)"})
{const sizes = {"Temperature (2B int16)":2,"Humidity (2B uint16)":2,"Pressure (4B uint32)":4,"Timestamp (4B uint32)":4,"Battery (1B uint8)":1,"Device ID (6B MAC)":6,"CO2 level (2B uint16)":2,"Light (2B uint16)":2,"GPS lat (4B float)":4,"GPS lon (4B float)":4 };const attHeader =3;const maxPayload = mtu_negotiated - attHeader;const total = mtu_fields.reduce((s, f) => s + (sizes[f] ||0),0);const fits = total <= maxPayload;const defaultFits = total <=20;const fieldList = mtu_fields.map(f =>`<span style="display:inline-block;padding:2px 8px;margin:2px;border-radius:3px;background:${fits ?"#d5f5e3":"#fce4e4"};font-size:12px;">${f.split("(")[0].trim()}${sizes[f]}B</span>`).join("");returnhtml`<div style="background:#f8f9fa;padding:1rem;border-radius:8px;border-left:4px solid ${fits ?"#16A085":"#E74C3C"};margin-top:0.5rem;"> <p style="margin:0 0 6px;font-size:13px;"><strong>Selected fields:</strong> ${fieldList}</p> <table style="width:100%;border-collapse:collapse;font-size:13px;margin-top:8px;"> <tr><td style="padding:3px;">Total payload</td><td style="padding:3px;text-align:right;font-weight:bold;">${total} bytes</td></tr> <tr><td style="padding:3px;">ATT header overhead</td><td style="padding:3px;text-align:right;">3 bytes</td></tr> <tr style="border-top:1px solid #dee2e6;"><td style="padding:3px;">Total on wire</td><td style="padding:3px;text-align:right;font-weight:bold;">${total + attHeader} bytes</td></tr> <tr><td style="padding:3px;">MTU capacity (${mtu_negotiated}B)</td><td style="padding:3px;text-align:right;">${maxPayload} bytes payload</td></tr> </table> <div style="margin-top:8px;padding:6px 10px;border-radius:4px;background:${fits ?"#d5f5e3":"#fce4e4"};font-size:13px;">${fits?`✓ <strong style="color:#16A085;">Fits!</strong> ${maxPayload - total} bytes remaining.`:`✗ <strong style="color:#E74C3C;">Exceeds MTU by ${total - maxPayload} bytes!</strong> ${mtu_negotiated ===23?"Negotiate larger MTU or remove fields.":"Increase MTU or split into chunks."}`}${!defaultFits && mtu_negotiated ===23?`<br><span style="color:#E67E22;">⚠ This payload requires MTU negotiation — default 23-byte MTU only allows 20 bytes of payload.</span>`:""} </div> </div>`;}
Common Pitfalls
Four traps that account for most avoidable BLE field failures. Each panel below names the trap — expand it for why it bites and the concrete fix.
Using Bluedroid When NimBLE is Sufficient
ESP32’s Bluedroid BLE stack requires ~120 KB RAM; NimBLE requires only ~40 KB. For IoT sensor projects that only need BLE (no Classic Bluetooth), using Bluedroid wastes 80 KB of RAM that could be used for application buffers. Select NimBLE via menuconfig (CONFIG_BT_NIMBLE_ENABLED=y) unless Classic Bluetooth profiles (A2DP, HFP) are required.
Blocking the BLE Event Loop
BLE event handlers (NimBLE ble_hs_cfg.sync_cb, gap_event_cb) run in the NimBLE host task context. Calling blocking operations (vTaskDelay, I2C sensor reads) inside these handlers blocks all BLE protocol processing, causing connection timeouts. Dispatch application work to a separate FreeRTOS task using xQueueSend() and return immediately from BLE callbacks.
Forgetting to Deinitialize BLE Before Deep Sleep
Entering ESP32 deep sleep without calling ble_hs_stop(), nimble_port_stop(), nimble_port_deinit(), and esp_bt_controller_disable() causes the BLE controller to consume ~8 mA during sleep instead of ~10 µA. Always perform a clean BLE shutdown sequence before calling esp_deep_sleep_start() and re-initialize the stack upon wakeup if connections are needed.
Setting BLE_SM_IO_CAP_NO_INPUT_NO_OUTPUT (Just Works pairing) for a device that stores sensitive user data provides zero MITM protection. Just Works pairing generates an unauthenticated LTK that any BLE central can establish without user confirmation. For devices handling health, financial, or access-control data, require at minimum Passkey Entry (IO_CAP_DISP_ONLY or IO_CAP_KEYBOARD_ONLY) with MITM protection flag.
Check: BLE MTU Negotiation
When these failures are under control, the build starts looking like a product rather than a lab. The closing sections keep the same ideas but ask the production questions: power, security, evidence, and what to study next.
16.4 Under the Hood: Parameters, Payloads, and Internals
The war stories above diagnose a working build from the outside. This section is for the reader who wants to know what the stack is really doing — the parameter coupling behind connection timing, and the full lab and code notes behind the build in BLE App Development on ESP32.
16.4.1 Connection Parameter Evidence and Timeout Bounds
The connection-interval mistake above is not only a battery problem; it is a parameter-coupling problem. Once a central accepts a BLE connection, review the granted connection interval, peripheral latency, supervision timeout, negotiated MTU, notification rate, and disconnect reason from the same run. A demo that connects once does not prove that the chosen values meet the product’s latency, battery, and recovery claims.
BLE implementation evidence should record the transition from advertising into a connection, then capture the granted interval, latency, timeout, MTU, and observed GATT behavior for the same test run.
Peripheral latency is useful because it lets a device keep a short interval available for central-initiated work while sleeping through idle events. For example, a 50 ms interval with latency 4 gives a worst idle listening gap of about (1 + 4) x 50 ms = 250 ms, before application processing and phone scheduling are added. A 1 s interval with latency 9 gives about (1 + 9) x 1 s = 10 s, which can fit a slow environmental sensor but would feel broken for a lock, controller, or vibration alarm.
The supervision timeout must cover the longest legal silence, not the average report period:
supervision_timeout > (1 + peripheral_latency) x connection_interval x 2
With interval 30 ms and latency 4, the bound is (1 + 4) x 30 ms x 2 = 300 ms, so a 2 s supervision timeout is valid and a 200 ms timeout is not. With interval 1 s and latency 9, the bound is 20 s; a 10 s timeout detects loss sooner, but it is invalid for that latency. This is the hidden reason slow sensors often need long supervision timeouts when they also use high latency.
Change
Evidence to retest
Raise peripheral latency to save power
Recalculate the timeout bound and log granted latency, timeout, and disconnect reason.
Shorten connection interval for faster control
Rerun current-budget and responsiveness measurements using the granted interval.
Negotiate a larger MTU for batched sensor data
Wait for the MTU callback, subtract the 3-byte ATT header, and verify notification chunking.
Move from lab phone to production central
Record the central-granted parameters, because mobile and gateway hosts may reject requested values.
16.4.2 Folded Lab Notes: Sensor Beacon and Deployment Tuning
Use the existing GATT server lab as the foundation for a sensor beacon extension:
Lab element
Implementation note
Why it matters
Environmental Sensing service
Use standard UUID 0x181A and Temperature characteristic 0x2A6E where the data format fits.
Standard services make generic BLE apps and gateways easier to integrate.
Battery Service
Add Battery Service 0x180F and Battery Level 0x2A19.
Gateways can alert on low battery without custom parsing.
Notification support
Add a Client Characteristic Configuration Descriptor, such as BLE2902 on ESP32 Arduino examples.
The NOTIFY property alone is not enough; clients must be able to enable notifications.
Custom service
Use a generated 128-bit UUID for proprietary measurements or diagnostics.
Avoid overloading standard services with non-standard payloads.
Data format
Pack multi-byte values in the expected byte order and document scale factors.
Many BLE bugs look like bad sensors but are actually byte order or resolution mistakes.
When the lab moves toward production, tune the radio behavior in three areas.
Payload discipline. Do not send large payloads immediately after requesting a larger MTU; wait for the negotiated MTU event, then subtract the 3-byte ATT header before sizing each write or notification.
Timing choices. Avoid continuous scanning on battery-powered gateways: match scan window and interval to the beacon advertising interval and the discovery latency you can accept. Pick the connection interval from the application latency requirement, then apply peripheral latency for routine sleep — a slow environmental sensor tolerates longer intervals than a lock, controller, or vibration monitor.
Field calibration. Calibrate RSSI in the deployment environment before using it for indoor positioning; a short walk test at known distances usually beats datasheet assumptions. For zone detection, model beacon placement around zone boundaries, not only zone centers — boundary ambiguity often dominates classification error.
16.4.3 Folded Code and Lab Portfolio Notes
Use the scanner, beacon, dashboard, and mesh exercises as a portfolio rather than as isolated demos:
Exercise
Preserve this implementation habit
Review evidence
Python BLE scanner
Handle scan exceptions, disconnects, duplicate advertisements, and adapter permission failures. Avoid synchronous BLE calls inside an event loop.
Error log, retry behavior, and a filtered device list from a real scan.
Arduino or ESP32 beacon
Advertise a clear service UUID, keep the interval realistic, and record the transmit power used for distance estimates.
Advertising packet capture, interval setting, and current draw sample.
Heart-rate or environmental monitor
Use standard services where possible and require the client to enable the CCCD before expecting updates.
Service discovery output and notification callback proof.
Dashboard or positioning lab
Separate RSSI smoothing, calibration samples, and zone classification from the BLE transport code.
Calibration table, known-distance samples, and boundary error notes.
Mesh simulation
Keep relay, friend, and low-power roles explicit so the design does not assume every node can forward traffic.
Node-role map and message path trace.
For throughput and power worked examples, state the negotiated MTU, connection interval, peripheral latency, notification rate, and current budget together. Those parameters interact: a larger MTU can shorten an OTA transfer, but a short connection interval or continuous scanning can erase the battery benefit.