5 Lab: Sensor Application Workflow
sensor application labs, IoT sensor lab, measurement question, sensor setup evidence, calibration comparison, sensor data record, lab troubleshooting
5.1 Start With the Lab Story
A lab starts with one question that can be checked, not with a box of parts. The learner sets up the sensor, records the context, compares the reading to a reference or expected condition, and says exactly what the evidence can and cannot prove.
5.2 In 60 Seconds
A good sensor lab is not a parts list or a deployment fantasy. It is a bounded investigation: ask a measurement question, define safe scope, record setup evidence, compare readings against a reference or expected condition, capture data with units and timestamps, interpret only what the evidence supports, and retest after changes.
This chapter gives a practical lab workflow for sensor-application exercises. Use it to plan, run, troubleshoot, and reflect on a lab without turning a small classroom measurement into an unsupported broad claim.

Phoebe’s Why
This chapter’s own lab questions – “does the distance reading remain plausible” and “does the motion signal match observation notes” – are wave-physics questions wearing lab-report clothes. An ultrasonic distance sensor is not measuring distance directly; it is timing an echo and inverting the speed of sound to get there, and that speed itself depends on the room’s temperature. A motion reading built on the same transducer works because a moving reflector Doppler-shifts the returning echo’s frequency. Both readings can also be fooled by the same physics that makes them work: a second surface can bounce back its own echo, arriving late enough to look like a second, farther object – multipath, in miniature, on a lab bench.
The Derivation
Speed of sound in air depends on temperature:
\[v_{sound} = 331.3 + 0.606\,T\ (^{\circ}\mathrm{C})\ \mathrm{m/s}\]
Echo ranging inverts a round-trip travel time \(t\):
\[d = \frac{v_{sound}\,t}{2}\]
A moving reflector Doppler-shifts the return echo; for a colocated transmitter and receiver, the shift doubles:
\[\Delta f = \frac{2\,v_{target}\,f_0}{v_{sound}}\]
A second reflector at distance \(d_2\) produces its own valid echo at its own delay – the multipath problem is not sensor error, it is a second correct answer to a question the setup did not narrow enough:
\[t_2 = \frac{2 d_2}{v_{sound}}\]
Worked Numbers: A Classroom Ultrasonic Bench
The chapter’s lab questions do not fix a sensor model or bench numbers, so take a standard ultrasonic module (\(f_0 = 40\) kHz) at a classroom temperature of \(22\,^{\circ}\mathrm{C}\).
- Speed of sound: \(v_{sound} = 331.3 + 0.606(22) = 344.6\) m/s
- A 2.00 ms round-trip echo gives \(d = 344.6 \times 0.00200/2 = 0.345\) m (34.5 cm) – a plausible desk-range reading for the “is this reading plausible” check
- A hand waved at \(0.5\) m/s past the sensor gives \(\Delta f = 2(0.5)(40{,}000)/344.6 = 116\) Hz – an audible-band shift the motion-signal claim can be checked against
- Multipath check: a second surface 0.60 m away returns its own echo at \(t_2 = 2(0.60)/344.6 = 3.48\) ms – if the setup’s expected object is only at 34.5 cm (2.00 ms), a 3.48 ms echo is not noise, it is real evidence of a second reflective surface the safe-scope note should name
5.3 Learning Objectives
By the end of this chapter, you will be able to:
- Write a sensor lab question that is narrow enough to test.
- Define safe lab scope, setup evidence, and data quality rules.
- Plan a calibration, reference, or comparison check appropriate for the exercise.
- Record sensor readings with enough context for another learner to review.
- Interpret lab results without overclaiming what the sensor proves.
- Use troubleshooting and retest notes to improve the next lab run.
5.4 Quick Check: Lab Scope
5.5 Minimum Viable Understanding
- Start with a measurement question, not a sensor part or platform.
- Safe scope defines what the lab will and will not test.
- Setup evidence records placement, wiring or connection, configuration, and expected behavior.
- Calibration or comparison evidence explains why readings are credible enough for the exercise.
- A data record needs units, timestamps, sensor identity, validity state, and notes about changes.
- Interpretation should stay within the lab evidence and name the retest trigger.
5.6 Prerequisites
- Applications and Sensors: purpose, measurement need, environment, validation evidence, and maintenance triggers.
- Sensor Hardware Selection: hardware fit, placement, calibration, and data quality.
- Sensor Selection Tools: planning and data checks for sensor decisions.
- Sensor Fundamentals and Types: measured quantities, outputs, and basic sensor behavior.
5.7 Lab Workflow
Every sensor lab should produce a record that another learner can inspect. The workflow below keeps the exercise bounded and evidence-focused.
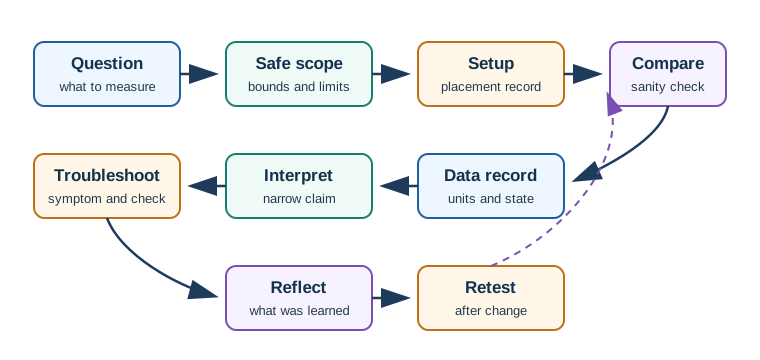
Use Figure 5.1 as the lab sequence:
- State the measurement question.
- Define safe scope and exclusions.
- Record the setup evidence.
- Run a calibration, comparison, or sanity check.
- Capture the data record.
- Interpret the result narrowly.
- Troubleshoot any mismatch.
- Record the retest trigger and reflection.
5.8 Measurement Question
A lab question should connect a physical quantity to a learning decision. It should avoid broad claims such as “monitor a building” or “optimize a city.” Use a small, testable question instead:
- Does this placement represent the air near the work area?
- Does the light reading change when the sensor is moved from shade to direct light?
- Does the distance reading remain plausible across the range used in the exercise?
- Does the motion signal match short observation notes during the lab run?
- Does the data path preserve unit, timestamp, and sensor identity?
A useful question names what is measured, where it is measured, and how the lab will decide whether the reading is usable.
5.9 Safe Scope
Safe scope keeps the exercise practical and prevents content drift. State:
- What sensor, signal, or data path is in scope.
- What environment or bench condition is being tested.
- What is excluded from the claim.
- What handling, mounting, or access constraints apply.
- What action is not allowed because it would be unsafe, invasive, or outside the course exercise.
For example, a lab can compare a room temperature sensor against a reference in a classroom. It should not claim the result proves comfort, health, building performance, or a long-term deployment outcome.
5.10 Setup Evidence
Setup evidence is the record that makes a lab repeatable. Capture:
- Sensor family or module type.
- Controller or phone interface.
- Placement and orientation.
- Connection, wiring, permission, or configuration state.
- Sampling setting or collection interval used for the exercise.
- Initial reading and expected direction of change.
- Any change made during the run.
Do not rely on memory. A short setup note often explains confusing data later.
5.11 Calibration Or Comparison
Calibration in a learning lab may be simple, but it should still be explicit. Choose one method that fits the exercise:
- Compare with a trusted classroom reference.
- Compare against a second sensor under the same condition.
- Check a known low, high, open, closed, still, moving, light, or dark condition.
- Confirm that a value changes in the expected direction when the condition changes.
- Record that no reference is available and treat the result as exploratory.
The point is not to pretend the lab produces universal accuracy. The point is to state how much confidence the evidence supports.
5.12 Data Record
A lab data record should preserve the meaning of each reading.
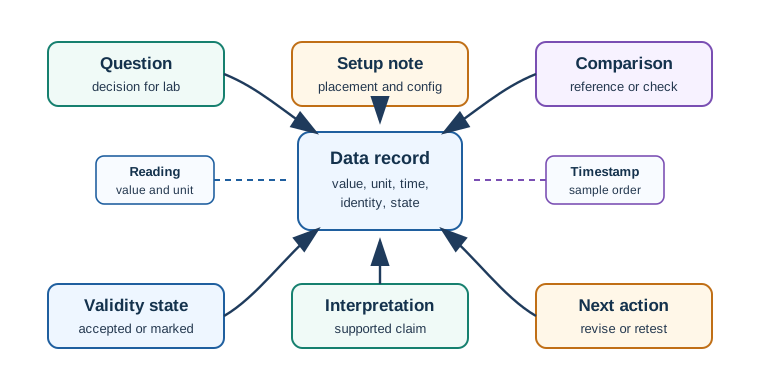
Use Figure 5.2 as a checklist for the record:
- Measurement question.
- Setup note and placement.
- Reference or comparison evidence.
- Reading value and unit.
- Timestamp or sample order.
- Sensor identity or location.
- Validity state: accepted, rejected, missing, stale, or estimated.
- Interpretation and next action.
Avoid data dumps. A smaller set of well-labeled readings is more useful than a long file with missing context.
5.13 Folded Evidence Packet Notes
Every lab should leave an evidence packet that another reviewer can inspect without rerunning the exercise. Include the narrow lab question, setup note, reading record, data-path check, quality state, interpretation, and retest trigger. This packet is especially important when a lab uses a bench sensor, phone sensor, simulated input, or prepared data source, because the same display can hide very different evidence quality.
Preserve troubleshooting as evidence. When a result does not match the expected behavior, keep the symptom, last setup change, reading before and after the change, suspected cause, check result, and next retest step. Unexpected readings are often the best proof that the learner understands the boundary between a demo screen and a reviewable sensor application.
5.14 Interpretation
Interpretation should answer the lab question and stop there. Good interpretations include:
- What the readings support.
- What they do not support.
- Which evidence was strong enough for the exercise.
- Which reading was rejected or uncertain.
- Which setup or collection detail may have biased the result.
- Which change would require a retest.
Example:
The light sensor reading increased when moved from shade to direct light, and timestamps were preserved in the data record. The lab supports the narrow claim that the sensor and data path detected the direction of change in this setup. It does not establish a general illumination model for the room.
5.15 Troubleshooting
Troubleshooting should preserve evidence rather than erase it. When a result does not match the expected behavior, record:
- The symptom.
- The last setup change.
- The reading before and after the change.
- The suspected cause.
- The check that confirmed or weakened the suspicion.
- The next retest step.
Common lab issues include missing units, stale values, swapped channels, loose connections, blocked sensor placement, permission denial, incorrect sample order, unexpected environmental change, or a threshold that does not match the measured quantity.
5.16 Lab Patterns
5.16.1 Placement Check
Question: does the chosen placement represent the condition the lab cares about?
Evidence: photo or note of placement, comparison reading at a nearby reference location, and a short interpretation of what the placement excludes.
5.16.2 Change Detection
Question: does the sensor detect the direction of change expected in the exercise?
Evidence: before-and-after readings with units, timestamps, setup note, and a validity state for each reading.
5.16.3 Data Path Check
Question: does the data path preserve measurement meaning from sensor to record?
Evidence: reading at the sensor, received value, unit, timestamp, identity, and any transformation applied.
5.16.4 Troubleshooting Retest
Question: did a setup change fix the observed problem?
Evidence: symptom, change, before-and-after record, remaining uncertainty, and the next retest trigger.
5.17 Worked Lab Record
Scenario: a learner uses a temperature and humidity module to observe air near a desk during a short exercise.
Measurement question
Does the sensor placement produce readings that plausibly represent air near the desk during the lab run?
Safe scope
The lab checks one indoor setup and one short data record. It does not claim comfort, health, building performance, or long-term stability.
Setup evidence
The sensor is placed near the desk, away from direct airflow and direct sunlight. The controller records value, unit, timestamp, and sensor identity.
Comparison check
The learner compares the first reading with a classroom reference or a second nearby sensor and records whether the values are close enough for the exercise. If no reference is available, the lab marks the reading exploratory.
Data record
The record contains a short sequence of readings with units, timestamps, identity, placement note, and accepted or uncertain state.
Interpretation
The lab supports a narrow observation about the desk-area setup during the exercise. It does not support broader claims about the whole room or future conditions.
Retest trigger
Retest if the sensor is moved, the enclosure changes, the sample setting changes, the reference changes, or the lab question changes.
5.18 Lab Review Checklist
Before submitting a sensor lab, check:
- Is the measurement question stated?
- Is safe scope explicit?
- Are exclusions clear?
- Is setup evidence recorded?
- Is the placement or interface described?
- Is there a calibration, comparison, or sanity check?
- Do readings include units, timestamps, identity, and validity state?
- Are rejected, missing, or uncertain readings marked?
- Does interpretation stay within the evidence?
- Is troubleshooting recorded when the result is unexpected?
- Is the retest or reflection note explicit?
5.19 Knowledge Check
5.20 Matching Quiz
5.21 Ordering Quiz
5.22 Common Mistakes
5.22.1 Starting With A Kit Instead Of A Question
Hardware is easier to evaluate after the measurement question is clear.
5.22.2 Treating A Lab As A Deployment Claim
A classroom or bench result supports a bounded lab observation. It does not prove long-term operation or broad environmental outcomes.
5.22.3 Recording Values Without Context
Values need units, timestamps, identity, placement, and validity state to remain meaningful.
5.22.4 Skipping Comparison Evidence
Even a simple reference or known-condition check helps explain whether readings are plausible for the exercise.
5.22.5 Overwriting Troubleshooting Evidence
Unexpected readings are useful if the record preserves the symptom, change, check, and retest result.
5.22.6 Forgetting Reflection
A short reflection should say what the lab supports, what it excludes, and what would require another run.
A Reading Is Not Evidence Until It Agrees With a Reference
The point of a sensor lab is not to produce a number — any sensor does that — but to show the number can be trusted. The standard way to earn that trust is comparison against a reference: place your device under test right next to a known-good instrument (co-location), record paired readings over the same conditions, and measure how well they agree.
Agreement collapses into two headline numbers. Bias is the average signed difference — a systematic offset that says the sensor reads consistently high or low. RMSE (root-mean-square error) is the typical size of the error, combining the bias and the random scatter into one figure. Together they tell you not just how wrong the sensor is, but what kind of wrong.
Intuition: co-location turns "the sensor seems fine" into a defensible claim. If two sensors sit in the same air and see the same light, any disagreement is the instruments, not the world.
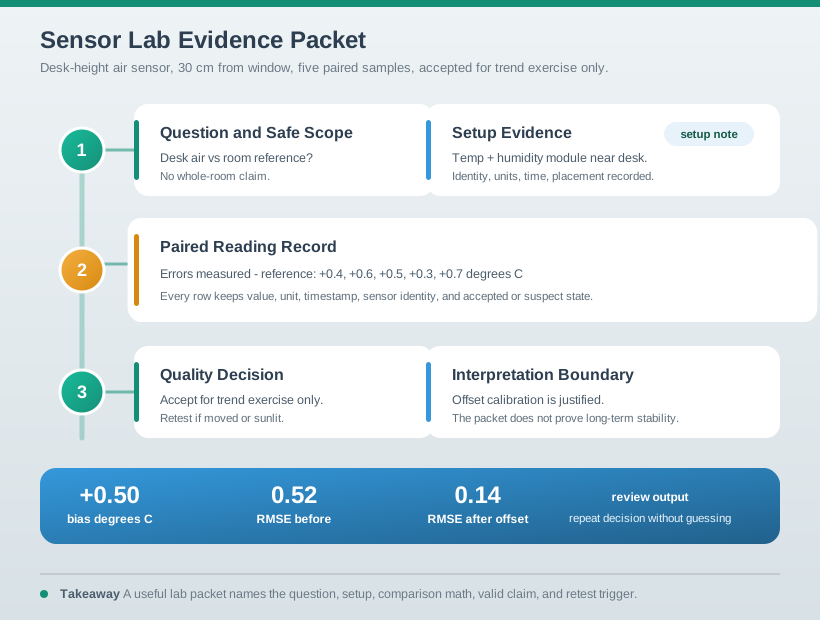
The packet also prevents a common failure mode: a lab that collects many readings but forgets why they were collected. A temperature exercise, for example, might record 23.6, 23.9, and 24.1 degrees C. Those values are not yet evidence. They become evidence only after the record says which sensor produced them, where it was placed, which reference or expected condition was used, whether the samples were accepted or rejected, and what claim the lab is allowed to make from them.
A compact evidence packet is enough for most classroom investigations. One line can hold the question, setup, reference, reading, quality state, and interpretation: "Desk-height air sensor, 30 cm from window, compared with classroom thermometer for five paired samples; mean difference +0.5 degrees C; accepted for trend exercise only; retest if moved or if sunlight reaches the enclosure." That sentence is more useful than a long unlabeled data table because it names the scope and the retest trigger.
Overview Knowledge Check
Bias and RMSE, Worked
From a set of paired readings (measured vs reference), compute the error for each pair, then summarise:
error_i = measured_i - reference_i
bias    = mean(error_i)                       (systematic offset)
RMSE    = sqrt( mean(error_i^2) )             (typical error size)
Worked example: five paired readings
errors (measured - reference): +0.4, +0.6, +0.5, +0.3, +0.7

  bias = (0.4+0.6+0.5+0.3+0.7)/5 = 2.5/5 = 0.50
  squared errors: 0.16, 0.36, 0.25, 0.09, 0.49  (sum 1.35)
  RMSE = sqrt(1.35/5) = sqrt(0.27) = 0.52

Because RMSE (0.52) is barely above the bias (0.50),
almost all the error is a systematic +0.5 offset.
Calibrate that offset out and the residual error is
just sqrt(0.27 - 0.50^2) = sqrt(0.02) = 0.14.
That last step is the payoff: separating bias from scatter tells you a simple zero-offset calibration would cut this sensor's error from 0.52 to 0.14. The lab measurement directly prescribes the fix.
Use the same arithmetic to decide whether a lab result is acceptable for the intended decision. Suppose a light-sensing lab only needs to distinguish "covered" from "uncovered," and the two states differ by 180 lux. An RMSE of 8 lux is probably acceptable for that purpose. If the lab is trying to compare two desk positions that differ by only 10 lux, the same RMSE is too large; the uncertainty is about the same size as the effect. Accuracy is therefore not a universal label. It is judged against the size of the decision the lab wants to make.
Also inspect the paired readings, not just the summary. If the first two samples differ by +0.5 units but later samples differ by +2.0 units, the sensor may be warming up, the reference may have moved, or the environment may not be stable. Mark those rows as suspect, record the setup change, and repeat the comparison after the condition settles. A good lab does not hide awkward samples; it explains why each sample was accepted, rejected, or rerun.
Also fix your sample rate first: sample at more than twice the fastest meaningful change in the signal, and record long enough to capture its real variability — otherwise the errors you compute describe an under-sampled caricature, not the sensor.
Practitioner Knowledge Check
Agreement Is Not Correlation
The decomposition behind those two numbers is exact, and it points to the most common analysis mistake in applied sensing.
Agreement starts with the paired error sequence, not with a trend line. For each row, subtract the reference from the device under test. The mean of those signed errors is the bias. The spread around that mean is the random component. Squaring, averaging, and square-rooting the errors gives RMSE, so a large RMSE can come from a large offset, large random scatter, or both. The distinction matters because each cause leads to a different engineering action: offset calibration, gain correction, better placement, more shielding, slower sampling, or a better sensor.
MSE = bias² + variance
Mean squared error splits cleanly into the squared bias (systematic) plus the variance of the errors (random). This identity is why measuring both lets you predict how much calibration alone can help.
Bland-Altman agreement
Plot each pair's difference against its mean; the limits of agreement are mean_diff ± 1.96 × SD_diff. It reveals whether the error is constant or grows with the measured level (proportional error).
Correlation is a trap
A high R² only says two sensors move together. Two instruments can correlate almost perfectly yet disagree by a fixed scale or offset. Correlation measures association; it does not measure agreement.
Report the error character
"RMSE 0.5, of which 0.5 is bias" is a far more useful lab result than a bare "accurate enough," because it names exactly which correction (offset, gain, or lower noise) the sensor needs.
Bland-Altman style thinking is useful even when a course does not draw the formal plot. If the difference stays near +0.5 across the whole range, the error is probably an offset. If the difference is small at low values and large at high values, the sensor may have a scale error. If the differences widen only after a setup change, the issue may be mounting, temperature, supply voltage, permission state, or a data-path transform. The lab record should connect that pattern to the likely next test.
So a defensible sensor lab does three things a casual one skips: it samples fast enough to see the real signal, it compares against a reference under shared conditions, and it reports agreement as bias and RMSE — never as a correlation coefficient that can look excellent while the two sensors quietly disagree by a constant.
The final report should make the limitation visible. "Reference comparison showed bias +0.5 degrees C and residual scatter 0.14 degrees C after offset correction" is reviewable. "The sensor is accurate" is not. The first statement tells a future learner what was tested, what correction was justified, and what uncertainty remains. The second hides all three, which is why it cannot support a responsible sensor-application claim.
Under-the-Hood Knowledge Check
5.23 Summary
Sensor application labs are evidence exercises. A strong lab record connects the measurement question, safe scope, setup evidence, calibration or comparison, data record, interpretation, troubleshooting, and retest reflection.
Keep claims narrow. The goal is not to prove a broad deployment outcome. The goal is to show that a learner can collect and interpret sensor data responsibly within a defined setup.
5.24 Key Takeaway
Sensor labs should record the measurement setup, calibration assumption, raw observation, transformed result, and limitation of the test.
5.25 Concept Relationships
- Applications and Sensors: defines purpose, measurement need, validation evidence, and maintenance triggers.
- Sensor Hardware Selection: explains how hardware fit, placement, and calibration affect lab evidence.
- Sensor Selection Tools: supports planning and checking sensor data records.
- Sensor Application Architecture: connects sensor readings to application data paths and decisions.
- Mobile Web Sensor Labs: applies similar lab evidence habits to browser-accessible phone sensors.
5.26 What’s Next
Continue to Sensor Selection Tools when you want guided planning checks for sensor data. Use Sensor Application Architecture when the lab result needs to be placed into a larger application data path.