Treat the assessment as a design review. A correct answer should not only name a motor, relay, PWM value, or flyback diode; it should explain the physical action, the driver boundary, the protection, and the evidence that the actuator result is believable.
When a scenario asks what to choose, start from the job: continuous motion, position, switching, alerting, safety, or troubleshooting. Then make the choice that keeps the output path controllable and testable.
In 60 Seconds
This chapter provides a comprehensive self-assessment quiz on actuator concepts, quick reference cards for common actuator specifications and motor driver pinouts, and a troubleshooting guide for diagnosing actuator problems in IoT projects.
Phoebe’s Field Notes: The Same Rounding Law Runs Through Three Different Actuators
Phoebe’s Why
This assessment tests PWM duty cycle, stepper step counting, and servo pulse widths as though they were three unrelated skills, but two of them are the exact same physics wearing different units. An 8-bit PWM timer cannot output “37.5% duty” any more precisely than the nearest of 256 discrete codes; a NEMA 17 stepper cannot land “on” 43.2 degrees, only the nearest 1.8-degree step. Both are uniform quantizers – one quantizes a voltage’s time-average, the other quantizes a shaft’s angle – and both leave behind the identical statistical rounding error once you ask “how far off, on average, is the command from what the actuator actually delivers?” Time sampling (Nyquist) is the third, genuinely separate axis: the servo’s 50 Hz refresh sets how fast a commanded angle profile can change before the actuator simply cannot keep up, which is a completely different limit from either quantizer’s step size.
The Derivation
Rounding a continuous quantity to the nearest of a uniform step \(q\) leaves an error uniform on \([-q/2, q/2]\), whose RMS value is the standard result:
\[\sigma_q = \frac{q}{\sqrt{12}}\]
For an \(N\)-bit PWM timer, \(q = V_{supply}/2^N\), giving the same converter ceiling used for ADCs and DACs:
\[\mathrm{SNR} \approx 6.02N + 1.76\ \text{dB}\]
Separately, refreshing a command at rate \(f_s\) (such as a servo’s frame rate) can only faithfully track motion content up to the Nyquist limit:
Worked Numbers: This Chapter’s Own PWM, Stepper, and Servo Numbers
This chapter’s own 8-bit PWM on its own 12 V motor example:\(q = 12/256 = 46.875\) mV, so \(\sigma_q = 46.875/\sqrt{12} = 13.53\) mV of average-voltage uncertainty on every duty setting, with an ideal ceiling of \(6.02(8)+1.76 = 49.9\) dB.
This chapter’s own NEMA 17 (200 steps/rev, 1.8°/step): treating the true target angle as equally likely anywhere inside one step, \(\sigma_{angle} = 1.8/\sqrt{12} = 0.520^{\circ}\) of open-loop positioning uncertainty – the same law, now measured in degrees instead of volts.
This chapter’s own 28BYJ-48 (2,048 steps/rev): step size \(360/2048 = 0.1758^{\circ}\), so \(\sigma_{angle} = 0.1758/\sqrt{12} = 0.0507^{\circ}\) – roughly \(10\times\) finer than the NEMA 17, quantifying why this chapter recommends it for finer positioning at lower speed and torque.
This chapter’s own 50 Hz servo refresh: by Nyquist, \(f_{max} = 25\) Hz is the fastest angle-profile content a stream of 50 Hz commands can represent without the motion aliasing into a jerky, stair-stepped path – a limit on command smoothness, distinct from either quantizer above and from the driver-circuit (“circuit physics”) question of whether the H-bridge or driver IC can even deliver that update rate.
Key Concepts
Actuator Types Coverage: This assessment covers all major actuator categories: DC motors, servo motors, stepper motors, relays, solenoids, LEDs and visual indicators, buzzers, and their associated driver circuits
Motor Control Concepts: Key concepts tested: PWM for DC motor speed control, pulse width for servo position (1-2 ms), step sequences for stepper motors, H-bridge for direction control, and back-EMF protection with flyback diodes
Driver Circuit Requirements: Assessment questions test the understanding that direct GPIO-to-actuator connections exceed current limits; transistors, MOSFETs, H-bridges, and relay modules are required to interface MCU GPIO to actuators
Safety and Protection Circuits: Questions cover flyback diode placement, current limiting resistors, thermal shutdown, and the rationale for protection circuits in actuator driver designs
PWM Fundamentals: Duty cycle, frequency, and resolution concepts as they apply to motor speed control, LED dimming, and servo positioning; understanding which parameter controls which actuator behavior
Actuator Selection Criteria: Applying selection criteria: torque vs. speed requirements for motors, load current vs. coil voltage for relays, step resolution vs. speed for stepper motors
Feedback and Control Loops: Assessment questions on closed-loop control using position feedback (encoder, potentiometer) versus open-loop control, and when each is appropriate
Sense-Decide-Act Cycle: The fundamental IoT control loop connecting sensor inputs through microcontroller decision logic to actuator outputs; demonstrating understanding of how sensors and actuators work together
Learning Objectives
After completing this chapter, you will be able to:
Evaluate your actuator knowledge through interactive self-assessment quizzes
Interpret quick reference cards to identify correct specifications for common actuators and motor drivers
Diagnose actuator problems using systematic troubleshooting frameworks
Recommend the appropriate actuator type (DC, servo, or stepper motor) for real-world IoT scenarios
Putting Numbers to It
Actuator control decisions are often power-budget decisions. For PWM-driven loads:
\[
P_{\text{avg}} = V \cdot I_{\text{max}} \cdot D
\]
where \(D\) is duty cycle (0 to 1).
Worked example: A 12V motor with 0.5A peak current at 40% duty cycle draws:
Running 2 hours/day consumes \(2.4 \times 2 = 4.8\) Wh/day. At 100% duty cycle it would be 12 Wh/day, so duty-cycle control cuts daily energy by 60% while still delivering usable actuation.
Interactive Calculator:
Show code
viewof voltage = Inputs.range([1,24], {value:12,step:0.5,label:"Supply Voltage (V)"})viewof current = Inputs.range([0.1,5], {value:0.5,step:0.1,label:"Peak Current (A)"})viewof dutyCycle = Inputs.range([0,100], {value:40,step:5,label:"Duty Cycle (%)"})viewof hoursPerDay = Inputs.range([0.1,24], {value:2,step:0.5,label:"Operating Hours per Day"})
Show code
avgPower = voltage * current * (dutyCycle /100)dailyEnergy = avgPower * hoursPerDayfullDutyCyclePower = voltage * currentfullDutyCycleEnergy = fullDutyCyclePower * hoursPerDayenergySavings = fullDutyCycleEnergy >0? ((fullDutyCycleEnergy - dailyEnergy) / fullDutyCycleEnergy *100) :0
Test your understanding of actuators with this auto-graded quiz.
Show code
actuatorQuestions = [ {id:1,question:"You need to control a robot arm that requires precise positioning at specific angles (0, 45, 90, 135 degrees). Which actuator is most appropriate?",choices: ["DC motor with PWM speed control","Servo motor with angle control","Stepper motor with step counting","Relay for on/off control" ],correct:1,explanation:"Servo motors are designed for precise angular positioning, typically 0-180 degrees. They have built-in feedback control that maintains the commanded angle." }, {id:2,question:"Your microcontroller GPIO pin can safely source 20mA at 3.3V. You need to control a 12V DC motor that draws 500mA. What is the correct approach?",choices: ["Connect the motor directly to the GPIO pin","Use a transistor or MOSFET with a separate 12V power supply","Reduce motor voltage to 3.3V to match the GPIO","Use multiple GPIO pins in parallel" ],correct:1,explanation:"GPIO pins cannot drive high-current loads directly. Use a transistor (2N2222, BC547) or MOSFET as a switch with a separate 12V power supply and flyback diode." }, {id:3,question:"A 3D printer uses NEMA 17 stepper motors for precise positioning. What advantage do stepper motors provide over servo motors for this application?",choices: ["Stepper motors are cheaper than servo motors","Stepper motors provide open-loop position control without feedback sensors","Stepper motors run faster than servo motors","Stepper motors consume less power" ],correct:1,explanation:"Stepper motors provide precise position control by counting steps without requiring encoders (open-loop). This simplifies design and reduces cost for applications like 3D printers." }, {id:4,question:"You're controlling LED brightness using PWM at 1kHz with 8-bit resolution (0-255). What duty cycle percentage corresponds to a PWM value of 64?",choices: ["64%","25%","32%","50%" ],correct:1,explanation:"PWM duty cycle = (PWM_value / Max_value) x 100 = (64 / 255) x 100 = 25.1% approximately 25%." }, {id:5,question:"Your ESP32 project controls a relay that switches a 120V AC heater. Why is a flyback diode necessary across the relay coil?",choices: ["To prevent AC voltage from backfeeding into the ESP32","To suppress inductive voltage spike when relay coil is de-energized","To reduce power consumption of the relay","To speed up relay switching time" ],correct:1,explanation:"Relay coils are inductors. When power is cut, the collapsing magnetic field generates a high voltage spike that can destroy transistors or microcontrollers. A flyback diode provides a safe path for this current." }]viewof currentQ = Inputs.range([0, actuatorQuestions.length-1], {step:1,value:0,label:"Question Number"})md`### Question ${currentQ +1} of ${actuatorQuestions.length}${actuatorQuestions[currentQ].question}`
constint pwmFreq =5000;// Frequency in Hzconstint pwmChannel =0;// 0-15 availableconstint pwmResolution =8;// 8-bit = 0-255ledcSetup(pwmChannel, pwmFreq, pwmResolution);ledcAttachPin(GPIO_PIN, pwmChannel);ledcWrite(pwmChannel, dutyCycle);
Formulas:
Duty Cycle (%) = (PWM value / Max value) x 100
Average Voltage = Supply Voltage x Duty Cycle

8-bit PWM:  Max = 255
10-bit PWM: Max = 1023
12-bit PWM: Max = 4095
When your IoT project needs rotational motion, choosing the right motor type is critical for performance, cost, and power efficiency. Use this framework to systematically evaluate your options:
Selection Criterion
DC Motor
Servo Motor
Stepper Motor
Motion Type
Continuous rotation, any direction
Limited rotation (0-180° or 0-360°)
Precise discrete steps
Position Control
None (open-loop)
Built-in (closed-loop)
Step counting (open-loop)
Speed Control
Smooth via PWM
Fixed speed per model
Step rate (slower = more precise)
Holding Torque
None (coasts when off)
Strong (holds position)
Very strong (resists motion when off)
Cost
$2-10 (low)
$5-20 (medium)
$10-40 (higher)
Driver Complexity
Simple (H-bridge)
Very simple (PWM signal)
Moderate (step sequencing)
Power Efficiency
High
Medium
Low (current even at idle)
Typical Current Draw
100-500mA running
100-600mA peak
200-1500mA continuous
Applications
Fans, wheels, pumps
Robot arms, camera gimbals
3D printers, CNC machines
Decision Tree:
Q1: Do you need to control the POSITION of the shaft (not just speed)?
NO → Use DC motor (simplest, cheapest, most efficient for continuous rotation)
YES → Continue to Q2
Q2: Do you need full 360° continuous rotation OR limited angular range (like 0-180°)?
Limited range (0-180° or 0-270°) → Use Servo motor (easiest position control, built-in feedback)
Full 360°+ with position tracking → Continue to Q3
Q3: Do you need to hold position without power or track absolute position indefinitely?
NO (position relative, occasional reset OK) → Use Servo motor with continuous rotation modification
YES (absolute position critical, no position loss allowed) → Use Stepper motor
Real-World Examples:
Example 1: Automated Blinds
Need: Rotate to specific angles (0° = open, 180° = closed) and hold position
Motor Choice: Servo motor (SG90 or MG996R)
Why: Limited rotation range, needs to hold position when off, angle control is primary requirement
Cost: $8 per servo + $3 driver = $11 total
Example 2: Cooling Fan for IoT Gateway
Need: Variable speed to control airflow based on temperature
Motor Choice: DC motor (TT motor or 80mm PC fan)
Why: Continuous rotation, no position control needed, PWM speed control efficient
Cost: $18 high-torque servo + $3 driver = $21 total
Example 5: Robot Wheel Drive
Need: Variable speed forward/backward, turns via differential steering
Motor Choice: DC motor (dual TT motors)
Why: Continuous rotation both directions, speed control via PWM, no position tracking needed
Cost: $6 for 2 motors + $8 L298N H-bridge = $14 total
Common Mistakes to Avoid:
Mistake 1: Using servo for continuous rotation when DC motor suffices - Problem: Servos draw current even when idle to maintain position; DC motors coast to stop and draw zero current - Impact: Battery life 3x shorter with servo for fan application
Mistake 2: Using DC motor when position matters - Problem: No feedback means no way to know if motor reached target position (could stall, slip, or overshoot) - Impact: Blinds system that randomly stops at wrong positions; requires manual reset
Mistake 3: Using stepper for high-speed rotation - Problem: Steppers lose torque at high step rates (>1000 steps/sec) and consume 500mA-1.5A continuously - Impact: 300 RPM fan application uses stepper drawing 800mA when DC motor drawing 150mA would work better
Comparison Summary:
Choose DC motor when:
You need continuous rotation (fans, wheels, conveyor belts)
Speed control is sufficient (no position required)
Power efficiency matters (battery-powered)
Cost is constrained (<$5 per motor)
Choose Servo motor when:
You need angular positioning (0-180° typical)
Holding torque is required (robotic arms, locks)
Feedback control simplifies your code (no encoders needed)
Rotation range limited and predictable
Choose Stepper motor when:
You need precise step-by-step positioning (3D printers, CNC)
Absolute position tracking is critical (no position loss over hours)
High holding torque needed even when not moving
Open-loop precision acceptable (no encoder feedback)
Key Insight: Start with the simplest motor that meets your requirements. DC motors are the default for continuous rotation. Only use servos when you need positioning, and steppers when you need open-loop precision. Over-specifying motors wastes money and power.
13.4 Chapter Summary
Actuators are the hands of IoT systems, converting electrical signals from microcontrollers into physical actions that affect the real world.
13.4.1 Key Takeaways
Motor Types: DC (continuous rotation), Servo (precise angles), Stepper (precise steps)
Driver Circuits: Required for high-current loads (L298N, A4988, transistors)
PWM Control: Enables smooth speed/brightness control by varying duty cycle
Safety: Flyback diodes, current limiting, watchdog timers, fail-safe defaults
Visual/Audio: LEDs, displays, buzzers provide user feedback
13.4.2 Motor Selection Quick Guide
Need
Choose
Why
Variable speed, no position
DC Motor
Simple, efficient, cheap
Precise angle (0-180 deg)
Servo
Built-in feedback, easy control
Precise position, any range
Stepper
Open-loop accuracy, holds position
On/off, high power
Relay
Electrical isolation, high current
Fast linear motion
Solenoid
Quick push/pull action
For Kids: Meet the Actuator Crew!
“Pop quiz time!” announced Max the Microcontroller, wearing a tiny graduation cap. “Who can tell me – if I need to move a robot arm to exactly 90 degrees, which actuator friend should I call?”
Sammy the Sensor raised his hand. “I know! You’d call Servo Sam! He’s great at holding exact angles because he has a built-in feedback loop – kind of like how I always check my measurements twice!”
“Correct!” Max beamed. “And what about spinning a fan really fast?”
“That’s DC Danny’s specialty!” said Lila the LED, flashing green for the right answer. “He spins round and round continuously, and you control his speed with PWM – just like how my brightness gets adjusted!”
Bella the Battery chimed in, “And don’t forget – always use a motor driver between Max and the motors. Max can only provide a tiny bit of power. Without a driver, it’s like asking me to power a whole city when I’m just a small battery!”
“Great teamwork!” said Max. “Remember: servos for angles, DC motors for spinning, steppers for precise steps, and ALWAYS use the right driver circuit!”
13.5 Knowledge Check
Quiz: Actuator Assessment
13.6 See Also
DC Motors - PWM speed control and H-bridge operation
1. Confusing Duty Cycle with Frequency in PWM Questions
PWM duty cycle controls the average power delivered (motor speed, LED brightness), while PWM frequency affects smoothness and audible noise. Assessment questions about motor speed ask about duty cycle; questions about servo position ask about pulse width (in milliseconds), not duty cycle percentage. Read each question carefully to identify which PWM parameter is being tested.
2. Forgetting Flyback Diodes in Inductive Load Questions
Questions involving relays, solenoids, or motor drivers almost always include flyback diode placement as a scored element. Inductive loads generate voltage spikes when current is switched off; without the diode, this spike can destroy the driver transistor. Mark flyback diodes in circuit diagrams and mention them explicitly in short-answer circuit design questions.
3. Misidentifying H-Bridge Control Inputs for Direction
H-bridge ICs like the L298N have IN1/IN2 pins that control motor direction: IN1=HIGH,IN2=LOW spins one way; IN1=LOW,IN2=HIGH spins the other. Assessment circuit diagrams test whether you can identify which input combination produces forward versus reverse rotation. Practice predicting H-bridge behavior from truth tables before the assessment.
4. Justify Driver Circuit Choice
Assessment short-answer questions about ‘why do we need a driver circuit?’ expect more than ‘because the motor needs more current.’ Explain specifically: GPIO pins typically source/sink 20-40 mA maximum, while even small DC motors draw 100-500 mA and stall current can be 5-10x higher. Quantify the current mismatch and explain what happens to the GPIO pin without protection.
13.7 Deep Dive: Selection Evidence, Sizing, and Gearing
Picking “a stepper” or “a servo” only narrows the field. The design still fails if the actuator is too weak, too slow, or overheats. A defensible assessment answer names the physical load, the required motion, the electrical driver, the protection component, and the acceptance test.
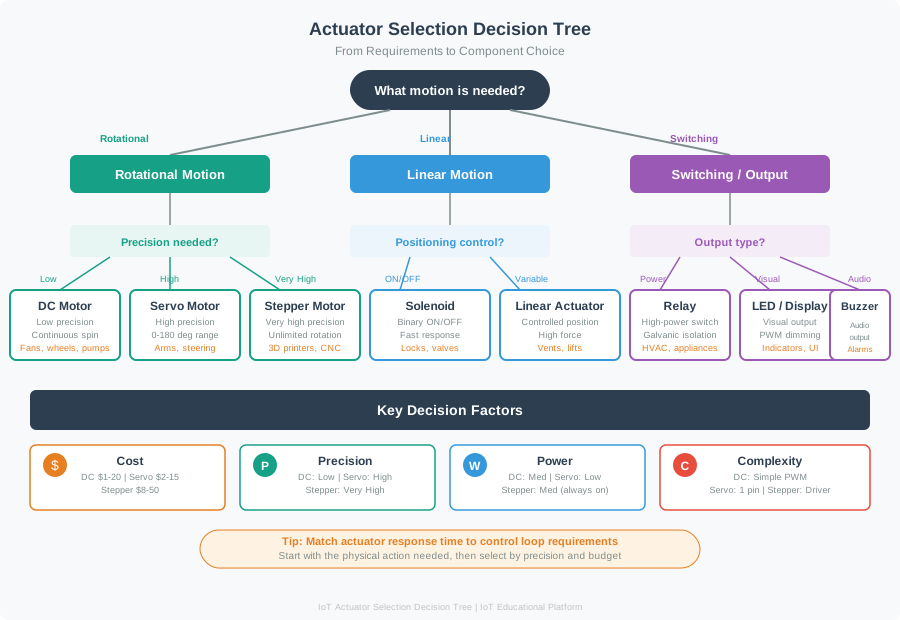
Figure 13.1: Use the decision tree to choose the actuator family, then prove the choice with sizing numbers for load, speed, duty cycle, and driver current.
For a small smart vent, a measured push of 1.8 N at a 25 mm linkage radius means the actuator must overcome 1.8 x 0.025 = 0.045 N m of load torque before friction and margin. With a 2x margin, the target becomes about 0.09 N m. If the vent only needs to sweep 90 degrees and hold position, a positional servo may fit. If it must rotate continuously, a DC gearmotor is a better starting point. If it must index repeatably through many turns without a position sensor, a stepper may be justified.
Requirement
What to compute
Watch out for
Torque or force
Load torque = force x radius, plus friction and acceleration torque; add a 1.5-2x margin
Forgetting acceleration and friction
Speed
Required rpm or travel time
Torque falls as speed rises
Duty and thermal load
Continuous versus intermittent operation; keep sustained torque under the continuous rating
Sizing to peak torque only, then overheating
Worst-case current
Stall or startup current for driver and supply
Supply sag on inrush resets the system
The recurring trap is confusing peak and continuous ratings. A motor can deliver stall torque briefly, but only its lower continuous torque without overheating. Likewise, size the power supply and driver to stall or startup current, not running current. If the chosen actuator can draw 900 mA at stall, the driver and supply must tolerate that worst case. If the load is inductive, include a flyback or clamp path; if a stall would overheat the actuator, include a timeout, current limit, or firmware fault state.
Work one pass numerically. A small valve actuator runs from 12 V, draws 0.4 A while moving, and is driven at 60% PWM during normal travel. The moving power estimate is 12 x 0.4 x 0.60 = 2.88 W. If the valve moves for 20 s every 120 s, the time duty is 20 / 120 = 0.167, so the average heat load from movement is much lower than the instantaneous moving power. That supports an intermittent actuator only if the datasheet allows the duty and the enclosure can shed the heat.
Speed must satisfy the application at the same time as torque. If a valve must close in 1 s and the mechanism needs 90 degrees of output travel, the output speed target is one quarter turn per second, or 15 rpm. If a gearbox produces enough torque but only reaches 5 rpm, it is safe but too slow. If an ungeared motor reaches 300 rpm but lacks torque, it is fast but unusable.
Every motor has a torque-speed curve running from stall torque to no-load speed. The load defines an operating point: required torque at required speed. A valid design places that point under the curve, with margin, and inside the continuous-torque thermal region. A gear reduction of ratio N multiplies torque by N and divides output speed by N, minus efficiency losses. It also divides the reflected load inertia the motor feels by N squared, which is why gearing helps a motor accelerate a heavy load.
Suppose the load needs 0.18 N m at about 30 rpm. A candidate motor can provide 0.06 N m continuously near 300 rpm. Direct drive fails on torque. A 4:1 reduction with an assumed 80% efficient gearbox gives output torque near 0.06 x 4 x 0.80 = 0.192 N m and output speed near 300 / 4 = 75 rpm. That is finally above the torque requirement and still faster than the 30 rpm target, so the controller can slow it with PWM or motion profiling. Reflected inertia falls by the square of the ratio, so a 4:1 reduction makes the motor feel about 4 x 4 = 16 times less load inertia, ignoring gearbox losses.
Assessment rule: the right answer is the smallest actuator and driver chain that meets torque, speed, thermal duty, and worst-case current with evidence-backed margin.
13.8 Summary
Actuator assessment questions test whether you can connect physical requirements to electrical limits, driver circuits, control methods, and safety evidence. Strong answers name the load, current path, protection component, control signal, and failure mode instead of only naming the actuator type.
13.9 Key Takeaway
When reviewing an actuator design, justify the complete chain: physical action needed, actuator selected, driver sized for running and stall current, protection added for inductive or high-current loads, and firmware behavior checked for safe startup and shutdown.
13.10 What’s Next?
Now that you can evaluate actuator types and diagnose common problems, you can deepen your skills with specific actuator technologies or combine actuators with sensors for complete IoT feedback control systems.