Production MQTT Python clients use callback-based architecture with paho-mqtt, implementing on_connect, on_message, and on_disconnect handlers for event-driven communication. Critical patterns include automatic reconnection with loop_start(), TLS configuration for encrypted connections on port 8883, and avoiding public test brokers (like test.mosquitto.org) in production due to security risks.
10.1 Start With One Callback
A Python MQTT program is not a straight script after it connects. The useful work happens when the broker calls back: connected, message received, disconnected, retry needed. Treat each callback as a piece of evidence about the client’s state, then add reconnection, TLS, topic handling, and tests around that event loop.
Chapter Roadmap
This is a long chapter, so here is the shape of the journey:
First you build the basic paho-mqtt callback pattern: connect, subscribe, receive, and keep the network loop alive.
Then you harden that pattern against the two production failures that hurt most often: public brokers and broker connection limits.
Next you add TLS timing margin, reconnection backoff, and a debugging flow that separates broker, topic, QoS, loop, and callback problems.
Finally you use calculators and quizzes to choose capacity, battery, reliability, and callback designs deliberately instead of copying defaults.
Checkpoints recap the main implementation decisions. Anything titled “Deep dive” is supporting detail you can return to after the core pattern is working.
10.2 Learning Objectives
By the end of this chapter, you will be able to:
Implement Callback Architecture: Construct callback-based MQTT clients with on_connect, on_message, and on_disconnect handlers using proper error handling patterns
Configure Connection Reliability: Select between loop_forever(), loop_start(), and manual loop() strategies and justify the choice for a given deployment scenario
Diagnose Security Vulnerabilities: Analyze why public brokers expose production data and evaluate the financial and operational risks of misconfigured MQTT deployments
Design Secure MQTT Infrastructure: Configure private brokers with TLS encryption on port 8883, username/password authentication, and ACL topic permissions
Apply TLS Timeout Strategies: Calculate appropriate connection timeouts for ESP32 and ESP8266 devices based on measured TLS handshake benchmarks and network conditions
Key Concepts
MQTT: Message Queuing Telemetry Transport — pub/sub protocol optimized for constrained IoT devices over unreliable networks
Broker: Central server routing messages from publishers to all matching subscribers by topic pattern
Topic: Hierarchical string (e.g., home/bedroom/temperature) used to route messages to interested subscribers
QoS Level: Quality of Service 0/1/2 trading delivery guarantee for message overhead
Retained Message: Last message on a topic stored by broker for immediate delivery to new subscribers
Last Will and Testament: Pre-configured message published by broker when a client disconnects ungracefully
Persistent Session: Broker stores subscriptions and pending messages allowing clients to resume after disconnection
10.3 For Beginners: MQTT Python Patterns
This chapter shows you how to implement MQTT in Python, one of the most beginner-friendly programming languages. You will learn common patterns for connecting to brokers, publishing sensor data, and handling incoming messages. If you can write basic Python, you can build IoT applications with MQTT.
Sensor Squad: Coding with Python
“Python makes MQTT so easy!” said Max the Microcontroller. “With the paho-mqtt library, publishing a sensor reading is literally three lines: create a client, connect, publish. Even Sammy could do it!”
Sammy the Sensor laughed. “I already did! But the real power is in callback patterns. You define an on_message function that automatically runs whenever a message arrives. It’s like setting an alarm – you don’t have to keep checking, Python calls your function when something happens.”
Lila the LED shared a pro tip: “Always use the reconnect pattern. WiFi drops happen, brokers restart. If your code doesn’t automatically reconnect, your sensor goes silent. Set on_disconnect to trigger a reconnect loop with exponential backoff – wait 1 second, then 2, then 4, then 8. Don’t hammer the broker!”
Bella the Battery added: “And use loop_start() instead of loop_forever() if your device does other things besides MQTT. loop_start() runs the network loop in a background thread, so your main code can keep reading sensors and processing data. It’s the pattern every production MQTT app uses.”
10.4 Prerequisites
Before diving into this chapter, you should be familiar with:
Python programming: Experience with callbacks, exception handling, and library installation
10.5 Python Implementation Patterns
This section provides practical MQTT patterns for IoT applications using the paho-mqtt library.
First build the smallest working client. Once callbacks and the network loop are in the right order, every later production concern has a clear place to attach.
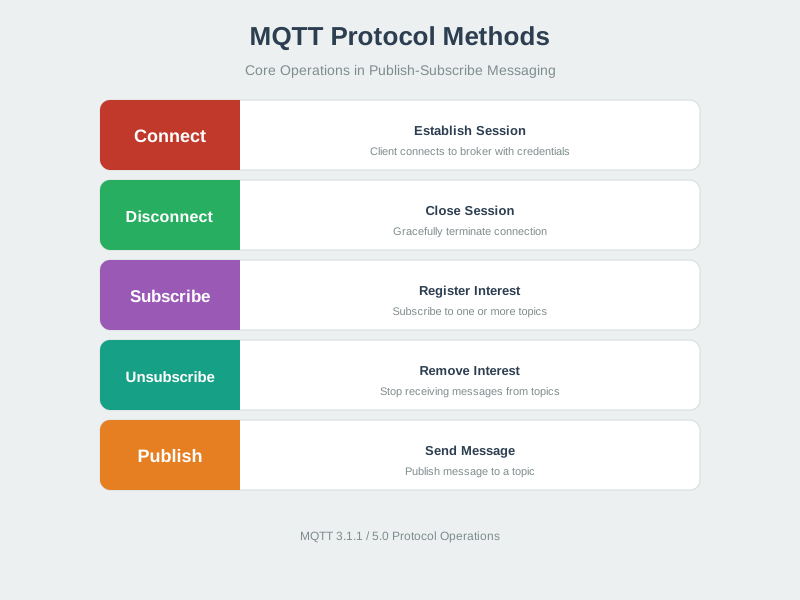
MQTT protocol methods for Python client implementation
Figure 10.1: Use the protocol methods as implementation checkpoints: connect with credentials, subscribe to the topics your callbacks handle, publish telemetry or commands, unsubscribe when a stream is no longer needed, and disconnect cleanly during shutdown.
Putting Numbers to It: loop_forever() vs loop_start() CPU Overhead
Python paho-mqtt provides two loop modes. loop_forever() blocks the thread in a tight poll loop, while loop_start() runs in a background thread.
CPU cost per loop wake-up (illustrative):\[
\text{CPU}_{\text{wake}} = T_{\text{wait}} + T_{\text{packet}} + T_{\text{callback}}
\]
Where: - \(T_{\text{wait}}\): time spent waiting on the socket or timeout - \(T_{\text{packet}}\): time spent parsing MQTT packets and acknowledgements - \(T_{\text{callback}}\): time spent in your application callback
Busy or near-zero timeout loop:
Wakes very frequently, even when there is no useful MQTT work
Can burn a full core if the wait path is accidentally configured as a busy poll
Makes battery-powered devices worse because the processor cannot spend much time asleep
Background loop with an ordinary socket wait:
Lets the network thread sleep until socket activity or timeout
Keeps the application thread free for sensor reads, queues, displays, or API work
Reduces idle wake-ups, which is usually the important power win on constrained devices
Battery impact:
A loop that wakes constantly keeps the radio and CPU path active more often than necessary
A loop that sleeps between packets gives the device more opportunities to enter lower-power states
The exact current draw depends on board, radio state, TLS settings, and sensor duty cycle, so measure it on the target hardware
Recommendation: Use loop_forever() only for simple subscriber-only scripts. For devices that do other work (read sensors, update displays), use loop_start() to run MQTT in background, or use loop() with manual timing control in your main loop.
Checkpoint: Callback and Loop Basics
You now know:
A paho-mqtt 2.0+ client should assign callbacks before it connects, then keep loop_forever(), loop_start(), or a disciplined manual loop() running.
Topic filters are routing rules: sensors/# captures a branch, + matches one level, and # matches zero or more levels.
Port 1883 is plain MQTT for learning and local testing; production security starts later with TLS on port 8883.
The next question is not “can the Python client connect?” but “who else can see or inject the traffic when it does connect?”
10.6 Security Pitfall: Public Brokers in Production
Common Misconception: “Public Brokers Are Fine for Production”
The Mistake: Many developers prototype with test.mosquitto.org and then deploy the same code to production, assuming a unique topic name provides adequate security.
Production impact:
Sensor readings, command topics, and status messages can be visible to unrelated subscribers
Anyone who can reach the broker may be able to publish fake commands to predictable topics
Retained messages and topic collisions can leak state or mix unrelated test traffic into a real deployment
Why This Happens:
Developers don’t realize: Anyone can run mosquitto_sub -h test.mosquitto.org -t '#' and see ALL messages from ALL users
False security: Topic names like myapp/device123/data feel private but are completely visible
Deadline pressure: Teams keep a prototype broker because the first demo worked
The Mistake: Developers deploy IoT systems without considering broker connection limits. They test with 10-20 devices successfully, then deploy 500+ devices to production. New devices fail to connect with cryptic errors like “connection refused” or timeout, while existing connections work fine.
Why It Happens: MQTT brokers have configurable maximum connection limits, often defaulting to 1,024 (OS file descriptor limit) or lower. Each MQTT connection consumes a file descriptor, memory for session state (~2-10KB), and a TCP socket. When limits are reached, new connections are silently rejected without clear error messages.
The Fix: Calculate connection requirements before deployment. Configure broker limits explicitly. Implement connection health monitoring and alerting when approaching 80% capacity. Use connection pooling or MQTT bridge patterns for high-scale deployments.
# Client-side connection monitoringimport paho.mqtt.client as mqttdef on_connect(client, userdata, flags, reason_code, properties):if reason_code ==0:print("Connected successfully")elif reason_code ==5:print("ERROR: Connection refused - not authorized")elif reason_code ==134: # MQTT 5.0 - Bad Username or Passwordprint("ERROR: Connection refused - bad username or password")elif reason_code ==136: # MQTT 5.0 - Server Unavailable (likely at max connections)print("ERROR: Server unavailable - broker may be at max connections")elif reason_code ==149: # MQTT 5.0print("ERROR: Connection rate exceeded - implement backoff")# Monitor broker capacity via $SYS topicsdef monitor_broker_capacity(client): client.subscribe("$SYS/broker/clients/connected") client.subscribe("$SYS/broker/clients/maximum")def on_sys_message(client, userdata, msg):if"connected"in msg.topic: connected =int(msg.payload.decode()) max_clients = userdata.get("max_clients", 1024) usage_pct = (connected / max_clients) *100if usage_pct >80:print(f"WARNING: Broker at {usage_pct:.1f}% capacity ({connected}/{max_clients})")
Capacity Planning Formula: Required connections = (devices x 1.2) + (backend_services x 2) + (monitoring x 3). For 1,000 devices with 5 backend services and 2 monitoring tools, plan for: (1000 x 1.2) + (5 x 2) + (2 x 3) = 1,216 connections minimum.
Try It: MQTT Connection Reason Code Explorer
Explore MQTT 3.1.1 and MQTT 5.0 connection reason codes to understand what each error means and how to handle it in your on_connect callback.
rcCodes311 = [ { code:0,name:"Connection Accepted",severity:"success",action:"Subscribe to topics and begin publishing.",category:"Success" }, { code:1,name:"Unacceptable Protocol Version",severity:"error",action:"Upgrade your MQTT client library to support the broker's required version.",category:"Protocol" }, { code:2,name:"Identifier Rejected",severity:"error",action:"Use a valid, unique client ID (1-23 characters, alphanumeric).",category:"Identity" }, { code:3,name:"Server Unavailable",severity:"warning",action:"Broker is running but cannot serve requests. Retry with exponential backoff.",category:"Server" }, { code:4,name:"Bad Username or Password",severity:"error",action:"Check credentials. Ensure username/password are correctly configured.",category:"Auth" }, { code:5,name:"Not Authorized",severity:"error",action:"Client lacks ACL permissions. Contact broker administrator.",category:"Auth" }]rcCodes50 = [ { code:0,name:"Success",severity:"success",action:"Connection established. Subscribe and publish.",category:"Success" }, { code:128,name:"Unspecified Error",severity:"error",action:"Generic failure. Check broker logs for details.",category:"General" }, { code:129,name:"Malformed Packet",severity:"error",action:"Client sent invalid data. Update your MQTT library.",category:"Protocol" }, { code:130,name:"Protocol Error",severity:"error",action:"Protocol violation detected. Check MQTT version compatibility.",category:"Protocol" }, { code:131,name:"Implementation Specific Error",severity:"error",action:"Broker-specific issue. Consult broker documentation.",category:"General" }, { code:132,name:"Unsupported Protocol Version",severity:"error",action:"Broker does not support this MQTT version. Try MQTT 3.1.1.",category:"Protocol" }, { code:133,name:"Client ID Not Valid",severity:"error",action:"Use a valid client ID. Some brokers reject empty or long IDs.",category:"Identity" }, { code:134,name:"Bad Username or Password",severity:"error",action:"Verify credentials match broker configuration.",category:"Auth" }, { code:135,name:"Not Authorized",severity:"error",action:"Client authenticated but lacks permission. Check ACLs.",category:"Auth" }, { code:136,name:"Server Unavailable",severity:"warning",action:"Broker temporarily unavailable. Implement retry with backoff.",category:"Server" }, { code:137,name:"Server Busy",severity:"warning",action:"Broker overloaded. Back off and retry later.",category:"Server" }, { code:138,name:"Banned",severity:"error",action:"Client has been banned. Contact administrator.",category:"Auth" }, { code:140,name:"Bad Authentication Method",severity:"error",action:"Authentication method not supported. Check TLS/SASL config.",category:"Auth" }, { code:149,name:"Connection Rate Exceeded",severity:"warning",action:"Too many connection attempts. Increase backoff delay.",category:"Server" }, { code:151,name:"Quota Exceeded",severity:"warning",action:"Resource quota hit (max connections). Scale broker or reduce clients.",category:"Server" }, { code:159,name:"Connection Rate Exceeded",severity:"warning",action:"Slow down reconnection attempts with exponential backoff.",category:"Server" }, { code:162,name:"Wildcard Subscriptions Not Supported",severity:"error",action:"Broker disallows wildcards. Use explicit topic names.",category:"Protocol" }]rcLookup = rcVersion ==="MQTT 3.1.1"? rcCodes311 : rcCodes50rcMatch = rcLookup.find(c => c.code=== rcCode)rcSeverityColor = rcMatch ? (rcMatch.severity==="success"?"#16A085": rcMatch.severity==="warning"?"#E67E22":"#E74C3C") :"#7F8C8D"rcSeverityLabel = rcMatch ? (rcMatch.severity==="success"?"SUCCESS": rcMatch.severity==="warning"?"WARNING":"ERROR") :"UNKNOWN"html`<div style="background: linear-gradient(135deg, #2C3E50 0%, #16A085 100%); padding: 24px; border-radius: 8px; color: white; margin-top: 16px;"> <h4 style="margin-top: 0; color: white; border-bottom: 2px solid #E67E22; padding-bottom: 8px;">${rcVersion} Reason Code: ${rcCode} </h4>${rcMatch ?html`<div class="mqtt-responsive-grid-2" style="margin-top: 12px;"> <div style="background: rgba(255,255,255,0.1); padding: 16px; border-radius: 6px; border-left: 4px solid ${rcSeverityColor};"> <div style="font-size: 0.8em; opacity: 0.8;">Status</div> <div style="font-size: 1.2em; font-weight: bold; margin-top: 4px;">${rcMatch.name}</div> <div style="margin-top: 8px;"> <span style="background: ${rcSeverityColor}; padding: 2px 10px; border-radius: 4px; font-size: 0.8em;">${rcSeverityLabel}</span> <span style="background: rgba(255,255,255,0.2); padding: 2px 10px; border-radius: 4px; font-size: 0.8em; margin-left: 6px;">${rcMatch.category}</span> </div> </div> <div style="background: rgba(255,255,255,0.1); padding: 16px; border-radius: 6px; border-left: 4px solid #3498DB;"> <div style="font-size: 0.8em; opacity: 0.8;">Recommended Action</div> <div style="font-size: 0.9em; margin-top: 8px; line-height: 1.5;">${rcMatch.action}</div> </div> </div> <div style="margin-top: 12px; background: rgba(255,255,255,0.08); padding: 12px; border-radius: 6px; font-family: monospace; font-size: 0.85em;"> <div style="opacity: 0.7; margin-bottom: 4px;"># Python handler for this code:</div> <div>def on_connect(client, userdata, flags, reason_code, properties):</div> <div> if reason_code == ${rcCode}: # ${rcMatch.name}</div> <div> print("${rcMatch.severity==='success'?'Connected successfully': rcMatch.severity==='warning'?'WARNING: '+ rcMatch.name+' - retrying...':'ERROR: '+ rcMatch.name}")</div> </div>`:html`<div style="background: rgba(231,76,60,0.2); border: 1px solid #E74C3C; padding: 16px; border-radius: 6px; margin-top: 12px;"> <div style="font-size: 1.1em; font-weight: bold;">Code ${rcCode} — Not a standard ${rcVersion} reason code</div> <div style="margin-top: 8px; font-size: 0.9em;">Try codes: ${rcVersion ==="MQTT 3.1.1"?"0-5":"0, 128-162"}. Known codes are shown in the table below.</div> </div> <div style="margin-top: 12px; display: flex; flex-wrap: wrap; gap: 6px;">${rcLookup.map(c =>html`<span style="background: rgba(255,255,255,0.15); padding: 3px 10px; border-radius: 4px; font-size: 0.8em; cursor: default;" title="${c.name}">${c.code}</span>`)} </div>`}</div>`
Checkpoint: Broker Exposure and Capacity
You now know:
A public broker is useful for demos, but a private broker with TLS on port 8883, authentication, ACLs, and monitoring is the production baseline.
Broker capacity needs headroom: the chapter formula is (devices x 1.2) + (backend_services x 2) + (monitoring x 3), which gives 1,216 minimum connections for 1,000 devices, 5 backend services, and 2 monitoring tools.
Capacity monitoring should warn before failure; this chapter uses 80% of the configured connection limit as the alert point.
After access control and capacity are sized, the remaining connection risk is timing: constrained devices can be correct but still time out during TLS setup.
10.9 TLS Timeout Pitfall
Pitfall: TLS Handshake Timeout on Constrained Devices
The Mistake: Developers enable TLS (port 8883) for production security, test on a fast development machine, and then reuse the same timeout settings on constrained Wi-Fi devices. In the field, slower crypto, Wi-Fi reconnects, network latency, and broker load can push the handshake beyond a default timeout and cause intermittent connection failures.
Why It Happens: TLS 1.2/1.3 handshakes involve RSA-2048 or ECDHE key exchange, which requires significant CPU for constrained devices. Default MQTT client timeouts (often 10-30 seconds) seem generous but don’t account for network latency + TLS negotiation + Wi-Fi reconnection combined. Under load, brokers may slow TLS handshake processing.
The Fix: Increase client connection timeout to 60+ seconds for constrained devices. Use TLS session resumption to skip full handshake on reconnection. Consider ECDHE with P-256 curve (faster than RSA-2048). Pre-provision device certificates during manufacturing to reduce runtime crypto operations.
// ESP32: Configure generous TLS timeouts#include <WiFiClientSecure.h>#include <PubSubClient.h>WiFiClientSecure espClient;PubSubClient mqttClient(espClient);void setup(){// Load CA certificate (or use setInsecure() for testing only) espClient.setCACert(root_ca);// Increase TCP timeout for TLS handshake (default is often 10s) espClient.setTimeout(60000);// 60 seconds for slow TLS// Configure MQTT client with longer keepalive mqttClient.setServer(mqtt_server,8883); mqttClient.setKeepAlive(120);// 2 minutes (allows for slow reconnects) mqttClient.setSocketTimeout(60);// 60 second socket timeout}bool connectWithRetry(){int attempts =0;while(!mqttClient.connected()&& attempts <5){ Serial.printf("TLS connect attempt %d...\n", attempts +1);unsignedlong start = millis();if(mqttClient.connect(client_id, mqtt_user, mqtt_pass)){unsignedlong elapsed = millis()- start; Serial.printf("Connected in %lu ms\n", elapsed);returntrue;} attempts++;// Exponential backoff: 10s, 20s, 40s, 80s, 160sint delay_ms =5000*(1<< attempts); Serial.printf("Failed, retrying in %d ms\n", delay_ms); delay(delay_ms);}returnfalse;}
# Python paho-mqtt: TLS with extended timeoutimport sslimport paho.mqtt.client as mqttclient = mqtt.Client(mqtt.CallbackAPIVersion.VERSION2)# Configure TLS with session tickets for faster reconnectioncontext = ssl.create_default_context()context.check_hostname =Truecontext.verify_mode = ssl.CERT_REQUIREDcontext.load_verify_locations("/path/to/ca.crt")# Enable TLS session resumption (reduces reconnect handshake time by 40-60%)# Do NOT set ssl.OP_NO_TICKET — omitting it allows session tickets (faster reconnects)client.tls_set_context(context)# Extended timeouts for constrained broker or slow networksclient.connect(broker, 8883, keepalive=120)# Note: paho-mqtt uses socket timeout, configure via:# client._sock.settimeout(60.0) after connect if needed
Timing guidance: Measure handshake time on the real board, network, certificate chain, and broker path. Then configure a timeout with enough margin for Wi-Fi reconnects, broker load, retries, and clock drift instead of copying a laptop default into firmware.
Worked Example: Debugging “Messages Not Received” Issue
Scenario: A developer deploys 20 ESP32 soil moisture sensors. The Python dashboard connects successfully but doesn’t receive any sensor messages. The Serial Monitor shows “Published: 45%” but the dashboard stays empty.
Step 1: Verify Broker Connectivity
# Terminal 1: Subscribe to all topicsmosquitto_sub-h test.mosquitto.org -t'#'-v# Wait 30 seconds. If you see ANY messages, broker is reachable.
Result: Sees messages like $SYS/broker/clients/connected: 147 but NO sensor messages.
Step 2: Check Topic Naming
# Sensors publish to:"farm/sensor01/moisture"# ESP32 code# Dashboard subscribes to:"farm/+/moisture"# Python code - this SHOULD match# But wait - check for typos!print(f"Subscribing to: {TOPIC}") # Add debug print
# ESP32 publishes with QoS 1client.publish(topic, payload, qos=1)# Python dashboard subscribes with QoS 0client.subscribe("farm/+/moisture", qos=0)
The Problem: Broker downgrades delivery to subscriber’s QoS level. If network has 5% packet loss: - Publisher (QoS 1): Retries until PUBACK received → 100% delivery to broker - Subscriber (QoS 0): Fire-and-forget → 95% delivery from broker - Dashboard misses 5% of messages
Step 4: Check client.loop()
# BAD: Developer forgot to call loopdef main(): client.connect(BROKER, 1883) client.subscribe("farm/+/moisture")whileTrue: time.sleep(1) # WRONG: No network processing!# GOOD: Call loop to process incoming packetsdef main(): client.connect(BROKER, 1883) client.subscribe("farm/+/moisture") client.loop_forever() # Blocks and processes messages
✓ Check topic spelling (add debug prints for actual subscriptions)
✓ Match QoS levels between publisher and subscriber
✓ Ensure client.loop(), loop_start(), or loop_forever() is called
✓ Verify callbacks are assigned BEFORE connect()
Lesson: Most “MQTT not working” issues are client-side configuration errors, not protocol problems. Systematic debugging with mosquitto_sub catches 95% of issues in 5 minutes.
By this point the client can fail gracefully: it knows how to connect securely, interpret reason codes, and test the message path. The next step is to make retry behavior predictable instead of noisy.
Try It: Exponential Backoff Timing Visualizer
Configure reconnection backoff parameters and see the exact delay schedule your client will follow when the broker connection drops. Understanding backoff timing prevents both “hammering” the broker and unacceptable reconnection delays.
Constrained clients may need 60+ second TLS timeouts, especially when Wi-Fi reconnects, certificate validation, network latency, and broker load combine.
Reconnect loops should have a retry cap and backoff: the ESP32 example limits attempts to 5, and the chapter shows 10s, 20s, 40s, 80s, and 160s delays for one TLS retry pattern.
TLS session resumption can reduce reconnect handshake time by 40-60%, but every new connection still needs subscriptions restored and state retested.
10.10 Try It: MQTT Callback Patterns on ESP32
Try It: ESP32 MQTT with Reconnection and Callbacks
Objective: See how callback-based MQTT works on an ESP32, including automatic reconnection when the broker connection drops.
Setup: Open the Wokwi ESP32 simulator below and paste the code that follows.
Watch the Serial Monitor for “Connected!” – the callback pattern handles the connection event
Every 5 seconds, a JSON message is published. The client.loop() call in loop() drives all network I/O and callback dispatch
The reconnect() function uses exponential backoff (2s, 4s, 8s) – try modifying the backoff delays
Change the subscribe topic and publish topic to see how the callback routes messages
10.11 MQTT Debugging Flow
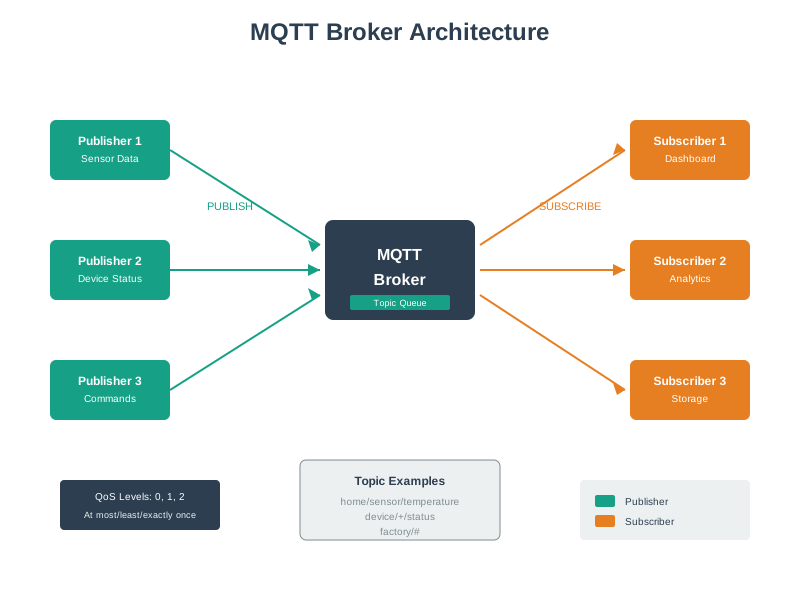
MQTT broker architecture for debugging message flow
Figure 10.2: Use the broker architecture as the debugging map: verify the publisher reaches the broker, confirm the topic queue or subscription pattern is correct, and then check whether each subscriber receives the routed message at the expected QoS.
When MQTT isn’t working, follow this systematic approach:
Check connection: Serial Monitor shows Wi-Fi and MQTT connection status
Verify message flow: MQTT Explorer shows all broker traffic
Validate topics: mosquitto_sub confirms messages reach the broker
Test payloads: Ensure JSON is valid and decodable
Try It: MQTT Debugging Checklist Simulator
Walk through a simulated MQTT debugging scenario. Select the symptoms you observe and the tool will identify the most likely root cause and recommend the correct fix.
Show code
viewof dbSymptom = Inputs.select( ["Client connects but no messages received","Client cannot connect (timeout)","Client connects then immediately disconnects","Messages received but payload is garbled","Intermittent message loss (some arrive, some don't)","Connection works locally but fails in production" ], { label:"Primary symptom",value:"Client connects but no messages received" })viewof dbBrokerType = Inputs.radio( ["Public (test.mosquitto.org)","Private (self-hosted)","Cloud (HiveMQ/AWS IoT)"], { label:"Broker type",value:"Public (test.mosquitto.org)" })viewof dbLoopCalled = Inputs.radio( ["Yes","No","Not sure"], { label:"Is client.loop() or loop_start() called?",value:"Yes" })
Show code
dbDiagnosis = {const s = dbSymptom;const lp = dbLoopCalled;if (s ==="Client connects but no messages received"&& lp ==="No") {return { cause:"Missing network loop",severity:"error",step:"Step 4: Check client.loop()",detail:"Without loop_forever(), loop_start(), or manual loop() calls, the paho-mqtt client never processes incoming packets. Callbacks will never fire.",fix:"Add client.loop_forever() after connect(), or use client.loop_start() for background processing.",debugCmd:"# Add after client.connect():\nclient.loop_forever() # or client.loop_start()" }; }if (s ==="Client connects but no messages received"&& lp !=="No") {return { cause:"Topic mismatch or subscription error",severity:"warning",step:"Step 2: Check Topic Naming",detail:"The most common cause is a typo in the subscription topic or a wildcard mismatch. Double slashes (farm//data), case mismatches, and missing wildcards are frequent culprits.",fix:"Add debug prints to verify actual topic strings. Use mosquitto_sub -t '#' to see all broker traffic.",debugCmd:"mosquitto_sub -h BROKER -t '#' -v\n# Compare published topics vs subscription pattern" }; }if (s ==="Client cannot connect (timeout)") {return { cause: dbBrokerType ==="Public (test.mosquitto.org)"?"Broker unreachable or overloaded":"Network/firewall/TLS issue",severity:"error",step:"Step 1: Verify Broker Connectivity",detail: dbBrokerType ==="Public (test.mosquitto.org)"?"Public brokers are often overloaded or temporarily down. They are not designed for reliable connections.":"Check firewall rules (port 1883/8883), TLS certificate validity, and DNS resolution.",fix: dbBrokerType ==="Public (test.mosquitto.org)"?"Switch to a private broker or try broker.hivemq.com as an alternative.":"Verify port is open: nc -zv BROKER 1883. Check TLS cert: openssl s_client -connect BROKER:8883.",debugCmd:"nc -zv broker.hivemq.com 1883\n# If TLS: openssl s_client -connect BROKER:8883" }; }if (s ==="Client connects then immediately disconnects") {return { cause:"Duplicate client ID or auth failure",severity:"error",step:"Step 1 + Step 5",detail:"When two clients share the same client ID, the broker disconnects the first one. Also check if authentication credentials are rejected after the initial TCP handshake.",fix:"Use unique client IDs (e.g., append random suffix). Check on_disconnect reason code.",debugCmd:"# Use unique client ID:\nclient_id = f'sensor-{random.randint(1000,9999)}'" }; }if (s ==="Messages received but payload is garbled") {return { cause:"Encoding mismatch",severity:"warning",step:"Step 4: Test Payloads",detail:"Publisher and subscriber use different encodings (UTF-8 vs raw bytes), or JSON serialization differs between platforms (Python dict vs Arduino String).",fix:"Always decode with msg.payload.decode('utf-8') and validate JSON with json.loads().",debugCmd:"# Safe payload handling:\ntry:\n data = json.loads(msg.payload.decode('utf-8'))\nexcept (UnicodeDecodeError, json.JSONDecodeError) as e:\n print(f'Bad payload: {e}')" }; }if (s ==="Intermittent message loss (some arrive, some don't)") {return { cause:"QoS mismatch or network packet loss",severity:"warning",step:"Step 3: Verify QoS Match",detail:"If publisher uses QoS 1 but subscriber uses QoS 0, the broker delivers to the subscriber at QoS 0 (fire-and-forget). On lossy networks, this means dropped messages.",fix:"Match QoS levels: subscriber should use same or higher QoS as publisher. For critical data, use QoS 1 on both sides.",debugCmd:"# Match QoS on subscribe:\nclient.subscribe('topic', qos=1) # Match publisher QoS" }; }if (s ==="Connection works locally but fails in production") {return { cause: dbBrokerType ==="Public (test.mosquitto.org)"?"Public broker security risk":"Production network restrictions",severity:"error",step:"Security Pitfall",detail: dbBrokerType ==="Public (test.mosquitto.org)"?"Public brokers have no security. Anyone can intercept your data. Production needs TLS + auth.":"Corporate firewalls may block MQTT ports. Cloud brokers require specific TLS configurations and IAM policies.",fix:"Deploy a private Mosquitto broker with TLS on port 8883 and username/password authentication.",debugCmd:"# Private broker setup:\nsudo apt install mosquitto\nsudo mosquitto_passwd -c /etc/mosquitto/passwd admin" }; }return { cause:"Unknown",severity:"warning",step:"Start from Step 1",detail:"Begin systematic debugging.",fix:"Follow the complete debugging checklist.",debugCmd:"mosquitto_sub -h BROKER -t '#' -v" };}html`<div style="background: linear-gradient(135deg, #2C3E50 0%, #16A085 100%); padding: 24px; border-radius: 8px; color: white; margin-top: 16px;"> <h4 style="margin-top: 0; color: white; border-bottom: 2px solid #E67E22; padding-bottom: 8px;"> Diagnosis: ${dbDiagnosis.cause} </h4> <div class="mqtt-responsive-grid-2" style="margin-top: 12px;"> <div style="background: rgba(255,255,255,0.1); padding: 16px; border-radius: 6px; border-left: 4px solid ${dbDiagnosis.severity==='error'?'#E74C3C':'#E67E22'};"> <div style="display: flex; align-items: center; gap: 8px; margin-bottom: 8px;"> <span style="background: ${dbDiagnosis.severity==='error'?'#E74C3C':'#E67E22'}; padding: 2px 10px; border-radius: 4px; font-size: 0.8em;">${dbDiagnosis.severity.toUpperCase()}</span> <span style="font-size: 0.85em; opacity: 0.9;">${dbDiagnosis.step}</span> </div> <div style="font-size: 0.9em; line-height: 1.5;">${dbDiagnosis.detail}</div> </div> <div style="background: rgba(255,255,255,0.1); padding: 16px; border-radius: 6px; border-left: 4px solid #16A085;"> <div style="font-size: 0.8em; opacity: 0.8; margin-bottom: 8px;">Recommended Fix</div> <div style="font-size: 0.9em; line-height: 1.5;">${dbDiagnosis.fix}</div> </div> </div> <div style="margin-top: 12px; background: rgba(0,0,0,0.2); padding: 12px; border-radius: 6px; font-family: monospace; font-size: 0.8em; white-space: pre-line;">${dbDiagnosis.debugCmd}</div></div>`
10.12 Interactive Calculators
Use these calculators as scenario estimators, not measured benchmarks. Replace the defaults with values from your broker logs, device current measurements, TLS traces, and deployment risk assumptions before making an engineering decision.
10.12.1 Broker Connection Capacity Planner
Use this calculator to determine the required broker connection capacity based on your deployment size. The formula follows the capacity planning guidance from this chapter: Required = (devices x 1.2) + (backend_services x 2) + (monitoring x 3).
Estimate the total TLS connection time for constrained IoT devices to configure appropriate timeouts. Based on real-world benchmarks from this chapter.
Compare the cost of deploying a private MQTT broker against the financial risk of using a public broker in production, based on incident data from this chapter.
Estimate the effective message delivery rate based on QoS level and network conditions, demonstrating why QoS matching matters between publisher and subscriber.
Capacity estimates should start with the chapter’s 120% device multiplier and then add backend and monitoring connections before choosing max_connections.
QoS is negotiated down to the lower publisher/subscriber level, so a QoS 1 publisher feeding a QoS 0 subscriber over 5% packet loss still loses about 5% of subscriber deliveries.
A single MQTT connection can become a throughput bottleneck; this chapter flags 100 messages/second with QoS 1 as enough to create TCP backpressure and points to partitioned connections above 1,000 messages/second.
The calculators turn the design knobs. The closing activities ask whether you can still name the callbacks, order the implementation steps, and spot the mistakes in a concrete program.
Common Pitfalls
1. Running MQTT Without TLS
Unencrypted MQTT exposes device credentials and sensor data to network eavesdroppers — in a building IoT deployment on shared WiFi, this means any connected device can read all sensor data. Always enable TLS 1.2+ on the broker and generate unique client certificates for each device class.
2. Ignoring Last Will and Testament Configuration
Without LWT, there is no automatic notification when a device disconnects ungracefully — missed timeout alarms and false-healthy device status are common consequences. Configure LWT on every device connection to publish an offline status message, enabling real-time fleet health monitoring.
3. Using a Single MQTT Connection for High-Throughput Publishing
A single MQTT connection serializes all publishes through one TCP socket — at 100 messages/second with QoS 1, TCP backpressure creates queuing latency. Use multiple parallel MQTT connections or partition topics across connection pools for throughput above 1,000 messages/second.
A paho-mqtt client is event-driven: callback assignment, connect(), and the network loop are separate responsibilities. Assign on_connect, on_message, and on_disconnect before connecting; start loop_forever(), loop_start(), or a disciplined manual loop() soon after; then treat on_connect as the place to subscribe so a reconnect restores subscriptions. If a debug log shows no callbacks, check the loop state and callback assignment order before blaming the broker.
Do not let message handlers become the application runtime. A slow database write, HTTP call, or machine-learning inference inside on_message can delay acknowledgements, keep-alive pings, and later messages. Parse quickly, validate the topic and payload, push the work onto a queue, and let worker code do the long task. loop_forever() is simplest for a dedicated subscriber process, while loop_start() fits a process that also reads sensors, serves an API, or updates hardware; a manual loop is acceptable only when timing tests prove it cannot be starved.
MQTT 5 features add another boundary to test. User properties carry message-level metadata such as schema version, trace id, or content hint, and topic aliases save repeated topic bytes by mapping a long topic string to a per-connection integer. Both require an MQTT 5 client connection, and both must be treated as scoped state: aliases disappear on reconnect, and user properties travel with one message rather than with a retained topic or subscription.
Keep one implementation acceptance record: callbacks assigned before connect, subscriptions restored in on_connect, the chosen loop kept alive under load, slow handlers moved to a queue, reconnects retested, and MQTT 5 properties validated per message after every new connection.
10.18 Summary
This chapter covered production-ready MQTT patterns:
Callback Architecture: Use on_connect and on_message callbacks for clean, event-driven code
Loop Management: Choose between loop_forever() (dedicated subscriber), loop_start() (background), or loop() (manual control)
Security Fundamentals: Public brokers expose ALL data to anyone - always use private brokers with TLS in production
Connection Limits: Plan capacity at 120% of expected devices, monitor $SYS topics for broker health
TLS Timeouts: ESP32/ESP8266 need 60+ second timeouts for TLS handshakes - defaults often cause failures
Debugging Workflow: Serial Monitor -> MQTT Explorer -> mosquitto_sub for systematic troubleshooting
Focus Robust error handling patterns for IoT transport layers
Why Read It Generalise the exponential backoff and reconnection strategies seen here to other protocols and transports.
10.24 Key Takeaway
Good MQTT Python clients are long-running network programs. They need persistent connections, callbacks that avoid blocking, reconnect logic, structured topics, and explicit handling for publish acknowledgements and shutdown.
 Checkpoint: Callback and Loop Basics