These hands-on labs cover building complete MQTT systems with real hardware: ESP32 DHT22 temperature publishers with configurable QoS levels, multi-device motion-to-lighting automation pipelines, secure broker deployment with TLS and ACLs, and Last Will Testament (LWT) for automatic device disconnection detection.
Phoebe’s Field Notes: The “833 Days” Number Assumes the Battery Never Ages
Phoebe’s Why
This chapter is already suspicious of its own always-on QoS0 estimate – 833 days from 2.4 mAh/day – and rightly points to Wi-Fi reconnect overhead as the reason the deep-sleep model (76.8 mAh/day, about 26 days) is more honest. There is a second, independent reason to distrust “833 days \(\approx\) 2.3 years”: that arithmetic divides a fixed 2000 mAh by a fixed daily current forever, as if the cell were a bucket that only empties from the bottom. A real lithium cell also empties itself slowly just sitting on the shelf, and over 2.3 years that self-discharge is not a rounding error – it competes with the load current for the same milliamp-hours.
The Derivation
Charge-budget life model:
\[t_{life}=\frac{C_{batt}}{I_{avg}}\]
Self-discharge, compounding over elapsed time \(t\) at monthly rate \(r\):
\[Q(t)=Q_0(1-r)^{t}\]
Terminal voltage under a radio pulse current \(I\):
\[V_{term}=V_{oc}-I\,R_{int}\]
Worked Numbers: This Chapter’s Own QoS Scenarios
Deep-sleep life (this chapter’s own 76.8 mAh/day, 2000 mAh pack): \(2000/76.8=26.0\) days – short enough that self-discharge barely registers: at catalog-typical LiPo \(r\approx2\%\)/month, 26 days is 0.856 months, leaving \((0.98)^{0.856}=98.3\%\) of nameplate, a 1.71% loss.
The always-on QoS0 claim (this chapter’s own 2.4 mAh/day, 833 days): that duration is 27.4 months, and compounding the same 2%/month gives \((0.98)^{27.4}=57.5\%\) of nameplate remaining – a 42.5% self-discharge loss over the claimed life, before the QoS0 radio current has drawn one extra milliamp-hour for reconnects. The naive \(C/I\) division and this chapter’s own Wi-Fi-overhead caveat are both right to distrust “833 days,” for two separate and additive reasons.
Voltage sag on this chapter’s own 120 mA radio pulse (catalog-typical 2000 mAh pack, \(R_{int}\approx0.10\,\Omega\) fresh, \(\approx0.40\,\Omega\) aged): 12.0 mV fresh, 48.0 mV aged – both small against 3.7 V, so for this pack size the sag risk stays minor even as self-discharge does not.
11.1 Start With One Working Pipeline
Every lab is a version of the same review path: a device senses something, publishes it to a topic, the broker applies a delivery rule, and another client proves it received the right state. Build that small path first, then make it secure, reliable, battery-aware, and observable.
Chapter Roadmap
This is a long lab chapter, so use it as a sequence of acceptance records:
First build one ESP32 publisher path and prove the topic, retained status, and publish interval behave as expected.
Then expand the path into a dashboard and a two-device motion-to-light automation flow.
Next harden the broker with TLS, authentication, and topic permissions before testing QoS and Last Will behavior.
Finally use the calculators and quizzes to turn lab observations into capacity, cost, battery, and review evidence.
Checkpoints recap what you have already proved, and sections titled “Deep dive” or calculator notes can be treated as optional support on a first pass.
11.2 Learning Objectives
By the end of this chapter, you will be able to:
Construct ESP32 MQTT Publishers: Implement complete sensor-to-broker data pipelines with DHT22 temperature sensors using the PubSubClient library
Design Multi-Device Automation Systems: Configure motion sensors and lighting actuators to communicate through an MQTT broker backbone
Select and Justify QoS Levels: Evaluate QoS 0, 1, and 2 trade-offs and select the appropriate level based on reliability requirements and power constraints
Configure Secure MQTT Brokers: Deploy Mosquitto with TLS certificates, username/password authentication, and ACLs for production-ready operation
Implement Last Will Testament: Configure LWT messages to automatically detect and report unexpected device disconnections
Calculate Battery Life Impact: Analyze the energy cost of different QoS levels and compare always-on versus deep-sleep publishing strategies
Key Concepts
MQTT: Message Queuing Telemetry Transport — pub/sub protocol optimized for constrained IoT devices over unreliable networks
Broker: Central server routing messages from publishers to all matching subscribers by topic pattern
Topic: Hierarchical string (e.g., home/bedroom/temperature) used to route messages to interested subscribers
QoS Level: Quality of Service 0/1/2 trading delivery guarantee for message overhead
Retained Message: Last message on a topic stored by broker for immediate delivery to new subscribers
Last Will and Testament: Pre-configured message published by broker when a client disconnects ungracefully
Persistent Session: Broker stores subscriptions and pending messages allowing clients to resume after disconnection
11.3 For Beginners: MQTT Hands-On Labs
These labs guide you through building real MQTT systems step by step. You will set up a broker, connect devices, publish sensor data, and subscribe to updates. It is like assembling furniture with instructions – each step builds on the previous one until you have a complete, working MQTT application.
11.4 Prerequisites
Before diving into this chapter, you should be familiar with:
Connecting to Wi-Fi...
Wi-Fi connected
IP address: 192.168.1.100
Connecting to MQTT broker... Connected
Temperature: 22.50C OK
Humidity: 45.30% OK
***
Temperature: 22.48C OK
Humidity: 45.35% OK
***
QoS 0 (At Most Once): Fire-and-forget, fastest but no guarantee
Retained Messages: client.publish(topic, msg, true) stores last value for new subscribers
Auto-Reconnect: if (!client.connected()) reconnect_mqtt()
MQTT Publishing Flow:
1. ESP32 connects to Wi-Fi network
2. ESP32 connects to MQTT broker (test.mosquitto.org:1883)
3. ESP32 publishes "online" status as retained message
4. Every 5 seconds:
   a. Read DHT22 sensor (temperature, humidity)
   b. Convert float to string
   c. Publish to "iotclass/lab1/temperature" topic
   d. Publish to "iotclass/lab1/humidity" topic
   e. Print success/failure indicators
5. Maintain connection with client.loop()
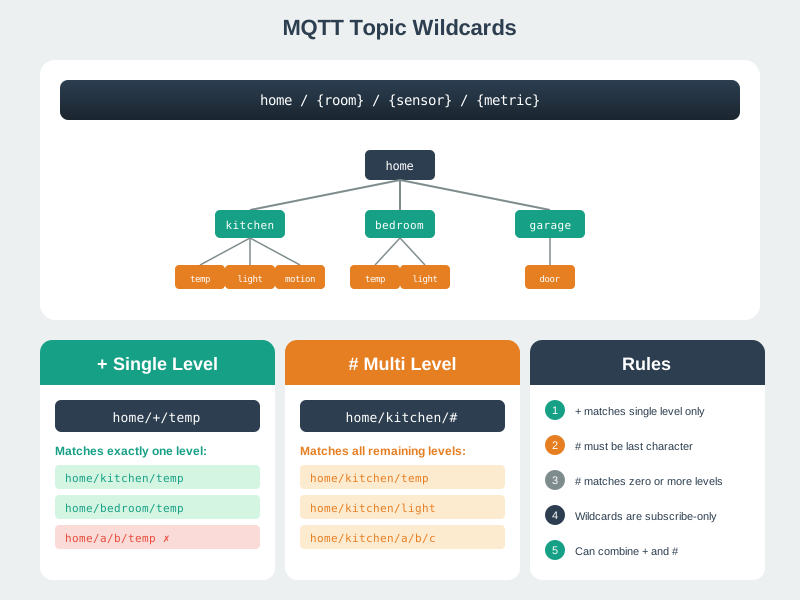
MQTT Topic Structure:
Figure 11.1: MQTT topic wildcard hierarchy for lab sensor data
Quality of Service Levels:
QoS 0 (At Most Once): Fast, no acknowledgment - used here
QoS 1 (At Least Once): Acknowledged, may deliver duplicates
QoS 2 (Exactly Once): Slowest, guaranteed single delivery
Real-World Applications:
Smart Agriculture: Soil moisture sensors publishing to cloud dashboard
Industrial Monitoring: Temperature/pressure sensors in manufacturing
Home Automation: Smart thermostats publishing temperature readings
Environmental Monitoring: Weather stations sending data to aggregation service
Add more sensors (motion, light) and publish to separate topics
Implement QoS 1 or 2 to see acknowledgments
Add Last Will and Testament message for disconnect detection
Publish JSON payload with multiple values: {"temp":22.5,"hum":45.3}
Add timestamp to messages for data logging
Learning Outcomes:
Configure ESP32 Wi-Fi connection
Integrate DHT22 sensor with MQTT
Implement publish with QoS levels
Handle MQTT reconnection
Use retained messages for status
Challenges:
Modify to publish only when temperature changes by +/-0.5C (reduce traffic)
Add battery voltage monitoring and publish with QoS 2
Implement Last Will and Testament to detect unexpected disconnections
Add JSON payload with multiple sensor readings
Checkpoint: First Publisher Evidence
You now know:
The Lab 1 evidence path starts with a DHT22 on GPIO 4, a 10k ohm pull-up, and iotclass/lab1/... topics.
The starter publisher sends temperature and humidity every 5 seconds and publishes retained online status for new subscribers.
The first optimization question is whether a +/-0.5C change threshold plus a 5-minute heartbeat is better than timer-only publishing.
Try It: MQTT Topic Hierarchy Builder
Design and visualize your own MQTT topic structure. Choose a domain and configure the hierarchy depth to see how topics scale.
Run it: Before you settle on the hierarchy in the builder below, stress-test a topic design in the Topic Designer Workbench. Enter a Publish Topic Name template and a Subscriber Topic Filter, set the fleet-scale assumptions (Tenants, Sites, Devices, Signals), and press Play to watch which levels the filter matches. Switch the scenario presets to Flat anti-pattern and Wildcard mistake to see the designs that break, then bring a filter that cleanly separates telemetry, commands, and status back into the builder here.
11.5.1 Worked Example: Optimizing Sensor Publish Frequency
Problem: Your DHT22 ESP32 sensors are publishing every 5 seconds (17,280 messages/day per sensor). With 50 sensors, that’s 864,000 messages/day. Assume a cloud message price of $1/million messages, and assume the broker is also hitting CPU limits.
Analysis:
Temperature in a room rarely changes more than 0.5°C per minute. Publishing every 5 seconds means 99% of messages report identical values.
Step 1: Calculate Current Costs
Messages/month: 864,000 × 30 = 25.9M messages
AWS IoT Core: 25.9 × $1 = $25.90/month
Broker CPU: Mosquitto on m5.large = $70/month
Total: $95.90/month
Step 2: Design Optimization
Publish only when temperature changes by ≥0.5°C OR 5 minutes elapse (heartbeat):
float lastTemp =0.0;unsignedlong lastPublish =0;constfloat THRESHOLD =0.5;// 0.5°C change triggers publishconstunsignedlong HEARTBEAT =300000;// 5 min max intervalvoid loop(){float temp = dht.readTemperature();unsignedlong now = millis();// Publish if temp changed OR heartbeat timeoutif(abs(temp - lastTemp)>= THRESHOLD ||(now - lastPublish >= HEARTBEAT)){ client.publish(topic_temp, String(temp).c_str()); lastTemp = temp; lastPublish = now;} delay(5000);// Still sample every 5s, but don't always publish}
Step 3: Calculate New Costs
For scenario estimation, assume an office temperature signal changes enough to report about 2-3 times/hour, plus a 5-minute heartbeat:
Meaningful changes: ~3/hour = 72/day
Heartbeats: (1440 min/day) / 5 = 288/day
Total: 360 messages/day per sensor (was 17,280)
For 50 sensors:
Messages/month: 360 × 50 × 30 = 540,000 messages
Message charge estimate: 0.54 × $1 = $0.54/month
Broker headroom may allow a smaller instance, depending on CPU, TLS, retained messages, and monitoring load.
Scenario result: scheduled publishing creates roughly 83% lower message-driven cost in this example.
Battery life: Publishing less often reduces radio transmit time; the actual gain depends on sleep, Wi-Fi association, and TLS setup overhead
Storage costs: Time-series DB costs drop proportionally
Key Insight: Don’t blindly publish on a timer. Publish on change with a heartbeat fallback. This pattern works for most slowly-changing telemetry (temperature, humidity, pressure, battery voltage).
The Mistake: Developers deploy IoT systems without considering broker connection limits. They test with 10-20 devices successfully, then deploy 500+ devices to production. New devices fail to connect with cryptic errors like “connection refused” or timeout, while existing connections work fine.
Why It Happens: MQTT brokers have configurable maximum connection limits, often defaulting to 1,024 (OS file descriptor limit) or lower. Each MQTT connection consumes a file descriptor, memory for session state (~2-10KB), and a TCP socket. When limits are reached, new connections are silently rejected without clear error messages.
The Fix: Calculate connection requirements before deployment. Configure broker limits explicitly. Implement connection health monitoring and alerting when approaching 80% capacity. Use connection pooling or MQTT bridge patterns for high-scale deployments.
Capacity Planning Formula: Required connections = (devices x 1.2) + (backend_services x 2) + (monitoring x 3). For 1,000 devices with 5 backend services and 2 monitoring tools, plan for: (1000 x 1.2) + (5 x 2) + (2 x 3) = 1,216 connections minimum.
11.6 Lab 2: Python MQTT Dashboard with Multiple Sensors
Objective: Create a real-time dashboard that subscribes to multiple sensor topics and displays data.
Materials:
Python 3.7+
paho-mqtt library
(Optional) Running ESP32 from Lab 1
Expected Output:
IoT MQTT Dashboard - Real-Time Sensor Data

LAB1
Temperature      22.50C              [14:32:15] QoS:0
Humidity         45.30%               [14:32:15] QoS:0
Status           Status: online       [14:32:10] QoS:0

Total messages received: 127
Last update: 14:32:15

Press Ctrl+C to exit
Learning Outcomes:
Subscribe to multiple MQTT topics with wildcards
Build real-time data visualization
Implement alert systems based on sensor data
Handle MQTT callbacks and data processing
Create user-friendly console interfaces
11.7 Lab 3: MQTT Home Automation - Lights and Motion
Objective: Build a complete home automation system with motion detection and automated lighting control.
Materials:
2x ESP32 boards (one for motion sensor, one for light control)
PIR motion sensor (HC-SR501)
LED (or relay module for real lights)
220 ohm resistor
Breadboard and wires
Circuit 1 - Motion Sensor (ESP32 #1):
PIR Sensor     ESP32
----------     -----
VCC    ------>  5V
OUT    ------>  GPIO 13
GND    ------>  GND
Circuit 2 - Light Control (ESP32 #2):
ESP32         LED
-----         ---
GPIO 2  ----> LED Anode (through 220 ohm resistor)
GND     ----> LED Cathode
Wi-Fi connected
Connecting to MQTT... Connected
Motion detected!
   Motion cleared
Auto turning off light
Expected Serial Output (Light Control):
Wi-Fi connected
Connecting to MQTT... Connected
Subscribed to: home/living_room/light/command
Received command: ON
Light turned ON
Received command: OFF
Light turned OFF
Implement automation logic with sensors and actuators
Use retained messages for state synchronization
Create topic naming conventions for home automation
Handle timing and auto-off functionality
Challenges:
Add manual control via MQTT (smartphone app or Node-RED)
Implement brightness control with PWM
Add multiple rooms with independent control
Create schedules (morning/evening modes)
Checkpoint: Multi-Device Automation
You now know:
The home automation lab splits motion sensing on GPIO 13 from light control on GPIO 2, so publish and subscribe roles are visible on separate ESP32 boards.
The topic plan keeps motion state, light commands, and light state separate instead of mixing sensor evidence with actuator commands.
The default AUTO_OFF_DELAY is 30 seconds, so PIR hold time, polling rate, and command timing all become part of the acceptance record.
Try It: Motion-to-Light Automation Timing
Experiment with motion sensor timing parameters to understand how AUTO_OFF_DELAY, PIR hold time, and sensor polling rate affect automation behavior and power consumption.
Show code
viewof autoOffDelay = Inputs.range([5,300], {value:30,step:5,label:"Auto-off delay (seconds)"})viewof pirHoldTime = Inputs.range([1,30], {value:8,step:1,label:"PIR hold time (seconds)"})viewof pollRate = Inputs.range([50,2000], {value:200,step:50,label:"Sensor poll rate (ms)"})viewof avgMotionEvents = Inputs.range([1,60], {value:10,step:1,label:"Motion events per hour"})
# Create password file with first usersudo mosquitto_passwd -c /etc/mosquitto/passwd iotuser# Add more users (without -c flag)sudo mosquitto_passwd /etc/mosquitto/passwd admin
Step 5: Restart Mosquitto
sudo systemctl restart mosquittosudo systemctl status mosquitto
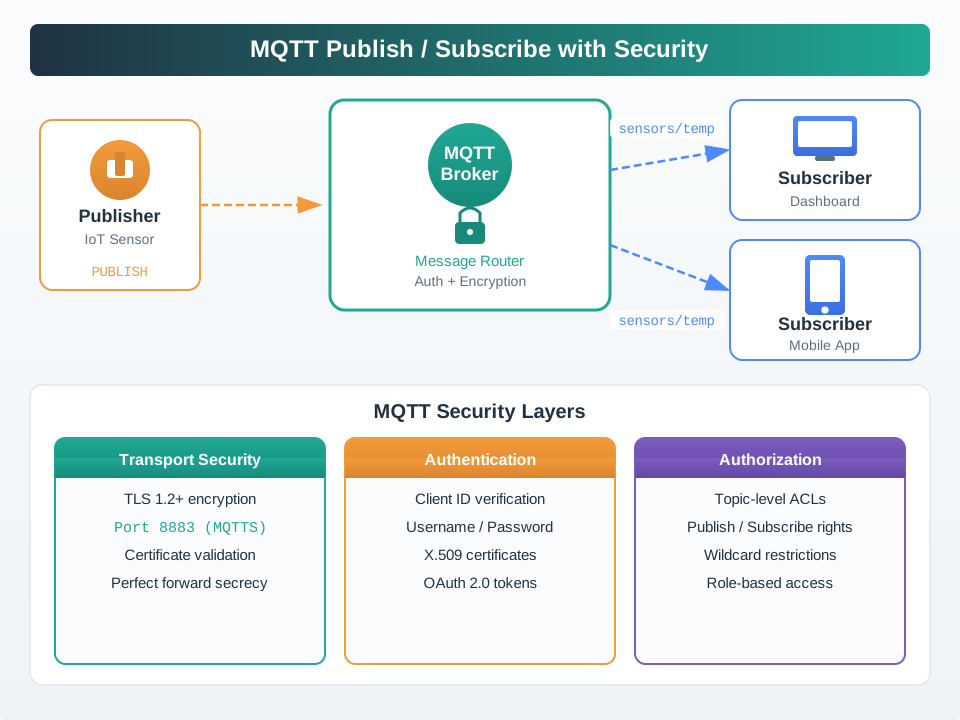
MQTT publish/subscribe flow with broker security layers
Figure 11.2: MQTT security architecture layers TLS transport, authentication, and topic-level authorization around the broker that routes messages from publishers to subscribers.
Testing Connection Security:
# Test with mosquitto_pub (with authentication)mosquitto_pub-h mqtt.local -p 8883 \-u iotuser -P your_password \--cafile /etc/mosquitto/certs/ca.crt \-t"secure/test"-m"Hello from terminal"-q 1# Test without authentication (should fail)mosquitto_pub-h mqtt.local -p 8883 \--cafile /etc/mosquitto/certs/ca.crt \-t"secure/test"-m"This will fail"
Learning Outcomes:
Generate SSL/TLS certificates for MQTT
Configure Mosquitto broker with security
Implement username/password authentication
Use encrypted MQTT connections
Understand certificate-based security
Test and troubleshoot secure MQTT
Security Best Practices:
Always use TLS in production (port 8883)
Disable anonymous access
Use strong passwords (12+ characters)
Implement topic-level ACLs (Access Control Lists)
Keep certificates updated (renew before expiration)
Monitor broker logs for suspicious activity
Use client certificates for enhanced security (mutual TLS)
Checkpoint: Secure Broker Baseline
You now know:
The secure lab moves MQTT traffic to TLS port 8883 with CA, server certificate, and server key files.
The minimum broker baseline disables anonymous access and adds a password file before production testing.
The negative test matters: an unauthenticated mosquitto_pub command should fail before you trust the broker configuration.
Try It: MQTT Security Configuration Advisor
Select your deployment scenario and security requirements to get a tailored Mosquitto configuration with an overall security score.
11.9 Interactive Simulator: MQTT QoS Levels and Last Will Testament
What This Simulates: ESP32 demonstrating MQTT Quality of Service levels and Last Will and Testament for reliable communication
QoS Levels Explained:
QoS 0 (At Most Once):          QoS 1 (At Least Once):      QoS 2 (Exactly Once):
Publisher -> Message ->         Publisher -> Message ->      Publisher -> Message ->
Broker -> Subscriber            Broker -> Subscriber         Broker -> PUBREC <-
                                Broker <- PUBACK             Publisher -> PUBREL ->
Fast, no guarantee              May duplicate                Broker -> PUBCOMP <-
                                Acknowledged                 Guaranteed once

Use for: sensor readings        Use for: commands            Use for: billing data
Power: Lowest                   Power: Medium                Power: Highest
Latency: ~5ms                   Latency: ~15ms               Latency: ~30ms
Run it: Rather than tracing the handshake diagrams above, operate the QoS Delivery Workbench to see delivery guarantees play out. Set the Publish QoS to 0, 1, and 2 in turn, then change the Network event to drop the first PUBLISH, the acknowledgement, or the QoS 2 PUBREL and press Play to watch which messages are lost, retried, or duplicated. Lower the Subscriber maximum QoS to see a downgrade, adjust Messages per minute and Round-trip time, and toggle the idempotent option, then use those observations to answer the QoS choice in the check below.
11.10 Quick Check: QoS Levels
Last Will and Testament (LWT):
Device connects with LWT set:
{
  topic: "devices/sensor01/status",
  message: "offline",
  qos: 1,
  retain: true
}

Normal flow:                    Unexpected disconnect:
1. Device connects              1. Device crashes
2. Publishes "online"           2. Network timeout (60s)
3. Sends data periodically      3. Broker detects disconnect
4. Publishes "offline"          4. Broker publishes LWT:
5. Disconnects gracefully          "devices/sensor01/status" -> "offline"
                                5. Monitoring system alerted

Result: Device status always known, even after crash
How to Use:
Click the Play button to start simulation
Watch LWT being set during connection
Observe messages sent with different QoS levels
See PUBACK responses for QoS 1
Monitor retained status messages
Learning Points
QoS Level Comparison:
QoS 0 Guarantee: None Duplicates: No ACK overhead: 0 bytes Use case: Sensors
QoS 1 Guarantee: At least once Duplicates: Possible ACK overhead: 4 bytes (PUBACK) Use case: Commands
QoS 2 Guarantee: Exactly once Duplicates: Never ACK overhead: 12 bytes (PUBREC + PUBREL + PUBCOMP) Use case: Billing
Last Will and Testament Flow:
CONNECT packet with LWT fields, for example:
Client ID: sensor01
LWT topic: devices/sensor01/lwt
LWT message: "offline"
LWT QoS: 1
LWT retain flag: true
Keep-alive: 60 seconds
The broker stores the LWT but does not publish it yet.
If the client disconnects gracefully, the LWT is discarded. If the client times out or crashes, the broker publishes the LWT message.
Monitoring clients subscribed to devices/+/lwt receive the notification and can alert an operator or trigger remediation.
DO:
- Set LWT on critical devices
- Use retain=true for status topics
- Set QoS 1 for LWT
- Include timestamp in LWT message
- Subscribe to +/status for monitoring

DON'T:
- Use large LWT messages (keep <100 bytes)
- Set very short keep-alive (<30s)
- Forget to publish "online" after connect
- Use QoS 0 for LWT (unreliable)

Example LWT message:
{
  "status": "offline",
  "reason": "unexpected",
  "timestamp": 1698765432,
  "last_seen": "2024-10-28T10:23:52Z"
}
Try It: MQTT Keep-Alive and LWT Timeout Planner
Configure keep-alive and LWT settings to balance between fast disconnect detection and network overhead. The broker detects a dead client after 1.5x the keep-alive interval (per MQTT spec).
Run it: Before you fix keep-alive and LWT values in the planner below, watch how the broker actually detects a lost client in the Last Will Workbench. Set the Keep Alive interval and a Will Delay, choose the Keep-alive timeout scenario, and press Play or Trigger event to see the broker publish the Will after 1.5x keep-alive; then compare the Graceful disconnect and Reconnect before Will Delay scenarios, which suppress the Will. Carry the detection-time and false-trigger behavior you observe into the keep-alive and QoS choices you record in the planner.
11.10.1 Pitfall: Stale Retained Messages After Device Removal
The Mistake: Developers use retained messages for device status (e.g., devices/sensor42/status with retain=true), but when devices are decommissioned or replaced, the old retained messages remain on the broker indefinitely. New subscribers receive stale “online” status for devices that no longer exist.
Why It Happens: Retained messages persist until explicitly cleared with an empty payload. Most developers focus on the “publish” side and forget that retained messages require lifecycle management. Brokers like Mosquitto will keep retained messages forever unless configured otherwise.
The Fix: Implement device decommissioning that clears retained messages. Publish an empty payload (zero-length) with retain=true to delete the retained message. For MQTT 5.0, use Message Expiry Interval to auto-expire stale status.
# MQTT 3.1.1: Clear retained message on device removaldef decommission_device(client, device_id):# Publish empty payload with retain=true to clear client.publish(f"devices/{device_id}/status", payload="", qos=1, retain=True) client.publish(f"devices/{device_id}/config", payload="", qos=1, retain=True) client.publish(f"devices/{device_id}/lwt", payload="", qos=1, retain=True)print(f"Cleared all retained messages for {device_id}")# MQTT 5.0: Auto-expire status messagesfrom paho.mqtt.properties import Propertiesfrom paho.mqtt.packettypes import PacketTypesprops = Properties(PacketTypes.PUBLISH)props.MessageExpiryInterval =300# Expire after 5 minutes of no updateclient.publish("devices/sensor01/status", payload='{"status": "online", "timestamp": 1699123456}', qos=1, retain=True, properties=props)# If device stops publishing, status auto-clears after 5 minutes
Broker Configuration (Mosquitto): Set retain_available false to disable retained messages entirely if your application doesn’t need them, or use $SYS/broker/retained messages/count to monitor accumulation.
11.10.2 Pitfall: Last Will Triggered on Graceful Disconnect
The Mistake: Developers configure Last Will and Testament (LWT) to publish “offline” status, expecting it only fires on crashes or network failures. But they observe LWT messages being published even during normal shutdown sequences, flooding monitoring systems with false “offline” alerts.
Why It Happens: The MQTT spec states LWT is published when the broker closes the connection “without receiving a DISCONNECT packet.” Many developers call client.disconnect() but don’t wait for completion, or the TCP connection closes before the DISCONNECT packet is sent. Network issues during graceful shutdown can also prevent DISCONNECT delivery.
The Fix: Always explicitly publish “offline” status before disconnecting, then send DISCONNECT. Use blocking disconnect or wait for confirmation. For Python paho-mqtt, use disconnect() followed by loop_stop() in the correct order.
// ESP32: Graceful shutdown with explicit statusvoid gracefulShutdown(){// Step 1: Publish explicit offline status mqttClient.publish("devices/sensor01/status","offline",true);// retain=true delay(100);// Allow time for publish to complete// Step 2: Send DISCONNECT packet (prevents LWT) mqttClient.disconnect(); delay(100);// Allow TCP to close cleanly// Step 3: Now safe to power down WiFi.disconnect(true); esp_deep_sleep_start();}// If LWT fires anyway, it's redundant (already sent "offline")// Better than missing offline status if crash occurs before explicit publish
# Python paho-mqtt 2.0+: Proper disconnect sequenceimport timedef graceful_disconnect(client):# Publish explicit status first result = client.publish("devices/sensor01/status", "offline", qos=1, retain=True) result.wait_for_publish(timeout=5.0) # Block until published# Now disconnect - this prevents LWT from firing client.disconnect() client.loop_stop() # Stop network thread AFTER disconnect# Common mistake: loop_stop() before disconnect()# This kills the network thread before DISCONNECT packet is sent# Result: Broker never receives DISCONNECT, triggers LWT
MQTT 5.0 Enhancement: Use Reason Code in DISCONNECT to tell broker why you’re disconnecting. Reason Code 0x00 (Normal disconnection) explicitly signals “don’t publish LWT.”
Battery Life Calculation:
Scenario: Send temperature every 60 seconds

QoS 0:
- Assumptions: ~120 mA radio current, ~50 ms radio-on time per publish
- Per message: 120 mA x 50 ms / 3,600,000 = 0.0017 mAh
- Per day: 1440 x 0.0017 = 2.4 mAh/day
- Battery (2000 mAh): 2000 / 2.4 = ~833 days (~2.3 years)

QoS 1:
- Assumptions: ~120 mA radio current, ~150 ms radio-on time (PUBLISH + PUBACK)
- Per message: 120 mA x 150 ms / 3,600,000 = 0.0050 mAh
- Per day: 1440 x 0.0050 = 7.2 mAh/day
- Battery (2000 mAh): 2000 / 7.2 = ~278 days (~9 months)

QoS 2:
- Assumptions: ~120 mA radio current, ~300 ms radio-on time (4-way handshake)
- Per message: 120 mA x 300 ms / 3,600,000 = 0.0100 mAh
- Per day: 1440 x 0.0100 = 14.4 mAh/day
- Battery (2000 mAh): 2000 / 14.4 = ~139 days (~4.6 months)

Conclusion: QoS 0 uses ~67% less TX energy than QoS 1; QoS 2 has the highest overhead.

Note: These estimates isolate MQTT exchange time. If the device reconnects Wi-Fi/TLS each minute (common with deep sleep), connection overhead will dominate and battery life will be much lower.
11.10.3 Putting Numbers to It
The QoS battery calculations above are a simplified “always-on” radio model. With ESP32 deep sleep, connection setup often dominates:
Deep sleep scenario (ESP32 wakes every 60 s, sends 1 reading, sleeps):
Battery life (2000 mAh): \[\frac{2{,}000}{76.8} = 26 \text{ days}\]
Key insight: In this example, Wi-Fi setup is much larger than the MQTT publish. Treat persistent sessions, sleep interval, retained status, and TLS setup as scenario variables instead of assuming a fixed battery-life multiplier.
Checkpoint: Reliability and Energy Evidence
You now know:
QoS choices change both delivery guarantees and packet exchanges: QoS 0 has no acknowledgement, QoS 1 adds PUBACK, and QoS 2 adds PUBREC, PUBREL, and PUBCOMP.
Last Will evidence depends on the broker not receiving DISCONNECT; keep-alive detection uses 1.5x the configured interval.
In the deep sleep example, Wi-Fi setup, MQTT setup, and one publish add to 53.33 uAh per wake, which is the number to challenge before promising battery life.
11.11 Interactive Design Tools
Use these calculators as scenario estimators for MQTT deployments. Confirm final sizing with measurements from your broker, radio, TLS settings, and cloud pricing.
11.11.1 MQTT QoS Battery Life Calculator
Estimate how MQTT publish exchange time changes battery demand at each QoS level.
Estimate monthly MQTT message charges and potential savings from change-based publishing. Update the unit price to match the provider and region you are using.
The battery calculator isolates MQTT publish exchange time, so it should not be treated as a full product battery-life estimate by itself.
The broker capacity planner uses the same connection formula as the pitfall section: devices x 1.2, backend services x 2, and monitoring x 3.
The cost and deep sleep calculators turn the lab trade-offs into reviewable claims about message volume, heartbeat interval, Wi-Fi setup, and MQTT setup overhead.
11.12 Knowledge Check
Test your understanding of MQTT implementations with these questions:
11.13 Matching Quiz: MQTT Concepts and Definitions
Last Will and Testament is strongest when the lab treats presence as evidence, not as a dashboard badge. A useful transcript shows the subscriber already listening, the will-enabled client connecting, the exact ungraceful stop, and the broker publication on the status topic. Record the broker, TLS mode, username or client-certificate method, will topic, retain flag, QoS, keep-alive, and termination method so another engineer can reproduce why the will did or did not fire.
Run this test on a private or local broker when the topic carries device status. Public brokers are useful for syntax checks, but they do not provide stable authorization boundaries, broker log access, or protection from another user publishing to the same topic. In production, scope the status topic by site and device id, protect it with ACLs so only the device or trusted service can write it, and include timestamps so operators can distinguish a fresh offline event from stale retained state.
The under-the-hood failure to rehearse is split-brain presence. A device can publish retained online before its sensors are ready, a long Will Delay Interval can make alarms late, and an aggressive keep-alive can make mobile or cellular devices flap offline during normal roaming. MQTT 5 Will Delay helps short network blips by waiting before publishing the will; retained-message cleanup prevents a decommissioned device or reprovisioned replacement from inheriting another device’s stale marker.
Keep one presence acceptance record: clean DISCONNECT suppresses the will, killed process or network drop fires it after keep-alive detection, late subscribers see the retained state, and decommissioning clears retained status topics.
11.19 Summary
This chapter provided complete hands-on MQTT implementation labs:
Lab 1 - ESP32 Publisher: Built a DHT22 temperature sensor system with QoS 0 publishing, retained status messages, and automatic reconnection
Lab 2 - Python Dashboard: Created multi-topic subscription with wildcards, real-time display, and alert thresholds
Lab 3 - Home Automation: Implemented motion-controlled lighting using two ESP32 devices communicating via MQTT
Lab 4 - Secure MQTT: Configured TLS certificates, username/password authentication, and ACLs for production deployment
QoS and LWT: Demonstrated Quality of Service levels (0/1/2) with battery impact calculations and Last Will Testament for disconnect detection
Common Pitfalls: Identified stale retained messages, LWT timing issues, and TLS timeout problems with solutions
MQTT Production Review: Scenario-based questions, MQTT vs CoAP vs HTTP comparisons, broker clustering Why read it: Synthesizes all MQTT concepts from hands-on labs into production-ready knowledge.
MQTT QoS and MQTT Sessions: QoS 0/1/2 mechanics, clean vs persistent sessions, message queuing Why read it: Deepens understanding of the QoS trade-offs applied throughout these labs.
MQTT Security Fundamentals: TLS mutual authentication, certificate management, threat modelling Why read it: Expands on the Lab 4 security configuration with production security design.
Sensor Lab Implementation: ESP32 wiring, sensor setup, measurement checks, and lab review Why read it: Supports hardware setup for Labs 1 and 3 and extends to battery-powered designs.
MQTT Production Review: Load testing, network simulation, capacity validation Why read it: Validates MQTT broker capacity planning before production deployment.
11.23 Key Takeaway
Hands-on MQTT labs should verify observable broker behavior, not only code execution. Check subscription filters, retained state, Last Will messages, QoS acknowledgements, and reconnection behavior in the broker logs or dashboard.

 Checkpoint: First Publisher Evidence