Raspberry Pi
Learn about Raspberry Pi in IoT systems -- from GPIO programming and sensor integration to edge computing and IoT gateway deployment
Raspberry Pi
Learning Objectives
By the end of this topic, you should be able to:
- Explain the architecture and capabilities of Raspberry Pi models for IoT applications
- Interface sensors and actuators using GPIO, I2C, SPI, and UART protocols
- Configure a Raspberry Pi as an IoT edge gateway or data collection node
- Develop Python-based IoT applications with sensor data processing and cloud connectivity
- Evaluate when Raspberry Pi is the appropriate choice vs. microcontrollers like Arduino or ESP32
- What it is: The Raspberry Pi is a single-board computer (SBC) running Linux, offering GPIO pins, multiple communication interfaces, and full operating system capabilities for IoT prototyping and edge computing.
- Why it matters: Unlike microcontrollers, the Raspberry Pi can run full software stacks (databases, web servers, ML inference), making it ideal for IoT gateways, edge processing, and rapid prototyping of complex IoT solutions.
- Key tradeoff: The Raspberry Pi offers far more computational power than microcontrollers but draws significantly more power (2—7W vs. microamps), making it unsuitable for battery-powered sensor nodes but excellent for always-powered gateway roles.
Temperature Terry says: “Think of the Raspberry Pi as a tiny computer that fits in your hand! It’s like having a mini laptop that can talk to sensors and control things around your house.”
the LED adds: “I love the Raspberry Pi because it has special pins called GPIO — those are like my little power sockets! When the Pi tells a pin to turn ON, I light up. When it says OFF, I go dark. It can even make me blink in patterns!”
the microcontroller explains: “I’m great at simple, quick tasks — like reading a temperature sensor over and over. But the Raspberry Pi is like my big sibling. It can run a whole operating system, browse the internet, AND talk to sensors at the same time. When a job is too big for me, the Pi takes over!”
the battery warns: “Here’s the thing though — the Raspberry Pi is hungry! It needs a lot more power than Max. I can keep Max running for months, but the Pi would drain me in just a few hours. So the Pi usually stays plugged into a wall socket, while Max goes on battery-powered adventures!”
Fun Fact: The very first Raspberry Pi was created in 2012 to help kids learn programming. Now there are over 60 million Raspberry Pis in the world, and many of them are being used in IoT projects — from smart weather stations to robot controllers!
A Raspberry Pi is a small, affordable computer about the size of a credit card. Unlike your laptop or desktop, it is designed to connect to the physical world through electronic pins along one edge of the board.
Why does this matter for IoT?
- Full computer: It runs Linux, so you can write programs in Python, JavaScript, C++, or any other language. You can install databases, web servers, and machine learning libraries.
- Hardware connections: Its 40 GPIO (General Purpose Input/Output) pins let you wire up sensors (temperature, humidity, motion), displays, motors, and LEDs directly.
- Networking built-in: Modern Raspberry Pi models include Wi-Fi and Bluetooth, so your IoT device can connect to the internet and other devices without extra hardware.
How is it different from Arduino?
| Feature | Raspberry Pi | Arduino |
|---|---|---|
| Type | Single-board computer | Microcontroller |
| OS | Linux (Raspberry Pi OS) | No OS (bare-metal) |
| Language | Python, C++, Java, etc. | C/C++ (Arduino IDE) |
| Power | ~2—7 W | ~0.05—0.5 W |
| Best for | Gateways, edge AI, UI | Simple sensor loops |
A simple mental model: If Arduino is like a light switch (does one thing reliably), the Raspberry Pi is like a smartphone (does many things, needs more power).
Overview
Key Concepts: single-board computer (SBC), GPIO, Linux, edge gateway, sensor integration, Python, I2C/SPI/UART
The Raspberry Pi is a family of single-board computers developed by the Raspberry Pi Foundation. In the IoT ecosystem, it serves as a versatile platform for prototyping, edge computing, gateway deployment, and data collection. Its ability to run a full Linux operating system distinguishes it from microcontrollers, enabling complex processing, multi-threaded applications, and rich software ecosystems.
Raspberry Pi Models for IoT
| Model | CPU | RAM | GPIO | Wi-Fi | Best IoT Use |
|---|---|---|---|---|---|
| Pi 5 | Quad-core 2.4 GHz | 4—8 GB | 40 pins | Wi-Fi 5, BLE 5 | Edge AI, video analytics |
| Pi 4B | Quad-core 1.8 GHz | 2—8 GB | 40 pins | Wi-Fi 5, BLE 5 | IoT gateway, dashboard |
| Pi Zero 2 W | Quad-core 1.0 GHz | 512 MB | 40 pins | Wi-Fi 4, BLE 4.2 | Compact sensor nodes |
| Pi Pico W | Dual-core 133 MHz | 264 kB | 26 pins | Wi-Fi 4, BLE 5.2 | Microcontroller tasks |
Raspberry Pi Architecture for IoT
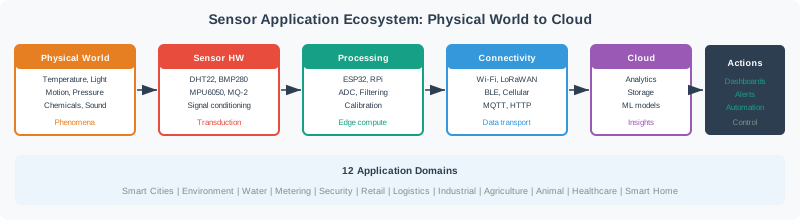
The following diagram illustrates how a Raspberry Pi interfaces with the physical world and connects to cloud services in a typical IoT deployment.
GPIO and Communication Interfaces
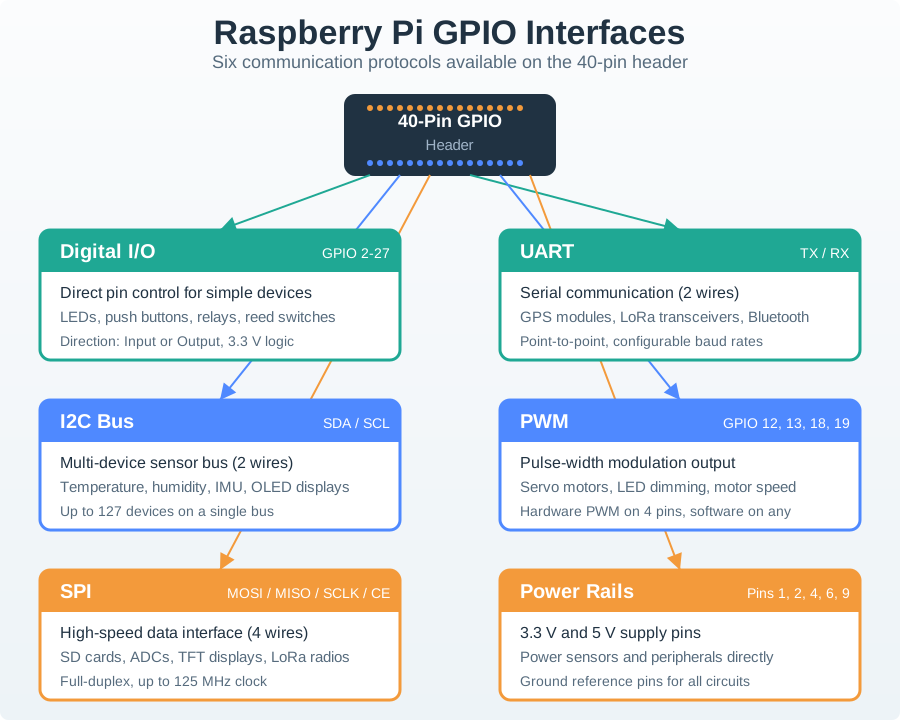
The Raspberry Pi’s GPIO header is the primary hardware interface for IoT projects. Understanding the available communication protocols is essential for connecting sensors and actuators.
Protocol Selection Guide
| Protocol | Speed | Wires | Max Devices | Best For |
|---|---|---|---|---|
| Digital GPIO | N/A | 1 per signal | 28 | Simple on/off (LEDs, buttons, relays) |
| I2C | 100—400 kbps | 2 (SDA, SCL) | 127 | Multi-sensor setups (temperature, humidity, IMU) |
| SPI | Up to 125 Mbps | 4 + 1 per device | Limited by CE pins | High-speed (displays, SD cards, fast ADCs) |
| UART | 9600—115200 bps | 2 (TX, RX) | 1 (point-to-point) | GPS modules, LoRa radios, debug console |
| PWM | Configurable | 1 | 2 hardware | Servo control, LED dimming |
Raspberry Pi as an IoT Gateway
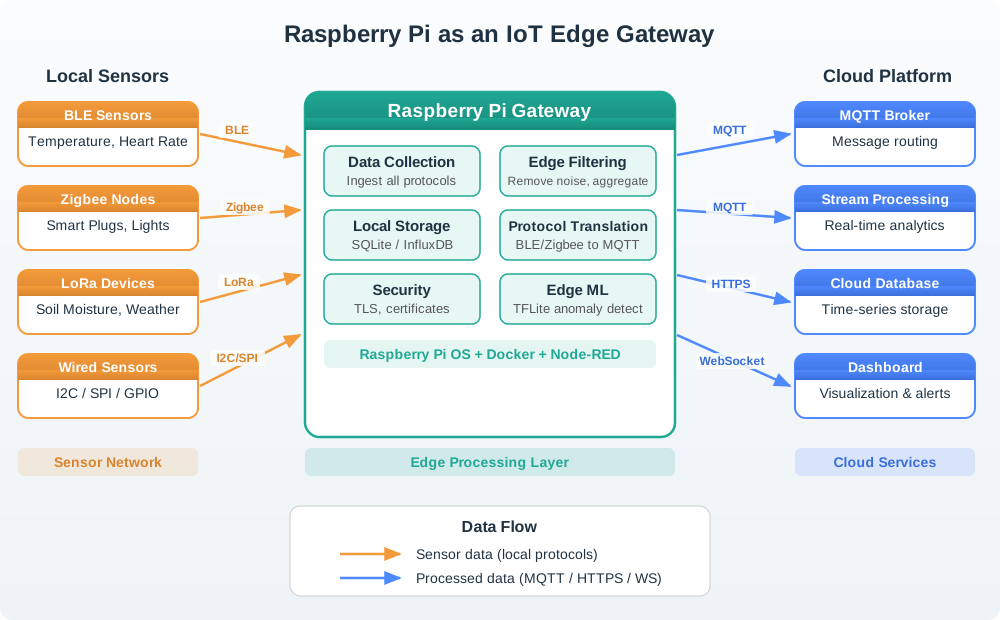
One of the most powerful IoT roles for the Raspberry Pi is as an edge gateway — bridging local sensor networks to cloud platforms.
Gateway Capabilities
The Raspberry Pi excels as a gateway because it can:
- Protocol translation: Convert BLE, Zigbee, or LoRa data into MQTT or HTTP for cloud delivery
- Edge filtering: Reduce data volume by filtering noise and aggregating readings before transmission
- Local buffering: Store data in SQLite or InfluxDB during network outages for later sync
- Security enforcement: Run TLS/SSL, implement access control, and manage device certificates
- Edge ML: Run lightweight inference models (TensorFlow Lite, ONNX) to detect anomalies locally
IoT Software Stack on Raspberry Pi
Understanding the software layers running on a Raspberry Pi IoT deployment helps you make informed architecture decisions.
Raspberry Pi vs. Microcontrollers: Decision Framework
Choosing between a Raspberry Pi and a microcontroller (Arduino, ESP32) is a critical IoT design decision. Use this framework to guide your choice.
Worked Example: Smart Environment Monitor
This worked example walks through building a complete IoT environment monitoring system using a Raspberry Pi, a BME280 sensor, and MQTT.
Problem Statement
Build a system that reads temperature, humidity, and barometric pressure every 30 seconds, stores data locally, and publishes readings to an MQTT broker for remote monitoring.
Step 1: Hardware Setup
Components needed:
- Raspberry Pi 4B (or newer)
- BME280 sensor breakout board (I2C)
- Jumper wires (4: VCC, GND, SDA, SCL)
- 5V power supply
Wiring (I2C connection):
| BME280 Pin | Raspberry Pi Pin |
|---|---|
| VCC | Pin 1 (3.3V) |
| GND | Pin 6 (Ground) |
| SDA | Pin 3 (GPIO 2 / SDA1) |
| SCL | Pin 5 (GPIO 3 / SCL1) |
Step 2: Software Setup
# Enable I2C interface
sudo raspi-config nonint do_i2c 0

# Install dependencies
pip3 install adafruit-circuitpython-bme280 paho-mqtt

# Verify sensor is detected (should show address 0x76 or 0x77)
i2cdetect -y 1
Step 3: Python Application
import time
import json
import board
import adafruit_bme280.advanced as adafruit_bme280
import paho.mqtt.client as mqtt

# Initialize I2C sensor
i2c = board.I2C()
bme280 = adafruit_bme280.Adafruit_BME280_I2C(i2c, address=0x76)

# Configure MQTT
client = mqtt.Client(client_id="rpi-env-monitor")
client.tls_set()  # Enable TLS for security
client.username_pw_set("iot_user", "secure_password")
client.connect("mqtt.example.com", 8883)
client.loop_start()

INTERVAL = 30  # seconds

try:
    while True:
        reading = {
            "temperature_c": round(bme280.temperature, 2),
            "humidity_pct": round(bme280.relative_humidity, 2),
            "pressure_hpa": round(bme280.pressure, 2),
            "timestamp": time.time()
        }

        # Publish to MQTT
        client.publish(
            "home/livingroom/environment",
            json.dumps(reading),
            qos=1  # At-least-once delivery
        )
        print(f"Published: {reading}")
        time.sleep(INTERVAL)

except KeyboardInterrupt:
    client.loop_stop()
    client.disconnect()
Step 4: Run as a System Service
# /etc/systemd/system/env-monitor.service
[Unit]
Description=IoT Environment Monitor
After=network-online.target
Wants=network-online.target

[Service]
ExecStart=/usr/bin/python3 /home/pi/env_monitor.py
Restart=always
RestartSec=10
User=pi

[Install]
WantedBy=multi-user.target
sudo systemctl enable env-monitor
sudo systemctl start env-monitorExpected Output
The system publishes JSON payloads every 30 seconds:
{
  "temperature_c": 22.45,
  "humidity_pct": 48.12,
  "pressure_hpa": 1013.25,
  "timestamp": 1706625000.0
}
Key design decisions in this example:
- I2C chosen over SPI because only one sensor is needed and I2C uses fewer wires
- QoS 1 ensures readings are delivered even if the network briefly drops
- systemd service ensures the monitor restarts automatically after power failures
- TLS encryption secures data in transit to the MQTT broker
Common Pitfalls
-
No graceful shutdown handling: Pulling power without proper shutdown corrupts the SD card. Always implement
shutdown -h nowvia a hardware button or remote command, or use a read-only filesystem overlay. -
Running as root unnecessarily: Many tutorials use
sudofor GPIO access. Instead, add your user to thegpiogroup (sudo usermod -aG gpio pi) and use libraries likegpiozerothat do not require root. -
SD card wear from excessive writes: Logging sensor data every second directly to the SD card will wear it out in months. Use
tmpfsfor temporary data, batch writes, or an external USB drive for databases. -
Ignoring thermal throttling: The Pi 4/5 throttles CPU speed when it overheats (above 80C). In enclosed IoT deployments, add a heatsink or fan, and monitor
/sys/class/thermal/thermal_zone0/temp. -
Assuming GPIO is 5V tolerant: Raspberry Pi GPIO pins operate at 3.3V logic. Connecting a 5V sensor output directly to a GPIO pin can permanently damage the board. Always use a level shifter or voltage divider.
-
Not securing the default configuration: Raspberry Pi OS ships with well-known defaults. Change the default password, disable SSH password auth (use key-based), enable the firewall (
ufw), and keep packages updated. -
Blocking the main thread with
time.sleep(): In multi-sensor setups, sleeping in the main loop blocks all other operations. Usethreading,asyncio, or event-driven frameworks like Node-RED instead.
Knowledge Check
Test your understanding of Raspberry Pi in IoT systems.
Learning Resources
- Start here: Set up a Raspberry Pi with sensors using the worked example above
- Explore communication: Study I2C, SPI, and UART in the Sensor Interfacing Protocols chapter
- Build a gateway: Follow the IoT gateway pattern from the Edge & Fog Computing chapter
- Deploy at scale: Learn fleet management and containerized deployment in Choosing a Hardware Platform
Chapter Content
Key related chapters that go deeper on the topics covered above:
- Sensor Interfacing Protocols: I2C, SPI, UART wiring and code patterns
- Edge & Fog Computing: Using the Pi as an edge processor and gateway
- MQTT Python Patterns: Publishing sensor data from Python, matching the worked example above
- Choosing a Hardware Platform: Where the Pi fits versus Arduino, ESP32, and other boards
Summary
| Aspect | Key Takeaway |
|---|---|
| What | Single-board computer running Linux with GPIO for sensor/actuator interfacing |
| Strengths | Full OS, rich software ecosystem, multiple protocols, edge AI capable |
| Limitations | High power draw (2—7W), not ideal for battery-powered nodes, SD card wear |
| Best roles | IoT gateway, edge processor, prototyping platform, dashboard host |
| Key interfaces | GPIO (digital I/O), I2C (multi-sensor bus), SPI (high-speed), UART (serial) |
| Software stack | Python + gpiozero + MQTT + Node-RED + InfluxDB + Docker |
| vs. Microcontrollers | Choose Pi for complexity, OS needs, gateway roles; choose MCU for power, cost, simplicity |
| At scale | Use fleet management (Balena, Ansible), containerization (Docker), OTA updates |
The Raspberry Pi occupies a unique position in the IoT ecosystem: more capable than microcontrollers but more power-hungry, it excels wherever you need a full operating system, complex processing, multi-protocol bridging, or rapid prototyping. Understanding when to use it — and when to reach for a microcontroller instead — is a critical skill for IoT system designers.