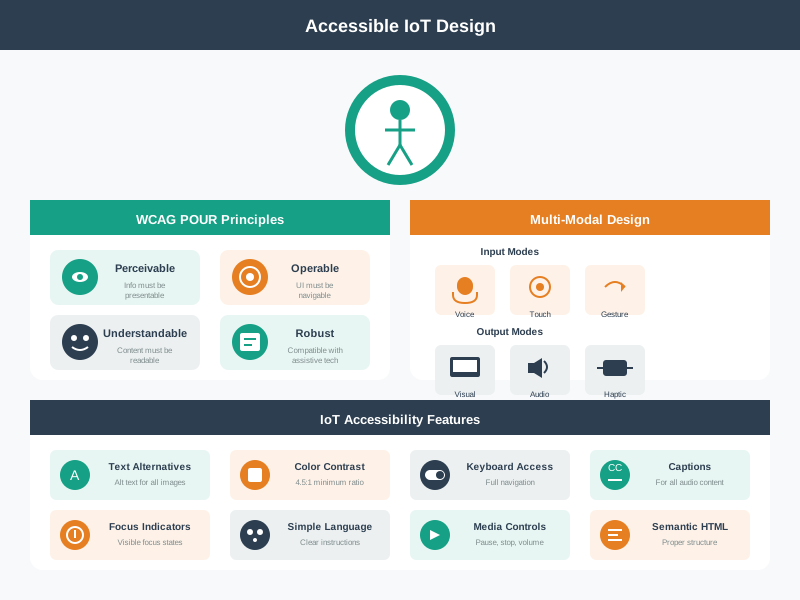
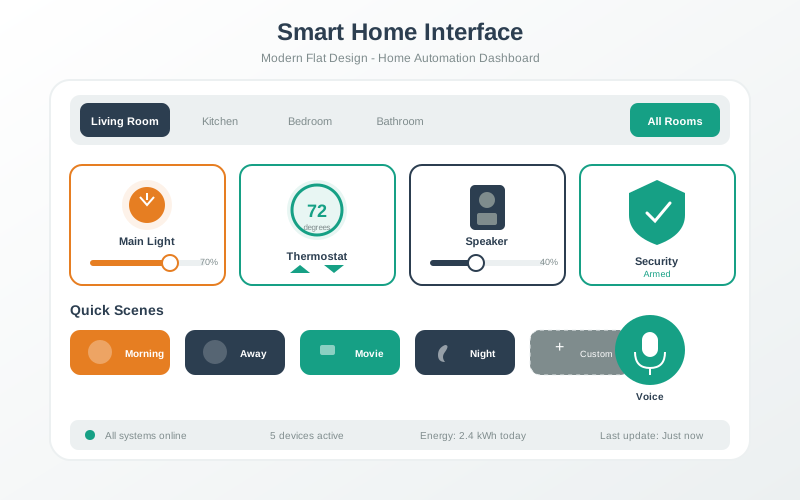
Multimodal design is not about adding channels for novelty; it is about giving people reliable ways to perceive and control important states. Start with the critical action, then decide which voice, touch, physical, visual, haptic, or redundant feedback keeps the experience usable when one mode fails.
Phoebe’s Field Notes: Why a Capacitive Button Goes Deaf Under a Glove
Phoebe’s Why
A capacitive button never touches your finger – it touches the electric field your finger perturbs. The sense electrode and your fingertip form the two plates of a tiny capacitor, and a firmware timer measures how long that capacitor takes to charge, which is a direct stand-in for how large the capacitance is. A winter glove does not block the field; it just pushes your finger farther from the electrode and replaces some of the coupling with low-permittivity fabric instead of skin. Both effects shrink the same capacitance the controller is trying to read, so “gloves do not work on touchscreens” is not a mystery – it is a measurable, first-principles drop in the electrical quantity the whole interaction depends on.
The Derivation
Parallel-plate coupling through a layered dielectric, summed as series capacitances:
Relaxation-oscillator charge time is what the controller actually measures, and inverts for \(C\):
\[T = RC\ln 2 \;\Rightarrow\; C = \frac{T}{R\ln 2}\]
Recovering a signal that has shrunk by ratio \(r\) needs oversampling gain \(10\log_{10}N\) dB to close a \(20\log_{10}r\) dB power deficit:
\[N \approx 10^{2\log_{10}r} = r^2\]
Worked Numbers: Bare Finger vs. Glove
Bare finger through a glass overlay (catalog-typical \(d=1.00\) mm, \(\varepsilon_r=4.00\)): \(d/\varepsilon_r = 0.250\) mm \(\to C_1 = \varepsilon_0 A/(d/\varepsilon_r) = 3.54\) pF (for \(A=1.00\) cm\(^2\))
Same finger through the glass plus a winter glove (catalog-typical \(d=3.00\) mm, \(\varepsilon_r=1.50\) fabric): total \(d/\varepsilon_r = 0.250+2.00 = 2.25\) mm \(\to C_2 = 0.394\) pF
Ratio:\(C_1/C_2 = 9.00\times\) – the glove’s reading is nine times smaller, and the charge time shrinks by the same \(9.00\times\) (\(T_1=2.45\ \mu\)s vs. \(T_2=0.273\ \mu\)s at \(R=1.00\) M\(\Omega\))
Battery tie: recovering a \(9.00\times\)-smaller signal needs roughly \(N\approx9.00^2=81.0\) times the averaged samples. At a catalog-typical 2.00 mA active cap-sense current and 50.0 \(\mu\)s per conversion, standard single-sample scanning at 100 Hz costs \(I_{\mathrm{avg}}=2.00(50.0\mu s\times100) = 0.0100\) mA, but 81\(\times\) oversampling for reliable glove detection costs \(2.00(0.500\%\times81) = 0.810\) mA – an 81.0\(\times\) jump in sensing current, which is exactly why products add a physical-button or voice fallback instead of chasing gloves with ever-heavier oversampling
27.2 Learning Objectives
By the end of this chapter, you will be able to:
Design Multimodal Interactions: Create interfaces that support voice, touch, physical, and gesture modalities appropriately
Apply Modality Selection Frameworks: Match interface modality to user context and task complexity
Implement Graceful Degradation: Design systems that continue functioning when components fail
Balance Tradeoffs: Make informed decisions between touch vs. voice, visual vs. audio, and cloud vs. local architectures
MVU: Multimodal Interaction Patterns
Core Concept: IoT interfaces must provide feedback through multiple simultaneous channels (visual, audio, haptic) because users interact in varied contexts where any single modality may be unavailable or inappropriate. Why It Matters: Users check IoT device status in 2-3 second glances while multitasking. If feedback requires focused attention on a single channel (reading text, counting LED blinks), users will miss critical information and lose trust in the system. Key Takeaway: Every state change must be confirmed through at least two modalities within 100ms - visual (LED color/animation) plus audio (beep pattern) or haptic (vibration), ensuring users can perceive feedback regardless of context (dark room, noisy environment, hands full).
Multimodal Interface Basics
IoT devices are used in many different contexts – a kitchen with greasy hands, a noisy factory floor, a dark bedroom. No single interaction method works everywhere. Multimodal design means supporting multiple ways to interact: voice (“turn off the lights”), touch (tapping an app), physical controls (pressing a button), and gesture (waving to activate). The key principle is that every important state change should be confirmed through at least two channels (for example, an LED color change plus a beep) so users get feedback regardless of whether they are looking at the device, listening, or feeling for vibration.
First define each modality’s input, output, fallback, accessibility, privacy, and test evidence.
Then keep voice, app, hub, firmware, and notifications synchronized around shared state.
Next compare touch, voice, visual, audio, cloud, local, and physical controls against latency, privacy, reliability, and accessibility.
Finally test the design with quizzes, a doorbell scenario, a modality budget, and degradation exercises.
Checkpoint callouts recap the review questions, and the interactive calculators turn the chapter’s numbers into design evidence.
27.4 Multimodal Redundant Meaning
Multimodal IoT design is not about adding every possible input. It is about making important meaning survive real contexts: noise, darkness, wet hands, gloves, limited reach, shared rooms, privacy limits, network loss, and disability. A strong design chooses modalities because each one covers a specific user need, attention state, risk level, or failure mode.
For a smart lock, voice can help when hands are full, an app can show event history, a physical thumb-turn or button can preserve local control, an LED can show locked or offline state, and a chime can confirm completion. The channels must agree about the same state. If the app says locked while the device is still pending, redundant channels spread confusion faster because each channel is repeating a different version of the truth.
Figure 27.1: Useful multimodal design starts by mapping the context and state promise each channel can carry, then choosing fallback channels for the cases where the primary channel is unavailable.
Input: decide which tasks belong to voice, touch, physical control, gesture, proximity, or automation.
Output: pair visual, audio, haptic, display, and notification feedback with the user’s attention context.
Fallback: define what still works when cloud, voice recognition, app access, sound, display, or touch input fails.
The practical design question is therefore not “how many modalities can the product advertise?” It is “which channel owns the user’s immediate question, which channel confirms the result, and which channel keeps the system usable when the first channel fails?” A doorbell camera might use the button press as the local input, the indoor chime as immediate household feedback, the phone notification as remote awareness, the app video stream as evidence, and a hardware privacy control as a trust boundary. Each channel has a narrower job than the whole product.
Good multimodal designs also decide what not to duplicate. A voice command can start a simple action, but it should not be the only path for a visitor, caregiver, technician, or child who lacks account access. A phone app can explain settings, but it should not be the only control for heating, access, alarms, or other local functions. A privacy indicator can help, but for a camera or microphone it may need a physical shutter or disconnect if the user must verify the claim without trusting software.
The reviewable output is a modality contract: task, context, state, channel, confirmation, fallback, accessibility note, privacy boundary, and test evidence. That contract keeps multimodal design from becoming a feature list. It turns the design into a set of promises that can be tested with users, prototypes, logs, and failure drills.
The next step is to make those promises concrete enough that another designer, firmware engineer, or support analyst can verify the same behavior. ## Practitioner: Specify Channel Contracts {.depth-l1}
Each modality needs a contract that designers and engineers can test. Voice may depend on wake-word detection, on-device speech recognition, cloud ASR, NLU intent matching, and TTS or pre-recorded confirmation. Touch may depend on app state, target size, focus order, screen-reader labels, and network freshness. Physical controls may depend on switch type, debounce, press duration, tactile shape, LED placement, and enclosure affordance.
Name the real technologies and constraints. A design might combine Matter local control, Zigbee binding, Thread border-router fallback, MQTT command topics, retained device state, HomeKit/Google Home/Alexa integrations, APNs/FCM push notifications, WebSocket dashboard updates, a hardware camera shutter, or a capacitive sensor with a physical backup. These choices affect privacy, latency, accessibility, and support.
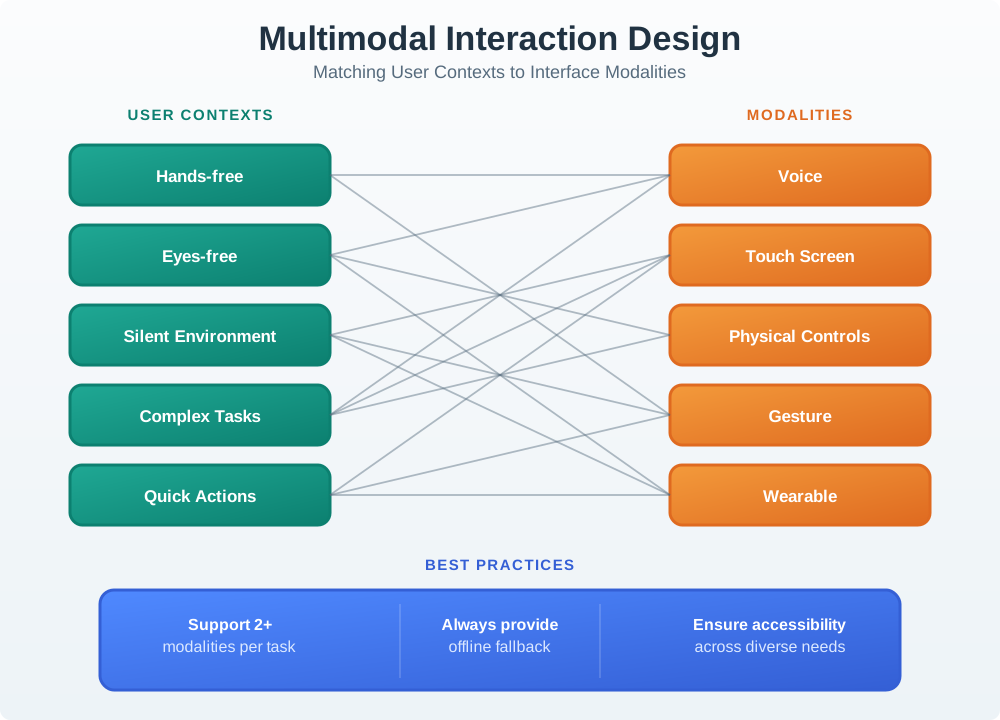
Map task to modality: choose fast physical control for urgent local action, touch for complex configuration, voice for hands-free tasks, and visual or haptic output for quiet or noisy contexts.
Define confirmation: state which channel acknowledges request accepted, command pending, command completed, rejected, offline, or unsafe.
Test degradation: simulate internet loss, muted audio, bright sunlight, low vision, gloves, weak speech recognition, phone unavailable, and shared-role conflict.
Use one contract row per decision moment rather than one row per feature. A thermostat row might say: “local occupant, cold room, raise setpoint, network offline, physical buttons own the action, LCD shows offline and new setpoint, app marks state stale, cloud sync waits.” A camera row might say: “resident, private room, disable capture, physical shutter owns proof, app shows shutter closed, cloud records no stream available, support cannot override.” These rows are short enough for design review and concrete enough for engineering tests.
Then prototype the risky links. For voice, test wake indication, misrecognition, barge-in, quiet confirmation, and a text or touch alternative. For touch, test 44 px or larger targets where appropriate, visible focus, accessible names, screen-reader order, and error recovery. For physical controls, test tactile identification, long-press versus short-press ambiguity, debounce, accidental activation, and whether the enclosure hides the control. For haptics and audio, test pattern distinctness and user control over intensity, mute, and quiet hours. For notifications, test delay, duplicates, stale state, and what happens when multiple household members receive different alerts.
Record evidence as observations, not assumptions. A Figma prototype can test wording and flow, but not radio latency or buzzer volume. A Wokwi or bench prototype can test button, LED, OLED, serial, and firmware state behavior, but not household notification fatigue. Home Assistant, Node-RED, MQTT test brokers, BLE simulators, browser dev tools, and device logs can all provide useful evidence if the record says exactly what each tool proved and what remains untested.
The practitioner deliverable should include acceptance criteria: the user can identify the state without relying on color alone; a core action works without internet; a privacy claim has a verifiable hardware boundary when needed; a muted channel has a redundant visual or haptic path; a delayed command is labeled pending instead of completed; and conflicting app, hub, and device states have a named source of truth.
Checkpoint: Channel Contracts
You now know:
A modality contract names the task, state, channel, confirmation, fallback, accessibility note, privacy boundary, and test evidence.
Important feedback should not depend on color alone, audio alone, cloud access alone, or phone availability alone.
Bench tools, Home Assistant, Node-RED, MQTT brokers, BLE simulators, browser dev tools, and device logs count as evidence only when the record says what each proved.
27.5 Sync Modalities Around State
Multimodal interfaces fail when channels race each other. A voice assistant may say “done” after publishing an MQTT command, while the actuator has not acknowledged it. A mobile app may optimistically show unlocked, while the physical lock rejected the command. A push notification may arrive after the local LED already shows recovery. The design needs a state model shared across channels.
Under-the-hood review should name the source of truth and timing budget for each state. Command ids, idempotency keys, sequence numbers, device-shadow versions, retained MQTT messages, Matter cluster attributes, WebSocket events, APNs/FCM delivery state, local hub logs, battery thresholds, privacy-switch state, and support correlation ids all affect what each modality should say.
Authority: separate requested, accepted, pending, completed, rejected, stale, offline, unsafe, and overridden states.
Latency: decide which feedback must be immediate and which can wait for device acknowledgement.
Trust: use physical controls for high-stakes privacy or safety claims that software indicators cannot prove alone.
The core implementation pattern is a small state machine rather than separate scripts for each channel. A command can move through requested, locally accepted, sent, queued, delivered, applied, verified, rejected, timed out, stale, and overridden. Not every product needs every state, but the chosen states should be named consistently across firmware, mobile UI, hub UI, cloud API, analytics, and support tools. Otherwise, one surface may show success while another still has only a request.
That model also needs ownership rules. A local physical switch may override a cloud schedule. A hardware shutter should override camera streaming even if an app toggle says enabled. A hub may keep cached control during internet loss, but should label data freshness when cloud dashboards reconnect. A BLE direct-control session may be authoritative for setup, while a cloud device shadow is authoritative for remote monitoring. The interface should expose the ownership boundary in plain language instead of showing a generic spinner or success toast.
Engineers can make the contract testable with instrumentation. Include a command id in voice, app, hub, firmware, and notification logs. Emit separate events for accepted, applied, sensor-confirmed, failed, and rolled back. Use retained MQTT topics or device-shadow versions carefully so stale state is visible. Attach timestamps and source labels to status messages. For Matter or Zigbee devices, distinguish attribute reports from command requests. For mobile notifications, record whether APNs or FCM delivery is only awareness, not proof that the device acted.
Failure drills should exercise the real split between channels: cloud outage, hub restart, phone offline, muted speaker, display failure, low battery, privacy switch closed, delayed actuator acknowledgement, duplicate command, and role conflict. A multimodal interface is production-ready only when those drills produce understandable feedback and a safe next action. Without that state discipline, adding more modalities simply creates more places for the same hidden failure to appear.
That is the professional version of the idea. The Sensor Squad story below retells the same principle for a younger reader before the chapter shifts into core terminology and design tradeoffs.
Sensor Squad: Talk, Touch, or Tap?
Hey friends! It’s Sammy the Sensor here with the whole squad! Today we’re learning about the different ways you can talk to your smart devices!
Imagine you have a smart lamp in your room:
Voice (talking): “Hey lamp, turn blue!” - Great when your hands are full with pizza!
Touch (tapping a screen): Open an app and tap the blue color - Perfect when you want to pick the exact shade!
Physical button (pressing): Push the button on the lamp itself - Works even when the internet is down!
Lila the Light Sensor says: “Think about when you’re watching a movie in the dark. You don’t want to search for your phone - just say ‘lights off’ and I’ll help!”
Max the Motion Detector adds: “And some devices can even see you wave your hand! That’s called gesture control - like magic!”
Bella the Buzzer reminds us: “The best smart devices let you choose HOW you want to talk to them. Voice when cooking, touch when relaxing, buttons when in a hurry!”
Fun Activity: Next time you use a smart device at home, count how many different ways you can control it! Can you use voice? An app? A button? The more ways, the better!
Key Concepts
Interaction Design: Discipline defining how users communicate with digital systems through input, output, and feedback mechanisms.
Multimodal Interface: System accepting input and delivering output through multiple channels (touch, voice, gesture, haptic) simultaneously.
User Testing: Structured observation of representative users attempting defined tasks, exposing interface problems invisible to designers.
Prototype Fidelity: Level of detail in a prototype: low fidelity (paper sketch) validates concepts; high fidelity (interactive mockup) validates usability.
Information Architecture: Structural design of digital spaces to support usability and findability, determining where content lives and how users navigate.
Cognitive Load: Mental effort required to use an interface; IoT systems must minimise cognitive load for users managing many connected devices.
Usability Heuristic: Principle-based rule for evaluating interface quality (e.g. Nielsen’s 10 heuristics) without requiring user testing.
27.6 Introduction
Most IoT devices are used in contexts where users cannot devote full attention to a single screen. A nurse checking patient vitals has gloved hands. A driver monitoring vehicle diagnostics is watching the road. A homeowner adjusting the thermostat may be carrying groceries. In each case, the interface must adapt to the user’s available senses and limbs rather than demanding a specific posture or focus.
Multimodal interaction design addresses this challenge by providing multiple parallel channels – voice, touch, physical controls, gesture, and haptic feedback – so that users can interact through whichever modality suits their current context. This chapter explores how to select, combine, and gracefully degrade across these modalities, with particular attention to accessibility and failure resilience.
The principles covered here build directly on the component hierarchies from Interface Design Fundamentals and the state synchronization patterns from Interaction Patterns. Where those chapters addressed what to display and when to update, this chapter addresses how users physically interact with IoT systems across diverse real-world conditions.
27.7 Multimodal Interaction Design
Different interface modalities excel in different contexts. Effective IoT design matches modality to use case:
Multimodal Interaction Design: Matching User Contexts to Interface Modalities
Figure 27.2
27.7.1 Modality Comparison Matrix
Modality
Best For
Limitations
Accessibility
Voice
Hands-free, quick commands
Privacy, noisy environments
Helps motor impairments
Touch (App)
Complex settings, browsing
Requires attention
Screen readers available
Physical
Immediate, tactile
Limited options
Works with disabilities
Gesture
Quick, natural
Learning curve
May exclude some users
Wearable
Glanceable info
Tiny screen
Haptic helps vision impaired
27.7.2 Modality Selection Framework
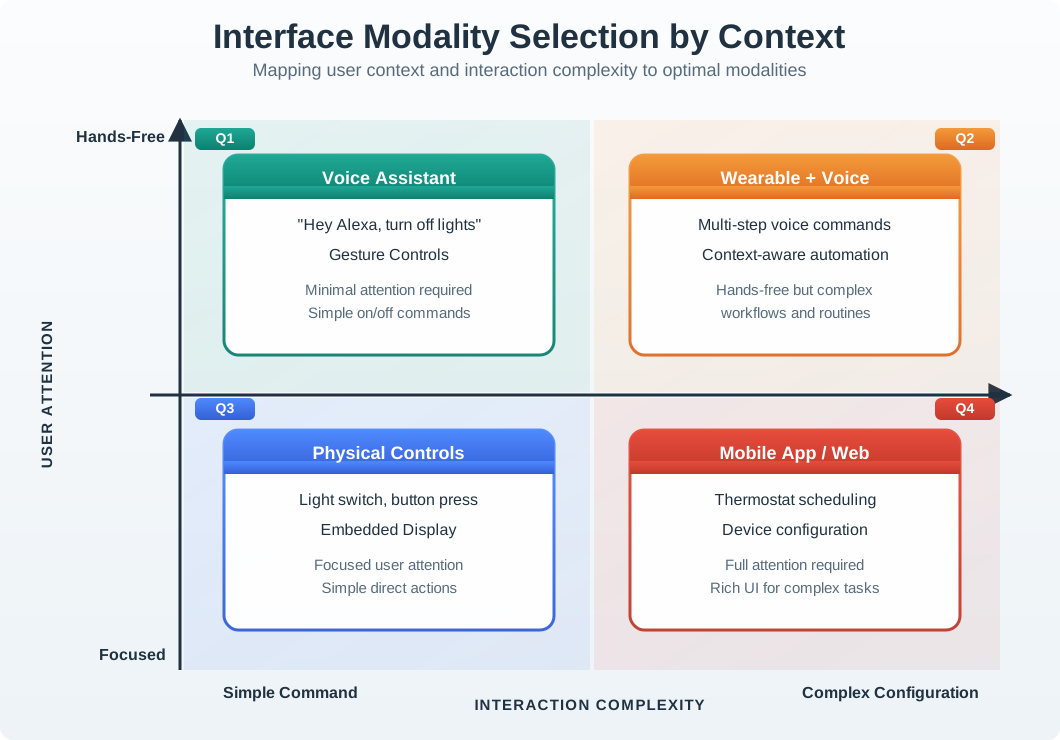
Use this decision framework to select the appropriate modality for a given interaction:
Interface Modality Selection by Context
Figure 27.3
Checkpoint: Modality Selection
You now know:
Voice fits hands-free commands; touch fits complex settings; physical controls fit immediate local actions.
Critical state changes need at least two output channels, with fast local feedback when users need confidence within 100ms.
Choose each channel because it answers a context, fallback, accessibility, or privacy problem.
27.8 Design Tradeoffs
Now the chapter pressure-tests the selection framework. Each tradeoff below asks whether a modality is the primary path, a fallback path, or a risk that needs another channel beside it.
Touch vs Voice Interfaces
Option A (Touch Interface): Visual app or touchscreen with tap/swipe gestures. User studies show 94% accuracy for touch interactions, 2.1 seconds average task completion for simple commands. Works in any noise level, preserves privacy, supports complex multi-step workflows. Requires visual attention and free hands.
Option B (Voice Interface): Natural language commands with audio feedback. Enables hands-free and eyes-free operation (cooking, driving). Average task time 3.5 seconds for simple commands, but 40% faster for multi-word requests like “set bedroom lights to 20% warm white.” Recognition accuracy drops to 85% in noisy environments (>65 dB). Privacy concerns in shared spaces.
Decision Factors: Choose touch when precision matters (selecting specific percentages, complex schedules), when privacy is needed (public spaces), when noise levels are high, or for detailed configuration. Choose voice when hands/eyes are occupied, for quick single commands, or for accessibility (motor impairments). Best products support both: “Hey Google, turn on kitchen lights” AND app toggle. Voice for convenience, touch for control, physical buttons for reliability.
27.8.1 Voice Interface Processing Pipeline
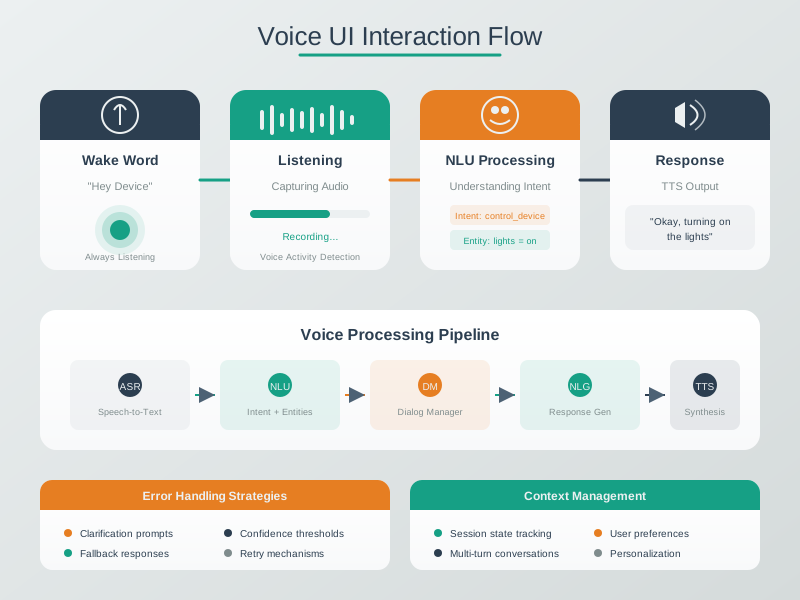
Understanding how voice commands are processed helps designers optimize response times and handle failures:
Voice Interface Processing Pipeline
Figure 27.4
Pipeline Latency Budget (target: <1 second total):
Stage
Target Time
Optimization
Wake word detection
<100ms
On-device ML model
Audio capture
200-500ms
Endpoint detection
Speech-to-text
100-300ms
Streaming ASR
Intent recognition
50-100ms
Pre-compiled grammar
Command execution
<100ms
Local device control
Voice confirmation
200-400ms
TTS or pre-recorded
Putting Numbers to It
How do we calculate the total latency of a voice interface and why does each millisecond matter?
Optimization path to reach <800 ms (acceptable threshold):
Edge ASR (avoid cloud round-trip): 220 ms → 45 ms saves 175 ms
Pre-recorded confirmations (skip TTS): 310 ms → 80 ms saves 230 ms
Endpoint prediction (don’t wait for silence): 350 ms → 180 ms saves 170 ms
New total: \(80 + 180 + 45 + 75 + 60 + 80 = 520\) ms (well below 800 ms threshold)
Cost tradeoff:
Cloud ASR: Free (or $0.006/query with Google Speech API)
Edge ASR: $8-15/unit (dedicated NPU chip) + 2W power draw
Payoff: 520 ms latency prevents 40% of repeat commands (users think system heard them)
Key insight: Every stage above 100 ms is a candidate for optimization. The 220 ms cloud ASR round-trip is the biggest bottleneck—moving to edge processing cuts total latency by 53% at the cost of $12/unit hardware.
Interactive Calculator: Optimize Your Voice Pipeline
Experiment: Try switching from Cloud ASR to Edge ASR and from TTS to Pre-recorded feedback. Notice how latency drops from 1,095ms to 520ms, moving from “Users give up” to “Acceptable” perception, at the cost of $14/unit in hardware.
Checkpoint: Voice Latency
You now know:
The default voice path totals 1,095ms across wake detection, capture, cloud ASR, intent parsing, execution, and TTS feedback.
Edge ASR plus pre-recorded feedback drops the example to 520ms, but adds hardware cost.
Latency is a UX requirement because slow feedback makes users doubt the system.
Visual vs Audio Feedback
Option A (Visual Feedback): LED indicators, screen displays, and app notifications. Silent operation suitable for quiet environments (bedrooms, offices). User studies show visual indicators are checked in 0.3-0.5 second glances. Color-coded states (green=OK, red=error, amber=warning) are universally understood. Limited to line-of-sight; users must look at device.
Option B (Audio Feedback): Beeps, chimes, voice announcements, and alarms. Attention-grabbing without requiring user to look at device. Reaches users anywhere in the room. Critical for urgent alerts (smoke alarms: 85+ dB required by code). However, 23% of users disable audio feedback due to annoyance, and audio is unusable in quiet hours (11 PM-7 AM) without disturbing others.
Decision Factors: Use visual-primary for routine status (device state, sync progress, battery level), quiet environments, and continuous monitoring. Use audio-primary for urgent alerts requiring immediate attention (security, safety, critical errors) and confirmation of voice commands. Best practice: tiered audio with visual redundancy. Critical alerts use both modalities. Routine confirmations default to visual with optional audio. Always provide mute/quiet hours settings. Accessibility: audio helps visually impaired users; visual helps hearing impaired users.
Single vs Multimodal Interaction
Option A: Optimize for a single primary modality (e.g., touch app only), allowing deep refinement of one interaction paradigm with lower development cost and simpler testing.
Option B: Support multiple modalities (voice, touch, physical, gesture) so users can interact via their preferred method based on context, accessibility needs, and situational constraints.
Decision Factors: Choose single modality when targeting a well-defined use context (office dashboard = mouse/keyboard), when budget is constrained, or when the modality perfectly fits the task. Choose multimodal when users interact in varied contexts (home = sometimes hands-free, sometimes visual), when accessibility is important, when the product serves diverse user populations, or when reliability requires fallback options. Consider that multimodal design improves resilience (if voice fails, touch still works) and accessibility (motor-impaired users can use voice, hearing-impaired users can use visual interfaces).
27.9 Input/Output Modalities for IoT
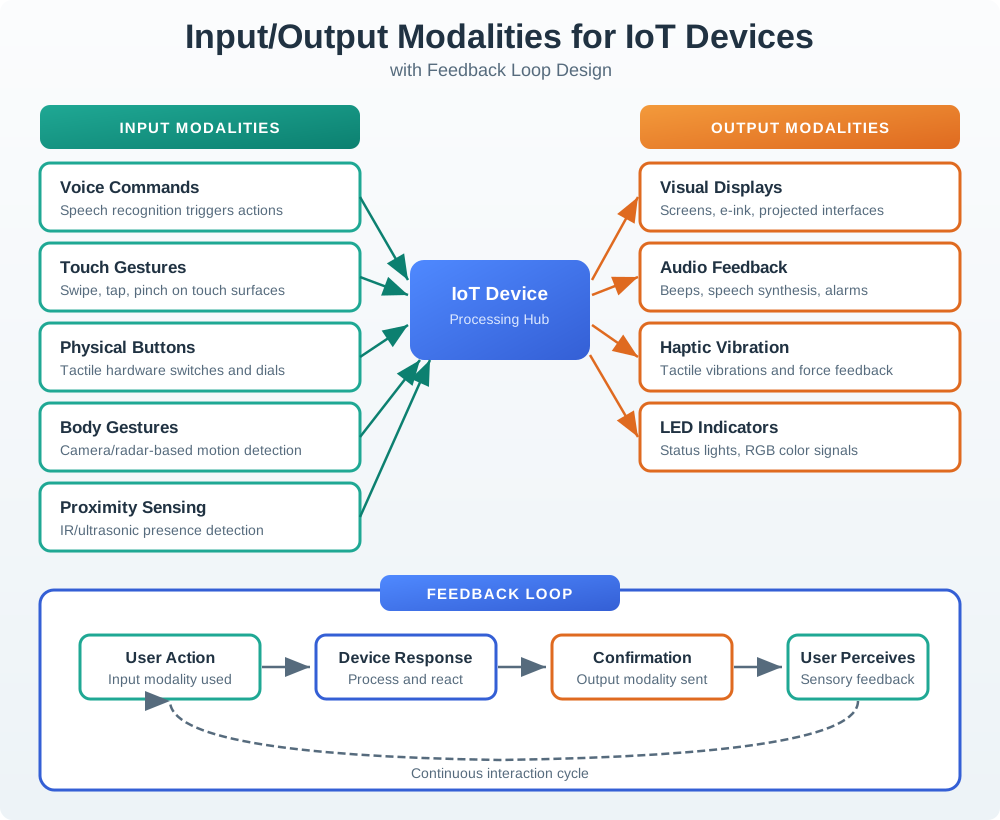
IoT devices use diverse input and output modalities. Effective design matches modality to message type and user context:
Input/Output Modalities for IoT Devices with Feedback Loop Design
Figure 27.5
Modality Selection Guidelines:
Message Type
Best Input
Best Output
Example
Quick command
Voice, physical button
LED + beep
“Lock door” with confirmation chime
Complex setting
Touch screen
Visual display
Thermostat schedule configuration
Urgent alert
Auto-triggered
Audio + haptic + visual
Smoke detector alarm
Status check
Glance, presence
LED, display
Light ring color shows device state
Privacy control
Physical switch
LED indicator
Camera shutter with red LED
27.10 Graceful Degradation
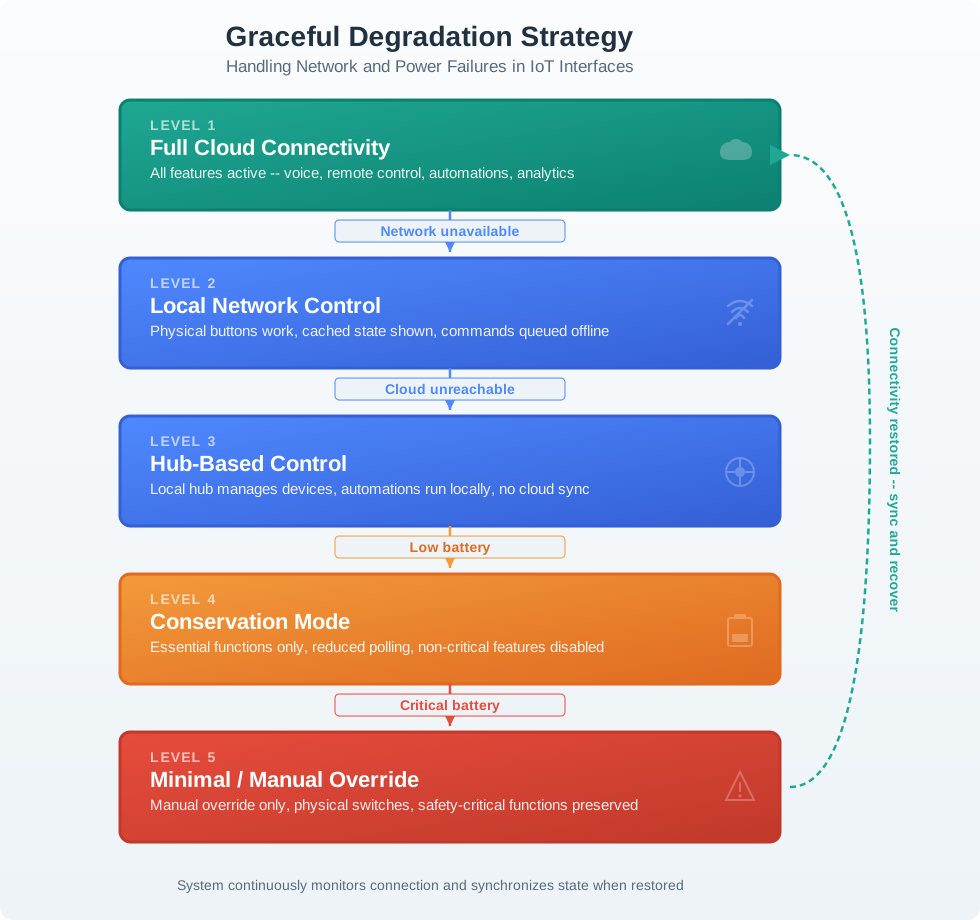
IoT interfaces must handle failures gracefully at each layer. The following diagram illustrates five degradation levels, from full cloud connectivity down to minimal manual override:
Graceful Degradation Strategy: Handling Network and Power Failures in IoT
Figure 27.6
Design for Failure – Four Essential Principles:
Always provide physical fallback – Light switches that work without Wi-Fi
Queue commands offline – Sync when connectivity returns
Cache last known state – Show users what they last knew
Clear failure indication – Don’t leave users guessing about device status
Cloud-First vs Local-First
Option A: Cloud-first architecture routes all commands through cloud services, enabling remote access, cross-device coordination, advanced AI features, and simplified device hardware at the cost of internet dependency.
Option B: Local-first architecture processes commands on-device or via local hub, ensuring core functions work offline with faster response times, but limiting remote access and advanced features without connectivity.
Decision Factors: Choose cloud-first when remote access is essential, when features require significant compute power (AI, complex automation), when devices need coordination across locations, or when continuous software updates add value. Choose local-first when reliability is critical (locks, safety devices), when latency matters (industrial control), when privacy is paramount, or when internet connectivity is unreliable. Best practice: hybrid approach with local-first core functions and cloud-enhanced features, so essential operations never depend on internet availability.
Checkpoint: Failure Resilience
You now know:
Graceful degradation is not just an error screen; core controls must keep working when cloud, phone, sound, display, or touch fails.
Local-first is strongest for locks, safety, industrial control, privacy, and unreliable connectivity; cloud-first is strongest for remote access or heavy compute.
The review question is always what still works, what is stale, and which channel tells the user the truth.
27.11 Accessibility Considerations
Multimodal design inherently improves accessibility by providing alternative interaction paths:
Accessible IoT Design Through Multimodal Interaction
Designing for accessibility benefits everyone. Voice control helps motor-impaired users AND users with full hands. Large touch targets help users with tremors AND users wearing gloves. Closed captions help deaf users AND users in noisy environments. When you design for edge cases, you improve the experience for all users.
27.12 Common Pitfalls in Multimodal Design
Pitfalls to Avoid
1. Voice-Only Trap: Designing a smart device that only supports voice interaction. When voice recognition fails (noisy room, accent mismatch, service outage), the device becomes a paperweight. Always provide at least one non-voice fallback.
2. Feedback Channel Mismatch: Confirming a voice command with a small on-screen text message the user cannot see because they are across the room. Match the feedback channel to the input channel – voice commands should produce audible confirmation.
3. Ignoring Quiet Hours: Audio feedback that cannot be silenced or scheduled. A smart lock that announces “DOOR UNLOCKED” at 2 AM will be disabled by users, losing the security benefit. Always provide configurable quiet hours with visual-only fallback.
4. Modality Overload: Supporting five input modalities but implementing none of them well. Better to have two polished modalities (e.g., app + physical button) than five half-finished ones. Prioritize the modalities your users actually need.
5. No Offline State Indication: When cloud connectivity is lost, the interface looks identical to the connected state. Users issue commands that silently fail, eroding trust. Always show a clear offline indicator and explain what still works.
6. Assuming Universal Gesture Recognition: Designing gesture controls that require specific hand shapes or movement speeds. Users with arthritis, tremors, or prosthetics may not be able to perform precise gestures. Provide generous recognition thresholds and alternative inputs.
27.13 Real-World Case Study: Amazon Echo Show
The Amazon Echo Show demonstrates effective multimodal design principles in practice:
Smart Home Multimodal Interface Pattern
Figure 27.8
Why it works:
Principle
Implementation
Redundant input
Voice (primary) + touch + gesture + app – user chooses based on context
Multimodal feedback
Voice response + screen card + LED ring color change simultaneously
Graceful degradation
Local smart home control continues during cloud outages; touch UI works when voice fails
Accessibility
Voice helps motor-impaired; screen helps hearing-impaired; large touch targets (44px+)
Context adaptation
Camera detects user approach and brightens screen; adjusts volume based on ambient noise
Lesson learned: The Echo Show’s physical camera shutter (a sliding plastic cover) demonstrates an important principle – some privacy controls must be physical, not software-based, because users need absolute certainty that the camera is off. No amount of on-screen indicators can match the trust of a physical barrier.
Checkpoint: Accessibility and Trust
You now know:
The curb cut effect applies directly to IoT: voice helps full hands, large targets help gloves, and visual or haptic alerts help when audio is muted.
Physical privacy controls differ from software indicators because users can verify the hardware boundary directly.
Common pitfalls come from missing fallback, mismatched feedback, overloaded modalities, unclear offline state, or gesture assumptions.
27.14 Knowledge Check
The quizzes below use the same review logic in concrete failure scenarios: deaf users, gloves, internet loss, delayed feedback, privacy mode, and quiet hours.
Quiz: Multimodal Design
Smart Doorbell Multimodal Design
Scenario: A family has a smart doorbell. Mother is in the kitchen (hands wet, can’t touch phone), father is in basement workshop (noisy, can’t hear audio), teenager is upstairs with headphones (can’t hear doorbell).
Single-modality failure:
Voice-only: Mother could use voice (“Who’s at door?”) but father/teenager miss notification entirely
Audio-only: Traditional doorbell—father in noisy workshop doesn’t hear it
App-only: Requires phone nearby and checking it—mother’s hands are wet, teenager has phone on silent
Multimodal solution:
Modality
Notification Method
Who It Reaches
Latency
Audio (chime)
Doorbell plays 85 dB chime
Mother (kitchen), father if workshop quiet
<50ms (instant)
Visual (LED flash)
Doorbell LED flashes red
Anyone with line of sight
<50ms
Haptic (watch vibration)
Smartwatch vibrates
Father (wearing watch), teenager
150ms (Bluetooth latency)
Push notification
Phone notification with image
All family members
300-800ms (cloud latency)
Hub announcement
Smart speaker says “Someone at front door”
Anyone in rooms with speakers
500ms (voice synthesis)
Example evaluation plan (replace with real pilot data before launch):
Record whether each doorbell press produced local chime, LED, watch vibration, phone notification, and hub announcement.
Record who noticed the alert first, which modality they used, and whether any channel was delayed, duplicated, or muted.
Separate “no one was home” from “someone was home but no usable modality reached them.”
Power budget fields to measure:
Standby draw for Wi-Fi, Bluetooth, PIR wake, and camera idle.
Active ring draw while audio, LED, radio, processor, and video preview are running.
Battery-life estimate under the chosen ring frequency, video length, climate, and charging assumptions.
Cost fields to estimate:
Speaker, LED, vibration or wearable integration, display, microphone, camera, enclosure, and certification impact.
Cloud notification, video relay, storage, and support costs.
Development and test cost for pairing, household roles, quiet hours, localization, and accessibility checks.
Result to report: missed-alert rate, duplicate-alert rate, median notice time, accessibility issues, quiet-hour complaints, battery impact, and support tickets. Do not claim a deployment result unless it comes from a named pilot, telemetry set, or user study.
Modality Support Decisions
Device Type
Minimum Modalities
Recommended Modalities
Rationale
Critical safety (smoke alarm, door lock)
3+ (audio + visual + physical button)
4+ (add haptic/app notification)
Failure to notify = life-threatening; redundancy essential
High-frequency use (lights, thermostat)
2 (physical button + app)
3 (add voice)
Used daily; users need options for different contexts
Status monitoring (security camera)
2 (app notification + visual LED)
3 (add audio announcements via hub)
Notifications must reach user in varied contexts
Convenience (smart plug)
1 (app or physical button)
2 (app + physical)
Low-stakes; single modality acceptable but fallback improves UX
Cost-benefit analysis per modality:
Modality
Added Cost
Development Time
User Benefit
Priority
Physical button
$0.50-2/unit
8 hours (GPIO + debounce)
Works offline, zero latency, accessible
ESSENTIAL
LED indicator
$0.30-1/unit
4 hours
Glanceable status, works at distance
HIGH
Audio feedback
$1.50-4/unit
12 hours (tone generation)
Works hands-free, eyes-free
HIGH
App interface
$0 hardware
200-400 hours (full app dev)
Detailed control, remote access
HIGH
Voice control
$3-8/unit (mic)
80-120 hours (NLU integration)
Hands-free, accessibility
MEDIUM
Haptic feedback
$2-5/unit (motor)
6 hours
Silent confirmation, hearing-impaired
MEDIUM
Gesture control
$8-15/unit (sensors)
60-100 hours (ML training)
Novelty factor, limited reliability
LOW
Decision rule:
Safety devices: Support 3-4 modalities regardless of cost
Consumer IoT: 2-3 modalities (physical + app + one more)
Budget constrained: Physical button + LED minimum viable product
Experiment: Start with just Physical Button ($1.25, 8 hours). Add LED Indicator for visual feedback. Notice how adding App Interface adds 300 dev hours but $0 hardware cost. Try building a safety-critical device (3-4 modalities) vs. a convenience device (1-2 modalities).
Voice-First Needs Fallbacks
The mistake: Designing smart devices that ONLY work via voice assistant, with no physical controls or app backup.
Review scenario: A smart ceiling fan is proposed as voice-only. There are no pull chains, no wall switch, and no app backup; control depends on Alexa or Google Home integration.
Failure scenarios to test before approval:
Voice assistant offline: internet outage means no fan control unless local controls exist.
Multiple users: guests may not know the command syntax or have account access.
Privacy moments: users may need silent control without speaking in front of roommates or guests.
Speech mismatch: accents, language settings, speech impairments, and background noise can prevent recognition.
Setup failure: account linking, Wi-Fi onboarding, or cloud consent can fail before the product is usable.
Launch decision: reject voice-only core control unless evidence shows an equivalent local fallback. Return-rate, support-cost, and review-impact claims require real product telemetry or a cited study.
Privacy: Some commands users want to issue silently
Guests/children: Can’t use device without setup
Accent/language barriers: Voice recognition 85-95% accurate = 5-15% frustration rate
Noise: Doesn’t work in loud environments (parties, TV on, kids playing)
The fix: Voice-FIRST, not voice-ONLY
Correct architecture:
Primary: Voice control for convenience (“Alexa, turn on fan”)
Secondary: Physical wall switch for reliability (works offline, guests can use it)
Tertiary: App for advanced control (speed percentage, scheduling)
Design principle: Every modality should enable 100% of CORE functionality. Advanced features can be modality-specific, but turning on/off must work via all three methods.
Cost to add physical fallback: estimate relay, switch, wiring, enclosure, firmware, and certification impact against the risk of unusable core control.
Remember: Voice is additive convenience, not a replacement for proven interaction methods. The “magic” of voice wears off fast when it fails 10% of the time.
Checkpoint: Modality Budget
You now know:
Safety devices justify 3-4 modalities; convenience devices can use fewer channels when fallback risk is low.
Physical buttons and LED indicators are cheap, fast fallback channels.
Voice-first products still need local control, guest access, silent control, and setup recovery.
Interactive Quiz: Match Concepts
Interactive Quiz: Sequence the Steps
Label the Diagram
💻 Code Challenge
27.15 Summary
Before leaving the chapter, check that your own product concept can name its primary modality, redundant confirmation, offline behavior, accessibility fallback, and privacy boundary in one short contract row.
This chapter covered multimodal interaction design for IoT interfaces, from modality selection to failure resilience.
Key Takeaways:
Context-Appropriate Modalities: Match interface type to user situation – voice for hands-free, touch for precision, physical buttons for reliability, gesture for quick actions
Redundant Modalities: Every critical function should be accessible through at least two different modalities so that failure of one channel does not block the user
Multimodal Feedback: Confirm every state change through at least two output channels (visual + audio, or visual + haptic) within 100ms to ensure perception across all contexts
Graceful Degradation: Design five levels of degradation from full cloud through local hub, direct control, conservation, and emergency mode – core functions must never depend on internet
Tradeoff Awareness: Choose between voice vs. touch, visual vs. audio, and cloud vs. local based on user context, privacy needs, noise levels, and reliability requirements
Accessibility as Default: The curb cut effect means designing for edge cases (motor impairments, vision loss, noisy environments) improves the experience for all users
Physical Privacy Controls: For high-stakes privacy features like cameras, physical mechanisms (shutters, hardware switches) provide trust that software indicators cannot match
Concept Relationships
How this chapter connects to other IoT concepts:
Builds on: Interaction Patterns provides state sync and feedback foundations that multimodal systems must maintain across all input channels
Haptic Feedback Design: Engineering vibration patterns for touchscreen interactions and wearable alerts
Emergency Positioning (E911): Regulatory requirements for location accuracy in safety-critical voice-activated systems
Offline-First Architecture: Designing IoT systems that maintain core functions during cloud outages, as discussed in graceful degradation
In 60 Seconds
This chapter covers interface design: multimodal interaction, explaining the core concepts, practical design decisions, and common pitfalls that IoT practitioners need to build effective, reliable connected systems.
Try It Yourself
Hands-on exercises to explore multimodal interaction:
27.15.1 Three-Modality Light Controller
Create a smart light control system supporting voice, touch, and physical inputs:
Use Wokwi ESP32 simulator with:
Physical button (GPIO pin) for on/off toggle
Serial Monitor for voice-like text commands (“lights on”, “dim to 50%”)
Web dashboard with slider for touch control
Implement state synchronization: any input method updates all outputs
Add multimodal feedback: LED state + Serial confirmation + web UI update
What to observe: Notice how each modality has different latency (physical button <10ms, serial “voice” ~100ms, web slider ~200ms with network). Test which modality feels most responsive in different scenarios.
27.15.2 Graceful Degradation Simulation
Configure a smart thermostat to fail gracefully:
Normal mode: Cloud-connected, voice commands work, app shows live data
Simulate internet outage: Disable cloud connection
Observe fallback: Physical buttons still control temperature, LCD shows cached schedule
Simulate power outage: Battery backup mode shows minimal interface
What to observe: Which features remain available at each degradation level? Measure how long it takes users to realize the system is degraded vs. completely failed.
27.15.3 Exercise 3: Voice Command Latency Budget
Build a voice pipeline timer:
Record a wake word detection event (timestamp T0)
Capture audio for 2 seconds (T1)
Simulate cloud ASR processing (300ms delay, T2)
Parse intent locally (T3)
Execute command and provide voice feedback (T4)
Calculate total latency: T4 - T0
What to observe: Where does time go in the pipeline? Which stage varies most between runs? Test what happens if total latency exceeds 1 second (users perceive as broken).

 Checkpoint: Channel Contracts