
12 Lab 1: ESP32 MQTT Publisher

Phoebe's Why
This chapter is already suspicious of its own always-on QoS0 estimate — 833 days from 2.4 mAh/day — and rightly points to Wi-Fi reconnect overhead as the reason the deep-sleep model (76.8 mAh/day, about 26 days) is more honest. There is a second, independent reason to distrust “833 days 2.3 years”: that arithmetic divides a fixed 2000 mAh by a fixed daily current forever, as if the cell were a bucket that only empties from the bottom. A real lithium cell also empties itself slowly just sitting on the shelf, and over 2.3 years that self-discharge is not a rounding error — it competes with the load current for the same milliamp-hours.
The Derivation
Charge-budget life model:
Self-discharge, compounding over elapsed time at monthly rate :
Terminal voltage under a radio pulse current :
Worked Numbers: This Chapter's Own QoS Scenarios
- Deep-sleep life (this chapter’s own 76.8 mAh/day, 2000 mAh pack): days — short enough that self-discharge barely registers: at catalog-typical LiPo /month, 26 days is 0.856 months, leaving of nameplate, a 1.71% loss.
- The always-on QoS0 claim (this chapter’s own 2.4 mAh/day, 833 days): that duration is 27.4 months, and compounding the same 2%/month gives of nameplate remaining — a 42.5% self-discharge loss over the claimed life, before the QoS0 radio current has drawn one extra milliamp-hour for reconnects. The naive division and this chapter’s own Wi-Fi-overhead caveat are both right to distrust “833 days,” for two separate and additive reasons.
- Voltage sag on this chapter’s own 120 mA radio pulse (catalog-typical 2000 mAh pack, fresh, aged): 12.0 mV fresh, 48.0 mV aged — both small against 3.7 V, so for this pack size the sag risk stays minor even as self-discharge does not.
12.1 Start With One Working Pipeline
Every lab is a version of the same review path: a device senses something, publishes it to a topic, the broker applies a delivery rule, and another client proves it received the right state. Build that small path first, then make it secure, reliable, battery-aware, and observable.
Use this chapter as one acceptance record. First create a unique client and topic suffix, then publish DHT22 readings, inspect retained state and timing, and finish with the capacity and battery evidence that explains the chosen cadence. The later dashboard, automation, and secure-broker labs now have their own resumable chapters.
12.2 Learning Objectives
By the end of this chapter, you will be able to build an ESP32-to-broker sensor path, isolate its public exercise traffic with a unique identity and topic root, and justify its publish interval using observed broker and energy evidence.
Carry the chapter forward as one connected chain. First, MQTT: Message Queuing Telemetry Transport — pub/sub protocol optimized for constrained IoT devices over unreliable networks. Then, Broker: Central server routing messages from publishers to all matching subscribers by topic pattern. Then, Topic: Hierarchical string (e.g., home/bedroom/temperature) used to route messages to interested subscribers. Then, QoS Level: Quality of Service 0/1/2 trading delivery guarantee for message overhead. Then, Retained Message: Last message on a topic stored by broker for immediate delivery to new subscribers. Then, Last Will and Testament: Pre-configured message published by broker when a client disconnects ungracefully. Finally, Persistent Session: Broker stores subscriptions and pending messages allowing clients to resume after disconnection.
12.3 For Beginners: MQTT Hands-On Labs
This lab guides you through one MQTT system step by step: connect the sensor, establish a unique broker identity, publish readings, and verify what another client can observe.
12.4 Prerequisites
Before diving into this chapter, you should be familiar with:
- MQTT Publisher-Subscriber Setup: Basic publisher/subscriber creation and simulator usage
- MQTT Python Patterns: Production patterns, security awareness, and debugging
- MQTT QoS Levels and MQTT Session Management: Understanding QoS 0, 1, 2 and clean/persistent sessions
- Arduino/ESP32 development: Experience with Arduino IDE, libraries, and basic C++ syntax
12.5 Lab 1: ESP32 DHT22 MQTT Publisher with QoS Levels
Objective: Build a temperature/humidity sensor that publishes to MQTT with different QoS levels.
Materials:
- ESP32 development board
- DHT22 temperature/humidity sensor
- 10k ohm pull-up resistor
- Breadboard and jumper wires
- Wi-Fi connection
Circuit Diagram:
DHT22          ESP32
-----          -----
VCC   ------>  3.3V
DATA  ------>  GPIO 4 (with 10k ohm pull-up to 3.3V)
GND ------> GNDtest.mosquitto.org:1883 is a shared, unauthenticated, unencrypted test service. Other users can read, retain, overwrite, or inject messages on topics they discover. Publish only disposable synthetic readings: never send passwords, personal data, precise locations, real device identifiers, or anything confidential. Use a private broker with TLS, authentication, and topic access controls for coursework evidence or real deployments.
MQTT uses the ClientID to identify one broker session. If two learners connect with the same ClientID, the later connection replaces the earlier session, so the boards appear to kick each other offline and repeatedly reconnect. The code below creates a random suffix locally at boot, then uses it for both the ClientID and the topic root. Copy the printed values from your own Serial Monitor; do not copy another learner’s suffix.
Complete Code:
#include <WiFi.h>
#include <PubSubClient.h>
#include <DHT.h>
#include <esp_system.h>

// Wi-Fi credentials
const char* ssid = "YOUR_WIFI_SSID";
const char* password = "YOUR_WIFI_PASSWORD";

// MQTT Broker settings
const char* mqtt_server = "test.mosquitto.org";
const int mqtt_port = 1883;

// Generated on this ESP32 at boot: 48 random bits, printed in setup().
char learner_suffix[13];
char mqtt_client_id[24];

// DHT22 sensor
#define DHTPIN 4
#define DHTTYPE DHT22
DHT dht(DHTPIN, DHTTYPE);

// MQTT topics
char topic_root[40];
char topic_temp[56];
char topic_humidity[56];
char topic_status[56];
char topic_command[56];

WiFiClient espClient;
PubSubClient client(espClient);

// Forward declaration (defined below loop)
void mqtt_callback(char* topic, byte* payload, unsigned int length);

unsigned long lastPublish = 0;
const long publishInterval = 5000; // 5 seconds

void make_lab_identity() {
  uint32_t random_high = esp_random();
  uint32_t random_low = esp_random();

  snprintf(learner_suffix, sizeof(learner_suffix), "%08lX%04lX",
           (unsigned long)random_high,
           (unsigned long)(random_low & 0xFFFF));
  snprintf(mqtt_client_id, sizeof(mqtt_client_id), "iotlab-%s", learner_suffix);
  snprintf(topic_root, sizeof(topic_root), "iotclass/lab1/%s", learner_suffix);
  snprintf(topic_temp, sizeof(topic_temp), "%s/temperature", topic_root);
  snprintf(topic_humidity, sizeof(topic_humidity), "%s/humidity", topic_root);
  snprintf(topic_status, sizeof(topic_status), "%s/status", topic_root);
  snprintf(topic_command, sizeof(topic_command), "%s/command", topic_root);
}

void setup_wifi() {
  Serial.println("\nConnecting to Wi-Fi...");
  WiFi.begin(ssid, password);

  while (WiFi.status() != WL_CONNECTED) {
    delay(500);
    Serial.print(".");
  }

  Serial.println("\nWi-Fi connected");
  Serial.print("IP address: ");
  Serial.println(WiFi.localIP());
}

void reconnect_mqtt() {
  while (!client.connected()) {
    Serial.print("Connecting to MQTT broker...");

    if (client.connect(mqtt_client_id)) {
      Serial.println(" Connected");

      // Publish online status as retained message
      client.publish(topic_status, "online", true);

      // Subscribe to commands (optional)
      client.subscribe(topic_command);
    } else {
      Serial.print(" Failed, rc=");
      Serial.println(client.state());
      delay(5000);
    }
  }
}

void setup() {
  Serial.begin(115200);
  dht.begin();

  setup_wifi();
  make_lab_identity();

  Serial.print("Unique MQTT ClientID: ");
  Serial.println(mqtt_client_id);
  Serial.print("Your Lab 1 topic root: ");
  Serial.println(topic_root);

  client.setServer(mqtt_server, mqtt_port);
  client.setCallback(mqtt_callback);
}

void mqtt_callback(char* topic, byte* payload, unsigned int length) {
  Serial.print("Message received on ");
  Serial.print(topic);
  Serial.print(": ");

  String message = "";
  for (int i = 0; i < length; i++) {
    message += (char)payload[i];
  }
  Serial.println(message);
}

void loop() {
  if (!client.connected()) {
    reconnect_mqtt();
  }
  client.loop();

  unsigned long now = millis();
  if (now - lastPublish >= publishInterval) {
    lastPublish = now;

    // Read sensor
    float humidity = dht.readHumidity();
    float temperature = dht.readTemperature();

    if (isnan(humidity) || isnan(temperature)) {
      Serial.println("Failed to read from DHT sensor!");
      return;
    }

    // Publish temperature with QoS 0
    char tempStr[8];
    dtostrf(temperature, 6, 2, tempStr);
    bool temp_success = client.publish(topic_temp, tempStr, false);
    Serial.print("Temperature: ");
    Serial.print(tempStr);
    Serial.print("C ");
    Serial.println(temp_success ? "OK" : "FAIL");

    // Publish humidity with QoS 0
    char humStr[8];
    dtostrf(humidity, 6, 2, humStr);
    bool hum_success = client.publish(topic_humidity, humStr, false);
    Serial.print("Humidity: ");
    Serial.print(humStr);
    Serial.print("% ");
    Serial.println(hum_success ? "OK" : "FAIL");

    Serial.println("---");
  }
}
Expected Output (Serial Monitor):
Connecting to Wi-Fi...
Wi-Fi connected
IP address: 192.168.1.100
Unique MQTT ClientID: iotlab-7A31C09E4B62
Your Lab 1 topic root: iotclass/lab1/7A31C09E4B62
Connecting to MQTT broker... Connected
Temperature: 22.50C OK
Humidity: 45.30% OK
Temperature: 22.48C OK
Humidity: 45.35% OK
***Try it yourself! See a complete IoT system publishing sensor data to an MQTT broker.
What This Simulates: An ESP32 with DHT22 sensor connecting to Wi-Fi, then publishing temperature and humidity data to an MQTT broker every 5 seconds.
How to Use:
- Click the Play button to start simulation
- Watch the Serial Monitor show Wi-Fi connection
- Observe MQTT broker connection with client ID
- See temperature/humidity published to topics
- Notice QoS 0 delivery with confirmation
- Open MQTT Explorer or subscriber to see messages in real-time!
Observe:
Build the decision in sequence. Begin with PubSubClient Library: Arduino MQTT client for ESP32. Then consider client.connect(): establishes one broker session under the random iotlab-... ClientID printed by your board. Then consider client.publish(): sends a message to a topic and returns success or failure. Then consider Topic Hierarchy: iotclass/lab1/<your-suffix>/temperature separates your disposable lab traffic from another learner’s namespace. Then consider QoS 0 (At Most Once): fire-and-forget, fastest but with no delivery guarantee. Then consider Retained Messages: client.publish(topic, msg, true) stores the last value for new subscribers, which is another reason never to put private data on a public broker. Close by considering Auto-Reconnect: if (!client.connected()) reconnect_mqtt().
MQTT Publishing Flow:
1. ESP32 connects to Wi-Fi network
2. ESP32 generates and prints its random learner suffix, ClientID, and topic root
3. ESP32 connects to MQTT broker (test.mosquitto.org:1883)
4. ESP32 publishes "online" status as a retained message under its own topic root
5. Every 5 seconds:
   a. Read DHT22 sensor (temperature, humidity)
   b. Convert float to string
   c. Publish to "iotclass/lab1/<your-suffix>/temperature"
   d. Publish to "iotclass/lab1/<your-suffix>/humidity"
   e. Print success/failure indicators
6. Maintain connection with client.loop()
MQTT Topic Structure:
Before extending the lab with more sensors or subscriptions, inspect Figure 12.1 to predict which filters will receive the two concrete telemetry topics. This is the point where a readable namespace becomes observable broker behavior.
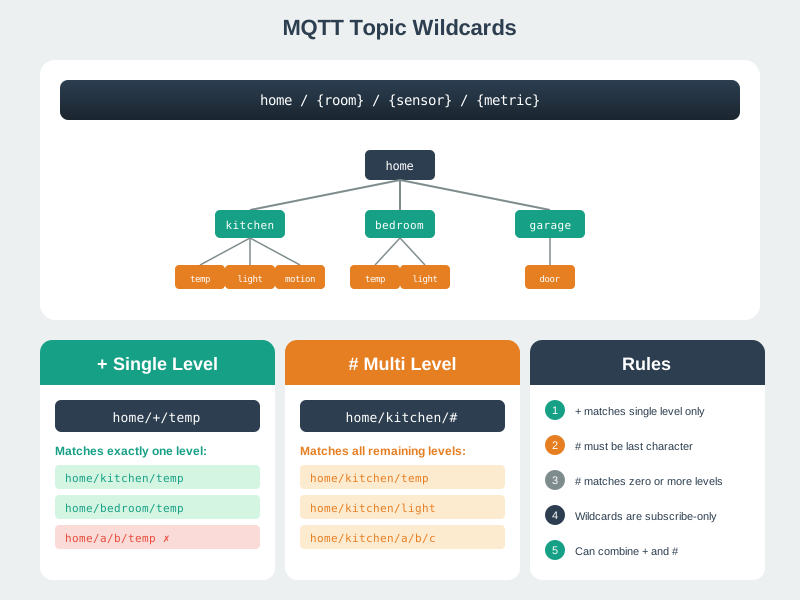
Read Figure 12.1 from the published topic into the broker’s stored filters. Check the exact filter first, then substitute one level with +, and finally follow a terminal # across the remaining levels. The non-matches show that level count, literal text, and wildcard placement are part of the comparison rather than suggestions. Use the fan-out result to connect the ESP32 publications above to the subscribers that should—and should not—receive them.
Quality of Service Levels:
QoS 0 (At Most Once): Fast, no acknowledgment - used here
QoS 1 (At Least Once): Acknowledged, may deliver duplicates
QoS 2 (Exactly Once): Slowest, guaranteed single delivery
Real-World Applications:
Build the decision in sequence. Begin with Smart Agriculture: Soil moisture sensors publishing to cloud dashboard. Then consider Industrial Monitoring: Temperature/pressure sensors in manufacturing. Then consider Home Automation: Smart thermostats publishing temperature readings. Then consider Environmental Monitoring: Weather stations sending data to aggregation service. Close by considering Asset Tracking: GPS devices publishing location updates.
Experiment:
Build the decision in sequence. Begin with Add more sensors (motion, light) and publish to separate topics. Then consider Implement QoS 1 or 2 to see acknowledgments. Then consider Add Last Will and Testament message for disconnect detection. Then consider Publish JSON payload with multiple values: {"temp":22.5,"hum":45.3}. Close by considering Add timestamp to messages for data logging.
Learning Outcomes:
Build the decision in sequence. Begin with Configure ESP32 Wi-Fi connection. Then consider Integrate DHT22 sensor with MQTT. Then consider Implement publish with QoS levels. Then consider Handle MQTT reconnection. Close by considering Use retained messages for status.
Challenges:
Build the decision in sequence. Begin with Modify to publish only when temperature changes by +/-0.5C (reduce traffic). Then consider Add battery voltage monitoring and publish with QoS 2. Then consider Implement Last Will and Testament to detect unexpected disconnections. Close by considering Add JSON payload with multiple sensor readings.
 Checkpoint: First Publisher Evidence
You now know:
Read the checkpoint as one evidence chain. Begin with the DHT22 on GPIO 4, a 10k ohm pull-up, and the random iotclass/lab1/<your-suffix>/... topic root printed by your board. Connect with the equally unique iotlab-<your-suffix> ClientID so a classmate’s session cannot replace yours. The starter publisher then sends temperature and humidity every 5 seconds and publishes retained online status for new subscribers. Finish by asking whether a +/-0.5C change threshold plus a 5-minute heartbeat is better than timer-only publishing.
12.5.1 Worked Example: Optimizing Sensor Publish Frequency
Problem: Your DHT22 ESP32 sensors are publishing every 5 seconds (17,280 messages/day per sensor). With 50 sensors, that’s 864,000 messages/day. Assume a cloud message price of $1/million messages, and assume the broker is also hitting CPU limits.
Analysis:
Temperature in a room rarely changes more than 0.5°C per minute. Publishing every 5 seconds means 99% of messages report identical values.
Step 1: Calculate Current Costs
- Messages/month: 864,000 × 30 = 25.9M messages
- AWS IoT Core: 25.9 × $1 = $25.90/month
- Broker CPU: Mosquitto on m5.large = $70/month
- Total: $95.90/month
Step 2: Design Optimization
Publish only when temperature changes by ≥0.5°C OR 5 minutes elapse (heartbeat):
float lastTemp = 0.0;
unsigned long lastPublish = 0;
const float THRESHOLD = 0.5;  // 0.5°C change triggers publish
const unsigned long HEARTBEAT = 300000;  // 5 min max interval

void loop() {
    float temp = dht.readTemperature();
    unsigned long now = millis();

    // Publish if temp changed OR heartbeat timeout
    if (abs(temp - lastTemp) >= THRESHOLD ||
        (now - lastPublish >= HEARTBEAT)) {

        client.publish(topic_temp, String(temp).c_str());
        lastTemp = temp;
        lastPublish = now;
    }

    delay(5000);  // Still sample every 5s, but don't always publish
}
Step 3: Calculate New Costs
For scenario estimation, assume an office temperature signal changes enough to report about 2-3 times/hour, plus a 5-minute heartbeat:
- Meaningful changes: ~3/hour = 72/day
- Heartbeats: (1440 min/day) / 5 = 288/day
- Total: 360 messages/day per sensor (was 17,280)
For 50 sensors:
- Messages/month: 360 × 50 × 30 = 540,000 messages
- Message charge estimate: 0.54 × $1 = $0.54/month
- Broker headroom may allow a smaller instance, depending on CPU, TLS, retained messages, and monitoring load.
- Scenario result: scheduled publishing creates roughly 83% lower message-driven cost in this example.
Step 4: Additional Benefits
- Bandwidth saved: 98% reduction (25.9M → 540K messages/month)
- Battery life: Publishing less often reduces radio transmit time; the actual gain depends on sleep, Wi-Fi association, and TLS setup overhead
- Storage costs: Time-series DB costs drop proportionally
Key Insight: Don’t blindly publish on a timer. Publish on change with a heartbeat fallback. This pattern works for most slowly-changing telemetry (temperature, humidity, pressure, battery voltage).
12.5.2 Pitfall: Broker Connection Limits Causing Silent Failures
The Mistake: Developers deploy IoT systems without considering broker connection limits. They test with 10-20 devices successfully, then deploy 500+ devices to production. New devices fail to connect with cryptic errors like “connection refused” or timeout, while existing connections work fine.
Why It Happens: MQTT brokers have configurable maximum connection limits, often defaulting to 1,024 (OS file descriptor limit) or lower. Each MQTT connection consumes a file descriptor, memory for session state (~2-10KB), and a TCP socket. When limits are reached, new connections are silently rejected without clear error messages.
The Fix: Calculate connection requirements before deployment. Configure broker limits explicitly. Implement connection health monitoring and alerting when approaching 80% capacity. Use connection pooling or MQTT bridge patterns for high-scale deployments.
Capacity Planning Formula: Required connections = (devices x 1.2) + (backend_services x 2) + (monitoring x 3). For 1,000 devices with 5 backend services and 2 monitoring tools, plan for: (1000 x 1.2) + (5 x 2) + (2 x 3) = 1,216 connections minimum.
Keep the printed client ID, unique topic root, and one timestamped broker trace. Continue to Lab 2: Python MQTT Dashboard and subscribe to that same topic tree.