Run your first MQTT loop on your computer
Follow a local synthetic reading through three terminals, break and repair its route, then replace the clients with Python and test a temperature alert.

Broker Bex
Broker Bex: I have shown how a reading travels; now let's run the loop on your own computer.
Predict the reading, then compare it with the measurement.
Mosquitto and Python 3 on your computer
PythonDownload publisher.py, subscriber.py and README.md; follow README.md to run the three-terminal Mosquitto loop, then the two Python clients.
Open the Python run guide (new tab)Get the files
Download all three prepared files into one folder. No account or paid service is required.
- Put main.py, requirements.txt, and README.md in the same folder.
- Create and activate a Python virtual environment, then install requirements.txt.
- Run python3 main.py and compare its output with each observed result below.
Steps
Step 1
- Do
- Prepare one computer and terminal window panels A, B and C. Install Mosquitto broker and command-line clients and put them on your path before testing. Complete this CLI loop before replacing either client with Python. In terminal window panel A run
mosquitto -p 1883 -vand keep it running in the foreground. If the address is in use, leave the other service running; use a separate lab host or an unused port consistently in every command and both Python scripts. - You will see
- Expect timestamped
Starting in local only mode.andOpening ipv4 listen socket on port 1883.messages.
- Expect timestamped
- Why it matters
- Installation comes before the observable exchange. Mosquitto routes messages; mosquitto_pub produces them and mosquitto_sub receives them. These are synthetic values, with no sensor required.
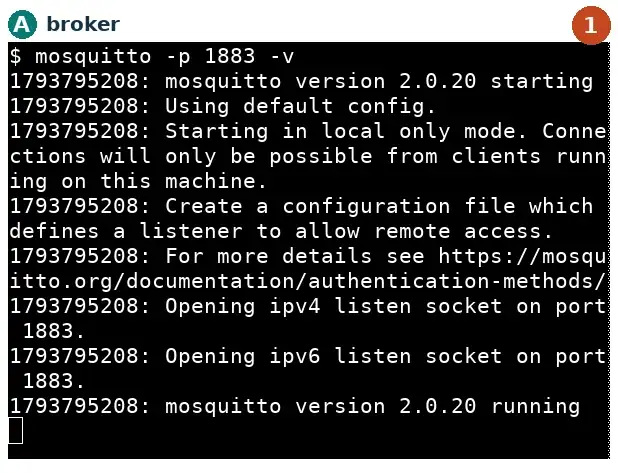
Step 1 · Mosquitto and Python 3 on your computer; numbered callout added to a real capture. Step 2
- Do
- In terminal window panel B run
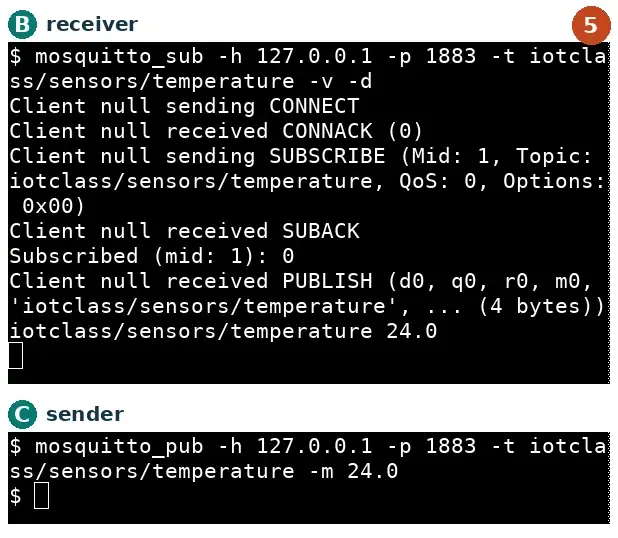
mosquitto_sub -h 127.0.0.1 -p 1883 -t iotclass/sensors/temperature -v -d. Wait for a successful QoS 0 grant. In terminal window panel C runmosquitto_pub -h 127.0.0.1 -p 1883 -t iotclass/sensors/temperature -m 24.0. If the payload is absent, compare exact topics, wait for grant 0 and send again. Resolve subscription denial with the lab broker administrator before retrying. - You will see
- Expect
CONNACK (0),SUBACKandSubscribed (mid: 1): 0for the first subscription. Grant 128 orAll subscription requests were denied.means refusal. The sender normally exits silently; B should printiotclass/sensors/temperature 24.0.
- Expect
- Why it matters
- Subscribe before this non-retained send. Label publisher, broker, subscriber, topic, payload and delivery evidence: B displaying the topic and payload proves receipt of those bytes; publisher exit alone does not.
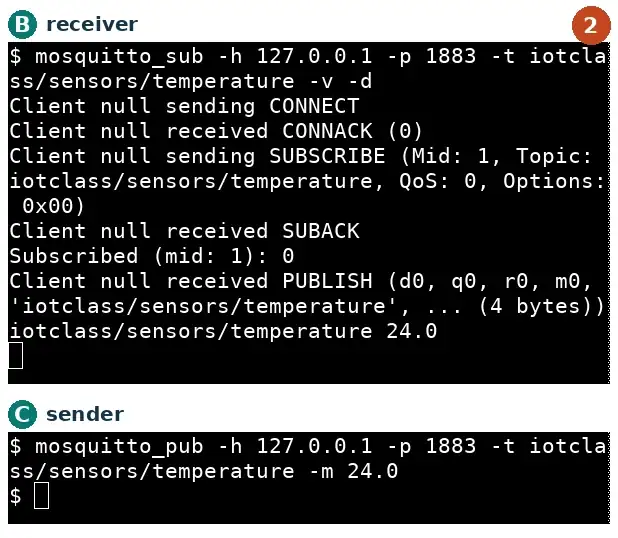
Step 2 · Mosquitto and Python 3 on your computer; numbered callout added to a real capture. Step 3
- Do
- In terminal window panel C run
mosquitto_pub -h 127.0.0.1 -p 1883 -t iotclass/sensors/temperatur -m 24.0. Restore the final e by repeating the correct send from step 2. Then send the correct command twice. - You will see
- Expect no new receiver payload line for the misspelled topic, a new reading after repair, and two received-value lines for two correct sends.
- Why it matters
- Exact topic spelling controls this route. Raising QoS cannot repair the missing letter. Keep the failed and repaired topic for comparison later.
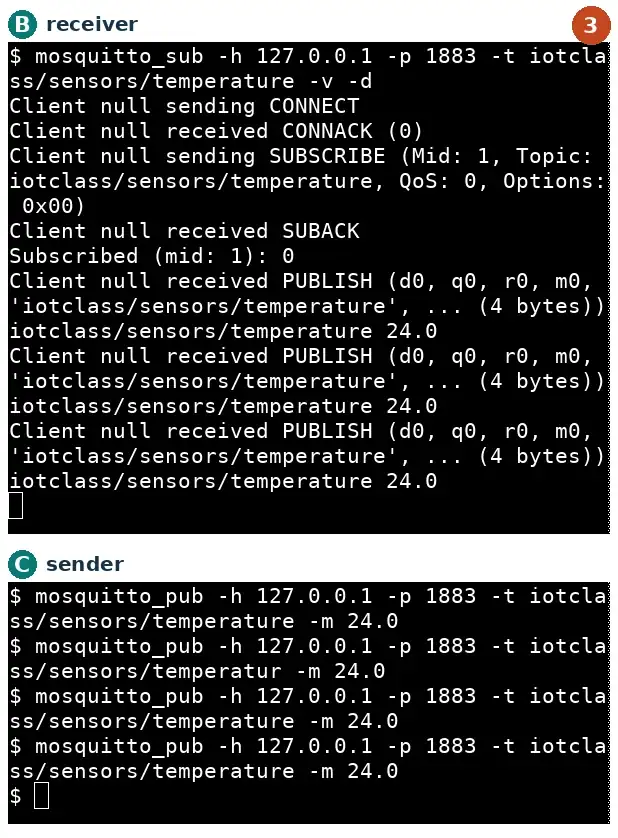
Step 3 · Mosquitto and Python 3 on your computer; numbered callout added to a real capture. Step 4
- Do
- Stop only your broker in terminal window panel A with Control-C and repeat the correct send in terminal window panel C.
- You will see
- Expect a connection-refused error.
- Why it matters
- This is a transport refusal, not a refused MQTT connection acknowledgement. Check the broker terminal, destination host and port before debugging the payload.
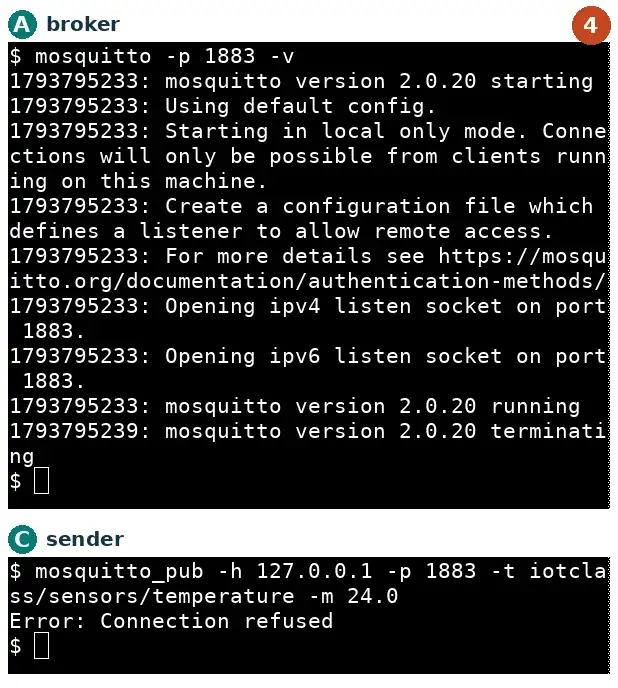
Step 4 · Mosquitto and Python 3 on your computer; numbered callout added to a real capture. Step 5
- Do
- Restart your broker in terminal window panel A and restart the receiver in terminal window panel B using steps 1 and 2. Wait for a successful QoS 0 grant, then resend 24.0 in terminal window panel C. If receipt does not return, check host, port and exact topic again. Write down the last successful checkpoint before changing anything.
- You will see
- Expect the payload line to return after the broker and receiver restart and a fresh send.
- Why it matters
- No CONNACK calls for endpoint checks. Accepted connection without a successful SUBACK calls for inspecting the grant: missing acknowledgement leaves acceptance unknown; 128 means refusal. After a successful grant, compare topics and resend while the receiver waits. If bytes arrive but the application fails, inspect the numeric format.
Step 5 · Mosquitto and Python 3 on your computer; numbered callout added to a real capture. Step 6
- Do
- Save tool versions, host, port, exact topic, SUBACK grant code, received payload and the failure/recovery observations. In each terminal window panel, stop your receiver and only your broker with Control-C, then repeat the correct send. If it succeeds, check the destination and whether another broker is listening. Restart your own broker for the Python extension.
- You will see
- Expect both terminals to return to their shells and a new send to fail after your broker stops.
- Why it matters
- Keep receipt and recovery together. This plaintext local test establishes neither TLS nor authentication nor physical measurement. The downloadable README has a worksheet for the connection record and source-inspection follow-ons.
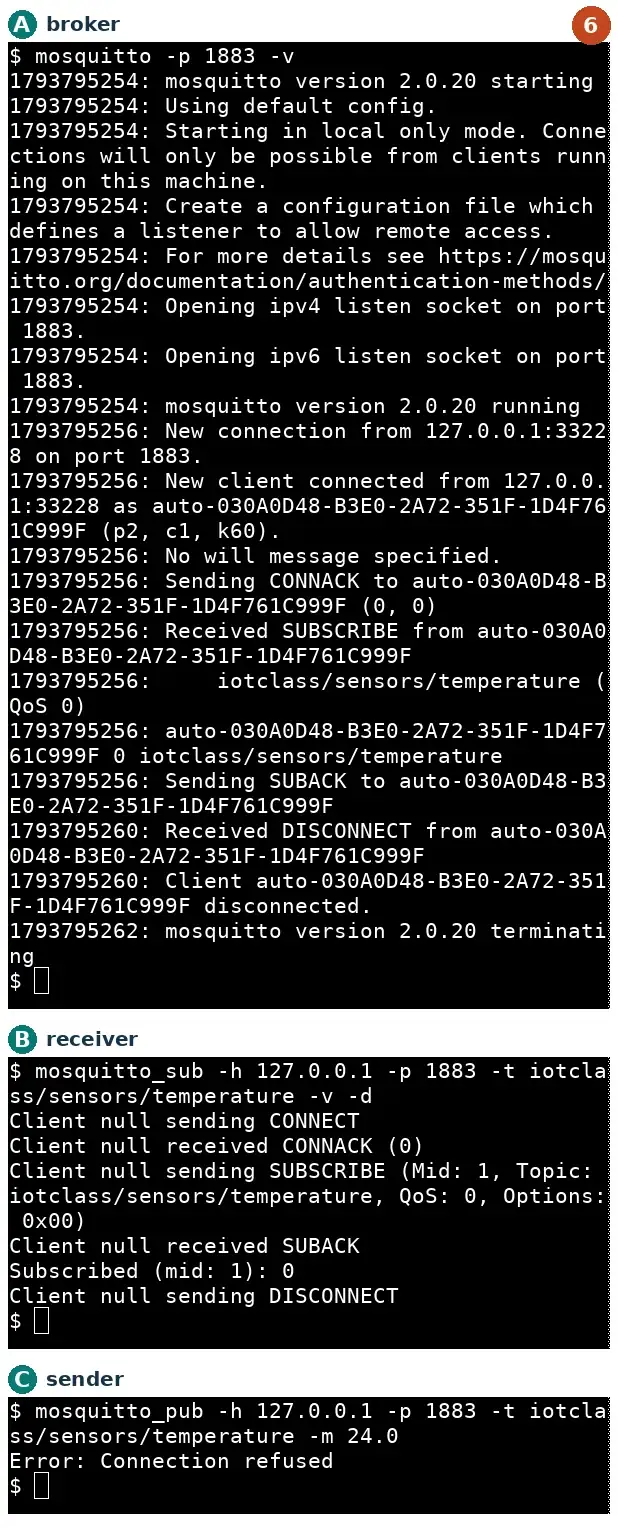
Step 6 · Mosquitto and Python 3 on your computer; numbered callout added to a real capture. Step 7
- Do
- Download publisher.py, subscriber.py and README.md into a new lab folder. Read README.md before using the generic file-panel commands: this lab runs two named clients, not main.py. Run
python3 -m venv .venv, then. .venv/bin/activate, thenpython -m pip install paho-mqtt==2.1.0. Runpython --versionandpython -c 'from importlib.metadata import version; print(version("paho-mqtt"))'. Record differing versions. If venv is missing, install platform support. Activate the environment in both Python terminals; check that selection for an import failure. Run one copy per client identifier. - You will see
- Expect your Python version and
2.1.0from the version commands.
- Expect your Python version and
- Why it matters
- Save a script, run it and stop your own foreground program with Control-C. The supplied files preserve the original examples. Both use loopback, port 1883 and iotclass/sensors/temperature; keep the broker and topic together when changing environments.
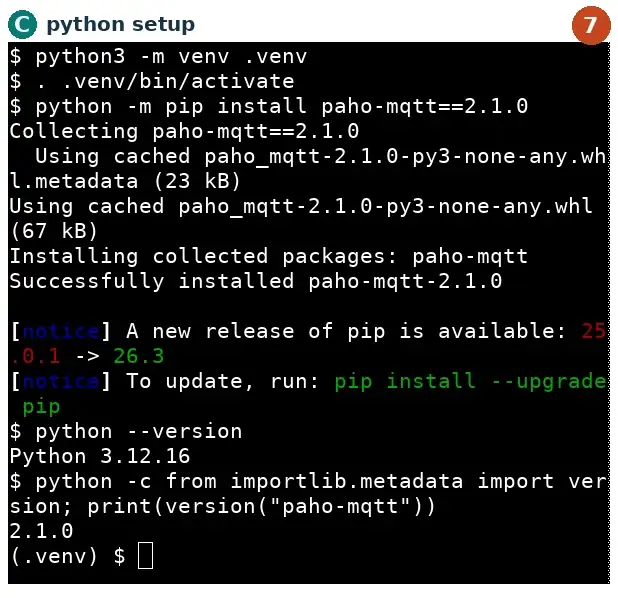
Step 7 · Mosquitto and Python 3 on your computer; numbered callout added to a real capture. Step 8
- Do
- Use terminal window panel A's broker; if stopped run
mosquitto -p 1883 -v. In terminal window panel C activate the environment and runpython -u publisher.py. Stop B's CLI receiver if it is still running, activate the environment there and runpython -u subscriber.py. Compare received values with publisher output. If only the sender prints, inspect receiver host/topic, its network loop and errors. For connection refusal, check A and the port. Stop the publisher with Control-C after comparison. - You will see
- Expect
Published: ...Cabout every five seconds, thenStopping publisher...on Control-C. The subscriber printsConnected with reason code Success,Subscribed to iotclass/sensors/temperatureand incoming readings.
- Expect
- Why it matters
- The broker and topic stay fixed while the clients change. The publisher network loop processes traffic during sleeps; loop_forever dispatches numeric messages at the receiver. Subscribed to reports a request, not a successful SUBACK: acceptance requires grant 0, 1 or 2 in MQTT 3.1.1, rather than refusal code 128. Send completion differs from receipt.
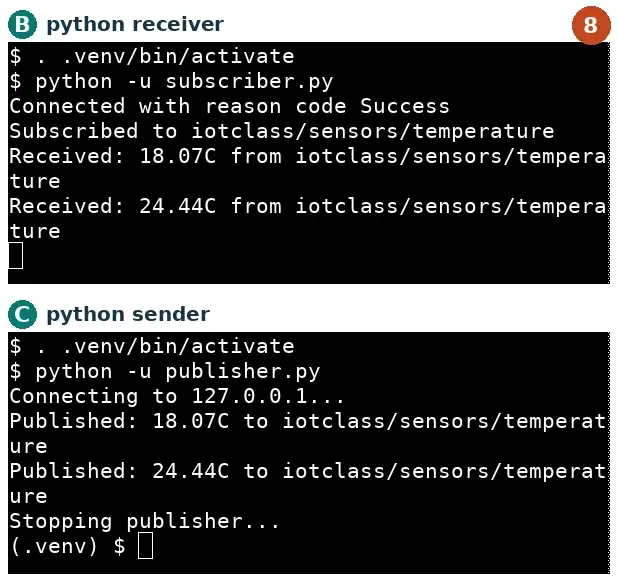
Step 8 · Mosquitto and Python 3 on your computer; numbered callout added to a real capture. Step 9
- Do
- Keep the Python subscriber running. In terminal window panel C repeat the CLI 24.0 command, then run
mosquitto_pub -h 127.0.0.1 -p 1883 -t iotclass/sensors/temperature -m 30.0. If no warning appears, check that you sent thirty: the random publisher generates only fifteen through twenty-five. Repeat the misspelled-topic send with this receiver, restore the topic and resend. Repeat the stopped-broker test; restart your broker and subscriber and resend to recover. Nonnumeric text fails at float(...); restart and send valid data if this happens. - You will see
- Expect
Received: 24.0C from iotclass/sensors/temperaturewithout a warning. For 30.0 expectReceived: 30.0C from iotclass/sensors/temperatureandWarning: High temperature detected!. The wrong topic gives silence; repair gives a new reading. A stopped broker gives connection refusal.
- Expect
- Why it matters
- The alert tests a strict greater-than-twenty-five threshold. Receiving numeric bytes and applying that comparison do not establish who supplied them. The random publisher cannot exceed this threshold; use the controlled 30.0 send.
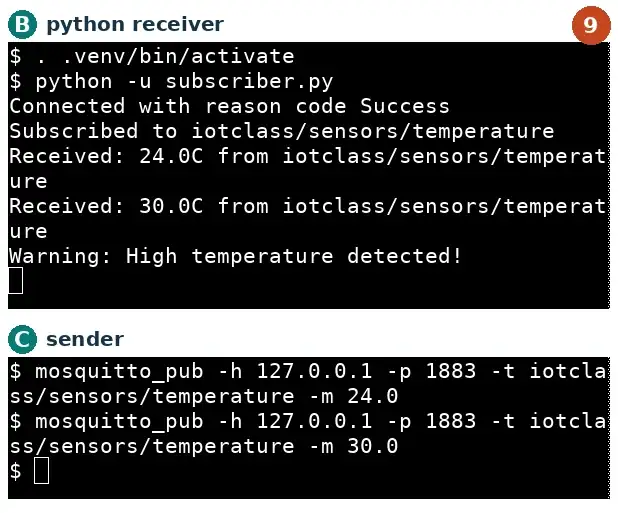
Step 9 · Mosquitto and Python 3 on your computer; numbered callout added to a real capture. Step 10
- Do
- Record evidence: keep both threshold results with CLI receipt, wrong-topic failure and recovery. Complete the README connection worksheet and source-inspection follow-ons separately from runtime evidence. In each terminal window panel, stop your Python clients and only your own broker with Control-C, then repeat a send to check cleanup. Run
deactivatein each Python shell. Carry your working host, failed/repaired topics and receiver trace into the next exercise before adding recovery logic. - You will see
- Expect the shells to return and a new send to fail after the broker stops. Stopping the Python subscriber with Control-C prints a KeyboardInterrupt traceback because the script does not catch it; that is expected here.
- Why it matters
- Prove the receiver prints the intended value before adding more moving parts. A different broker or regenerated sensor topic root can explain later silence before changing delivery policy. Benchmark the actual broker before making a capacity decision.
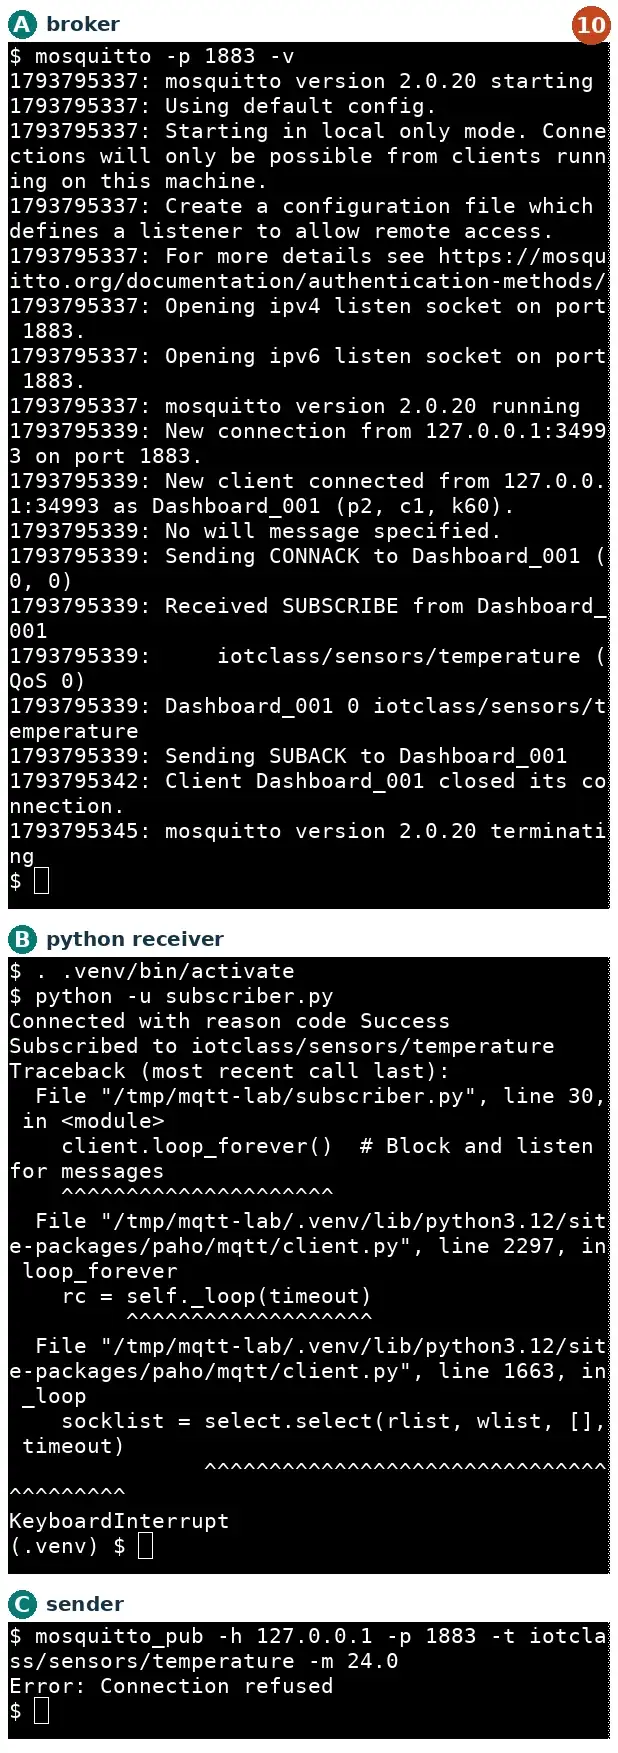
Step 10 · Mosquitto and Python 3 on your computer; numbered callout added to a real capture.
Chapter checks
These questions refer to the chapter’s examples. Use the return links to review their answers.
In an MQTT-based temperature monitoring system, an ESP32 sensor node reads temperature data and sends it to a broker. A Python dashboard running on a laptop displays the readings. Which statement correctly identifies each component's role?
Return to the chapter’s knowledge checkThis chapter's 'Common Mistake' warning concerns the unauthenticated, plaintext port 1883 listener at test.mosquitto.org. Which of the following is one of its four production dangers?
Return to the chapter’s knowledge check
Caution
Before you start
Read this before you start.
Use synthetic values on your own local broker. These QoS 0, non-retained clients configure no Will and provide no TLS or authentication. The subscriber expects numeric text and needs input validation for production. Stop only your own foreground processes; leave an occupied port and its service alone.
Technical details
- Version tested
- Version tested: Mosquitto broker and clients 2.0.20; Python 3.12.16; paho-mqtt 2.1.0; Xfce Terminal 1.0.4 on Xvfb; local 127.0.0.1 only.. Date: 2026-11-04.

https://iotclass.org/labs/mqtt-local-first-loop.html